某黑盒 App 登录参数逆向分析
一、前言
本文章中所有内容仅供学习交流使用,不用于其他任何目的,不提供完整代码,抓包内容、敏感网址、数据接口等均已做脱敏处理,严禁用于商业用途和非法用途,否则由此产生的一切后果均与作者无关.本文章未经许可禁止转载,禁止任何修改后二次传播,擅自使用本文讲解的技术而导致的任何意外,作者均不负责。
在吾爱论坛上看到一篇写的很详细的实战文章,于是就想复现一下,但没找到对应版本的,于是就用了写这篇文章时所下载的最新版本。
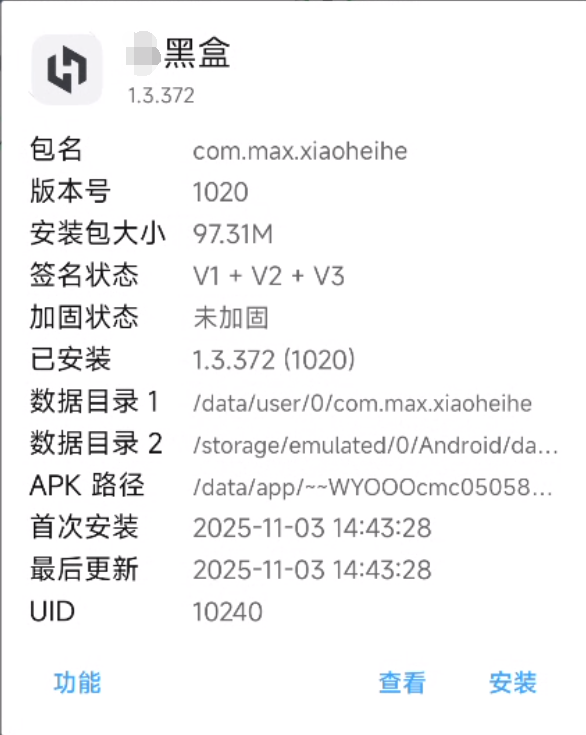
样本基本信息
包名:com.max.xiaoheihe
样本:某黑盒
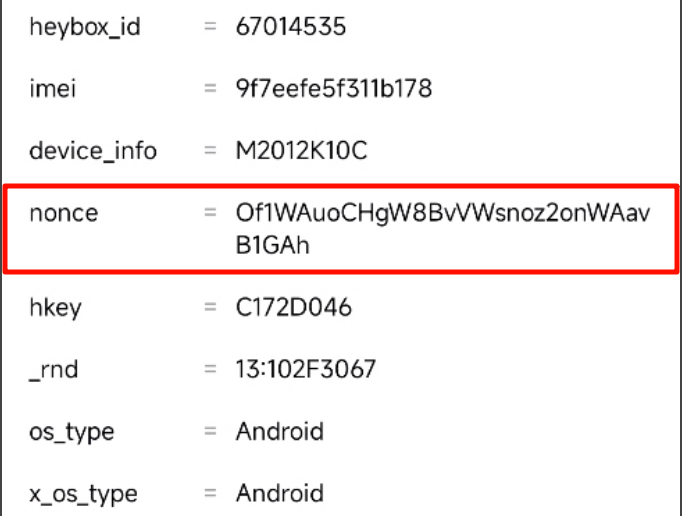
目标参数信息:请求头 noce
二、Frida 检测处理
先随意写一个脚本进行注入,用来测试 Frida 是否有被检测
Java.perform(function () {
  if (Java.available) {
    console.log("Java 环境已加载");
  }
});
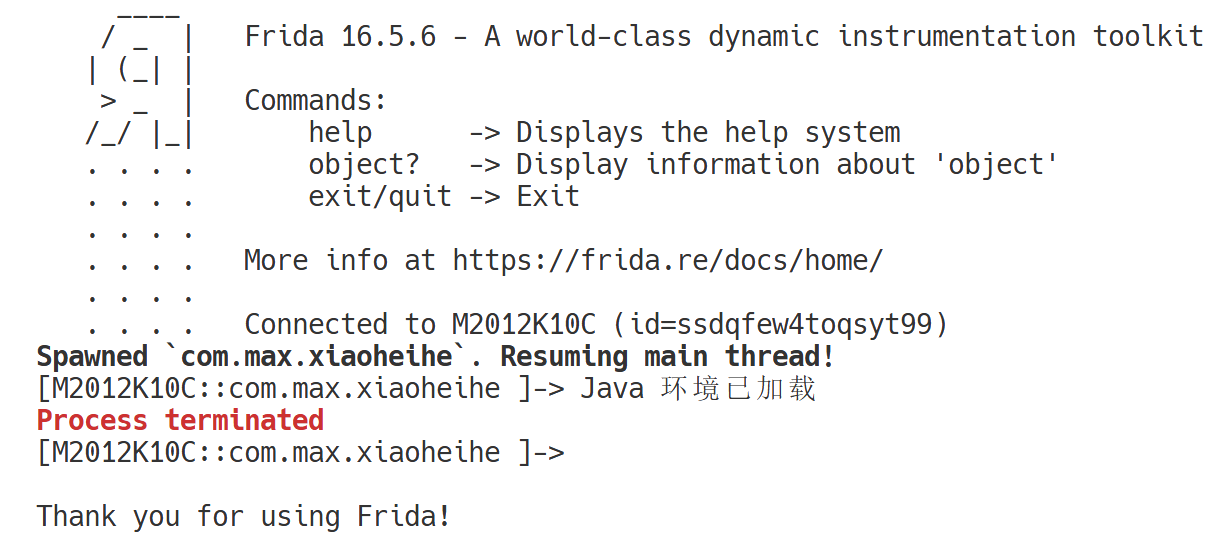
可以看到手机上正常进入,但是就是 Frida 进程已经被杀死了,有明显的进程检测的特征,所以接下来看看是哪一个 so 文件加载的线程导致杀死了 Frida 进程。
这里和文章的描述略有不同,因为我也不清楚参考文章中所用到的 frida 是否魔改,我用我电脑中的三种(两魔改,一标准)的都试过了,其中一个魔改的在 hook android_dlopen_ext 时不会被杀死,另一个魔改的则和参考文章中的一样,而标准的则会在加载 libglesv3_1.so 时被检测并杀死。
function hook_dlopen() {
    Interceptor.attach(Module.findExportByName(null, "android_dlopen_ext"),
        {
            onEnter: function (args) {
                var pathptr = args[0];
                if (pathptr !== undefined && pathptr != null) {
                    var path = ptr(pathptr).readCString();
                    console.log("load " + path);
                }
            }
        }
    );
}
[M2012K10C::com.max.xiaoheihe ]-> load /data/dalvik-cache/arm64/system@framework@org.apache.http.legacy.jar@classes.dex
load /data/app/~~WYOOOcmc05058KwVYe6E1g==/com.max.xiaoheihe-rJ2oVj7AljCYiLOlNFF--A==/oat/arm64/base.odex
load libforcedarkimpl.so
load /data/app/~~WYOOOcmc05058KwVYe6E1g==/com.max.xiaoheihe-rJ2oVj7AljCYiLOlNFF--A==/lib/arm64/libglesv3_1.so
load /data/app/~~WYOOOcmc05058KwVYe6E1g==/com.max.xiaoheihe-rJ2oVj7AljCYiLOlNFF--A==/lib/arm64/libmmkv.so
load /data/app/~~WYOOOcmc05058KwVYe6E1g==/com.max.xiaoheihe-rJ2oVj7AljCYiLOlNFF--A==/lib/arm64/libtxsoundtouch.so
load /data/app/~~WYOOOcmc05058KwVYe6E1g==/com.max.xiaoheihe-rJ2oVj7AljCYiLOlNFF--A==/lib/arm64/libtxffmpeg.so
load /data/app/~~WYOOOcmc05058KwVYe6E1g==/com.max.xiaoheihe-rJ2oVj7AljCYiLOlNFF--A==/lib/arm64/libliteavsdk.so
load /data/app/~~WYOOOcmc05058KwVYe6E1g==/com.max.xiaoheihe-rJ2oVj7AljCYiLOlNFF--A==/lib/arm64/libflutter.so
load /data/app/~~WYOOOcmc05058KwVYe6E1g==/com.max.xiaoheihe-rJ2oVj7AljCYiLOlNFF--A==/lib/arm64/libailab.so
load /data/app/~~WYOOOcmc05058KwVYe6E1g==/com.max.xiaoheihe-rJ2oVj7AljCYiLOlNFF--A==/lib/arm64/libnative-lib.so
load /data/app/~~WYOOOcmc05058KwVYe6E1g==/com.max.xiaoheihe-rJ2oVj7AljCYiLOlNFF--A==/lib/arm64/libucrash.so
load /data/app/~~WYOOOcmc05058KwVYe6E1g==/com.max.xiaoheihe-rJ2oVj7AljCYiLOlNFF--A==/lib/arm64/libumeng-spy.so
load /system/lib64/libz.so
load /system/lib64/liblog.so
load /system/lib64/libm.so
load /system/lib64/libdl.so
load /system/lib64/libc.so
load /data/user/0/com.max.xiaoheihe/files/dynamic_so/libscannative.so
load /data/app/~~WYOOOcmc05058KwVYe6E1g==/com.max.xiaoheihe-rJ2oVj7AljCYiLOlNFF--A==/lib/arm64/libsmsdk.so
load /data/dalvik-cache/arm64/system@framework@gson.jar@classes.dex
load /data/dalvik-cache/arm64/system@app@miui@miui.apk@classes.dex
load /data/dalvik-cache/arm64/system@app@miuisystem@miuisystem.apk@classes.dex
load /data/dalvik-cache/arm64/system@priv-app@RtMiCloudSDK@RtMiCloudSDK.apk@classes.dex
load /data/dalvik-cache/arm64/system@app@MiuiContentCatcher@MiuiContentCatcher.apk@classes.dex
load /data/dalvik-cache/arm64/system@app@CatcherPatch@CatcherPatch.apk@classes.dex
load /data/app/~~WYOOOcmc05058KwVYe6E1g==/com.max.xiaoheihe-rJ2oVj7AljCYiLOlNFF--A==/lib/arm64/libmsaoaidsec.so
Process terminated
[M2012K10C::com.max.xiaoheihe ]->

Thank you for using Frida!
关于 libmsaoaidsec.so 的概念可以看看这篇文章。
编写 hook 脚本看 libmsaoaidsec.so 是在哪调用了 pthread_create
function hook_dlopen() {
    Interceptor.attach(Module.findExportByName(null, "android_dlopen_ext"),
        {
            onEnter: function (args) {
                const fn = args[0];
                this.fileName = (fn && !fn.isNull()) ? fn.readCString() : "";
                console.log(`dlopen onEnter: ${this.fileName}`)
                if (this.fileName && this.fileName.indexOf("libmsaoaidsec.so") !== -1) {
                    hook_call_constructors()
                    hook_dlsym()
                }
            }, onLeave: function(retval){
                console.log(`dlopen onLeave fileName: ${this.fileName}`)
                if(this.fileName != null && this.fileName.indexOf("libmsaoaidsec.so") >= 0){
                    let JNI_OnLoad = Module.getExportByName(this.fileName, 'JNI_OnLoad')
                    console.log(`dlopen onLeave JNI_OnLoad: ${JNI_OnLoad}`)
                }
            }
        }
    );
}


function hook_call_constructors() {
    let linker = Process.findModuleByName("linker64");
    let call_constructors_addr, get_soname;
    let symbols = linker.enumerateSymbols();
    for (let index = 0; index < symbols.length; index++) {
        let symbol = symbols[index];
        if (symbol.name === "__dl__ZN6soinfo17call_constructorsEv") {
            call_constructors_addr = symbol.address;
        } else if (symbol.name === "__dl__ZNK6soinfo10get_sonameEv") {
            get_soname = new NativeFunction(symbol.address, "pointer", ["pointer"]);
        }
    }

    console.log("call_constructors_addr: " + call_constructors_addr)
    var listener = Interceptor.attach(call_constructors_addr, {
        onEnter: function (args) {
            var module = Process.findModuleByName("libmsaoaidsec.so")
            if (module != null) {
                console.log("libmsaoaidsec.so base address: " + module.base);
                listener.detach()
            }
        },
        onLeave: function (retval) {
            console.log("onLeave call_constructors")
        }
    })
}


function hook_dlsym() {
    var interceptor = Interceptor.attach(Module.findExportByName(null, "dlsym"),
        {
            onEnter: function (args) {
                const name = ptr(args[1]).readCString()
                if (name == "pthread_create") {
                    console.log("[dlsym]: ", name, " address: ", this.context.lr)
                }
            }
        }
    )
    return interceptor
}

setImmediate(hook_dlopen)
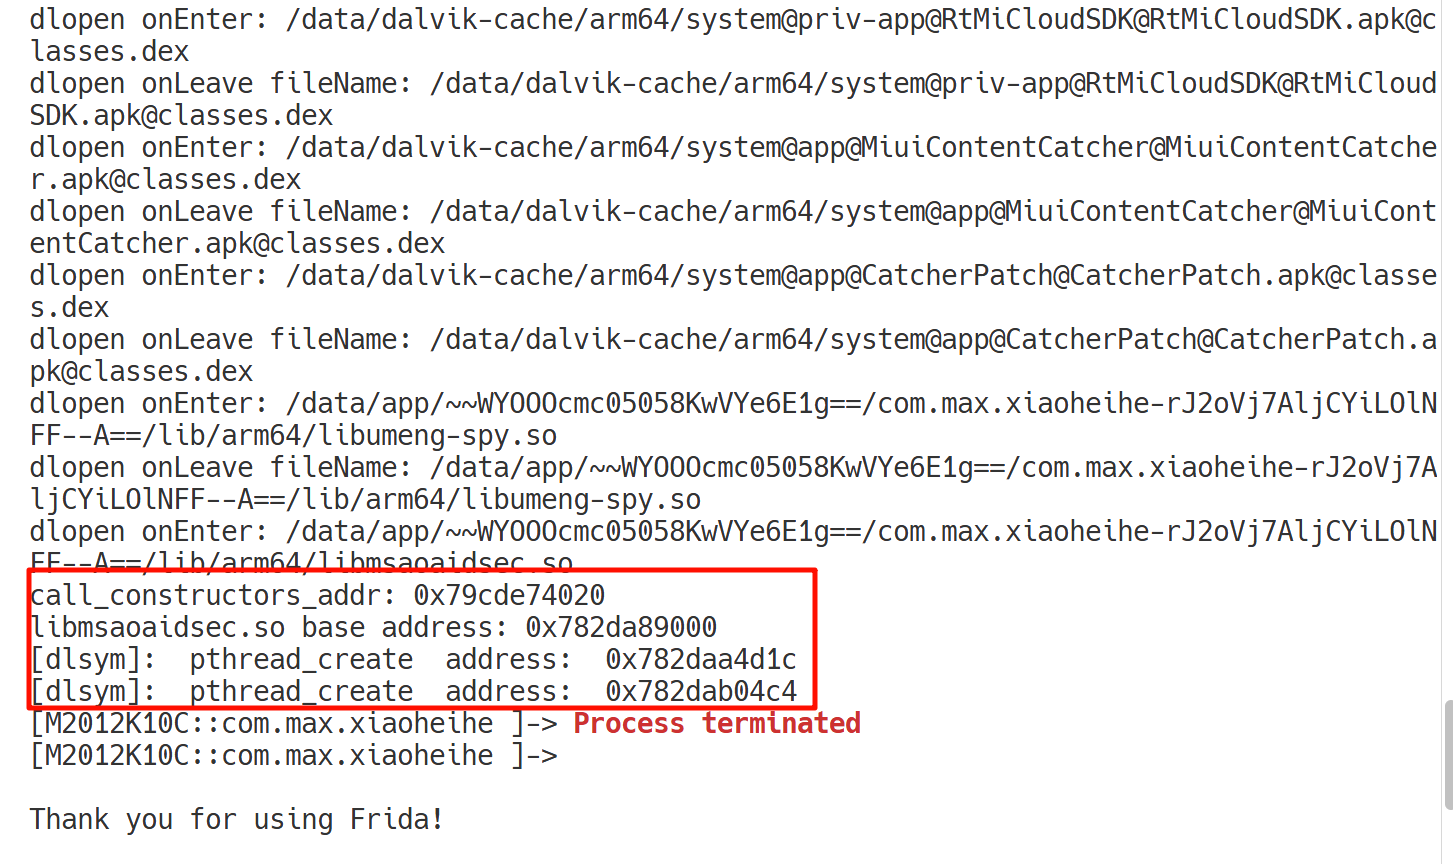
通过上图打印的日志信息可以计算 pthread_create 函数的调用位置分别为 0x782daa4d1c、0x782dab04c4,相对于 libmsaoaidsec.so 库文件基地址的偏移地址分别为 0x1BD1C、0x274C4。
然后通过这个偏移地址可以去 IDA 中找到这两处的 dlsym。
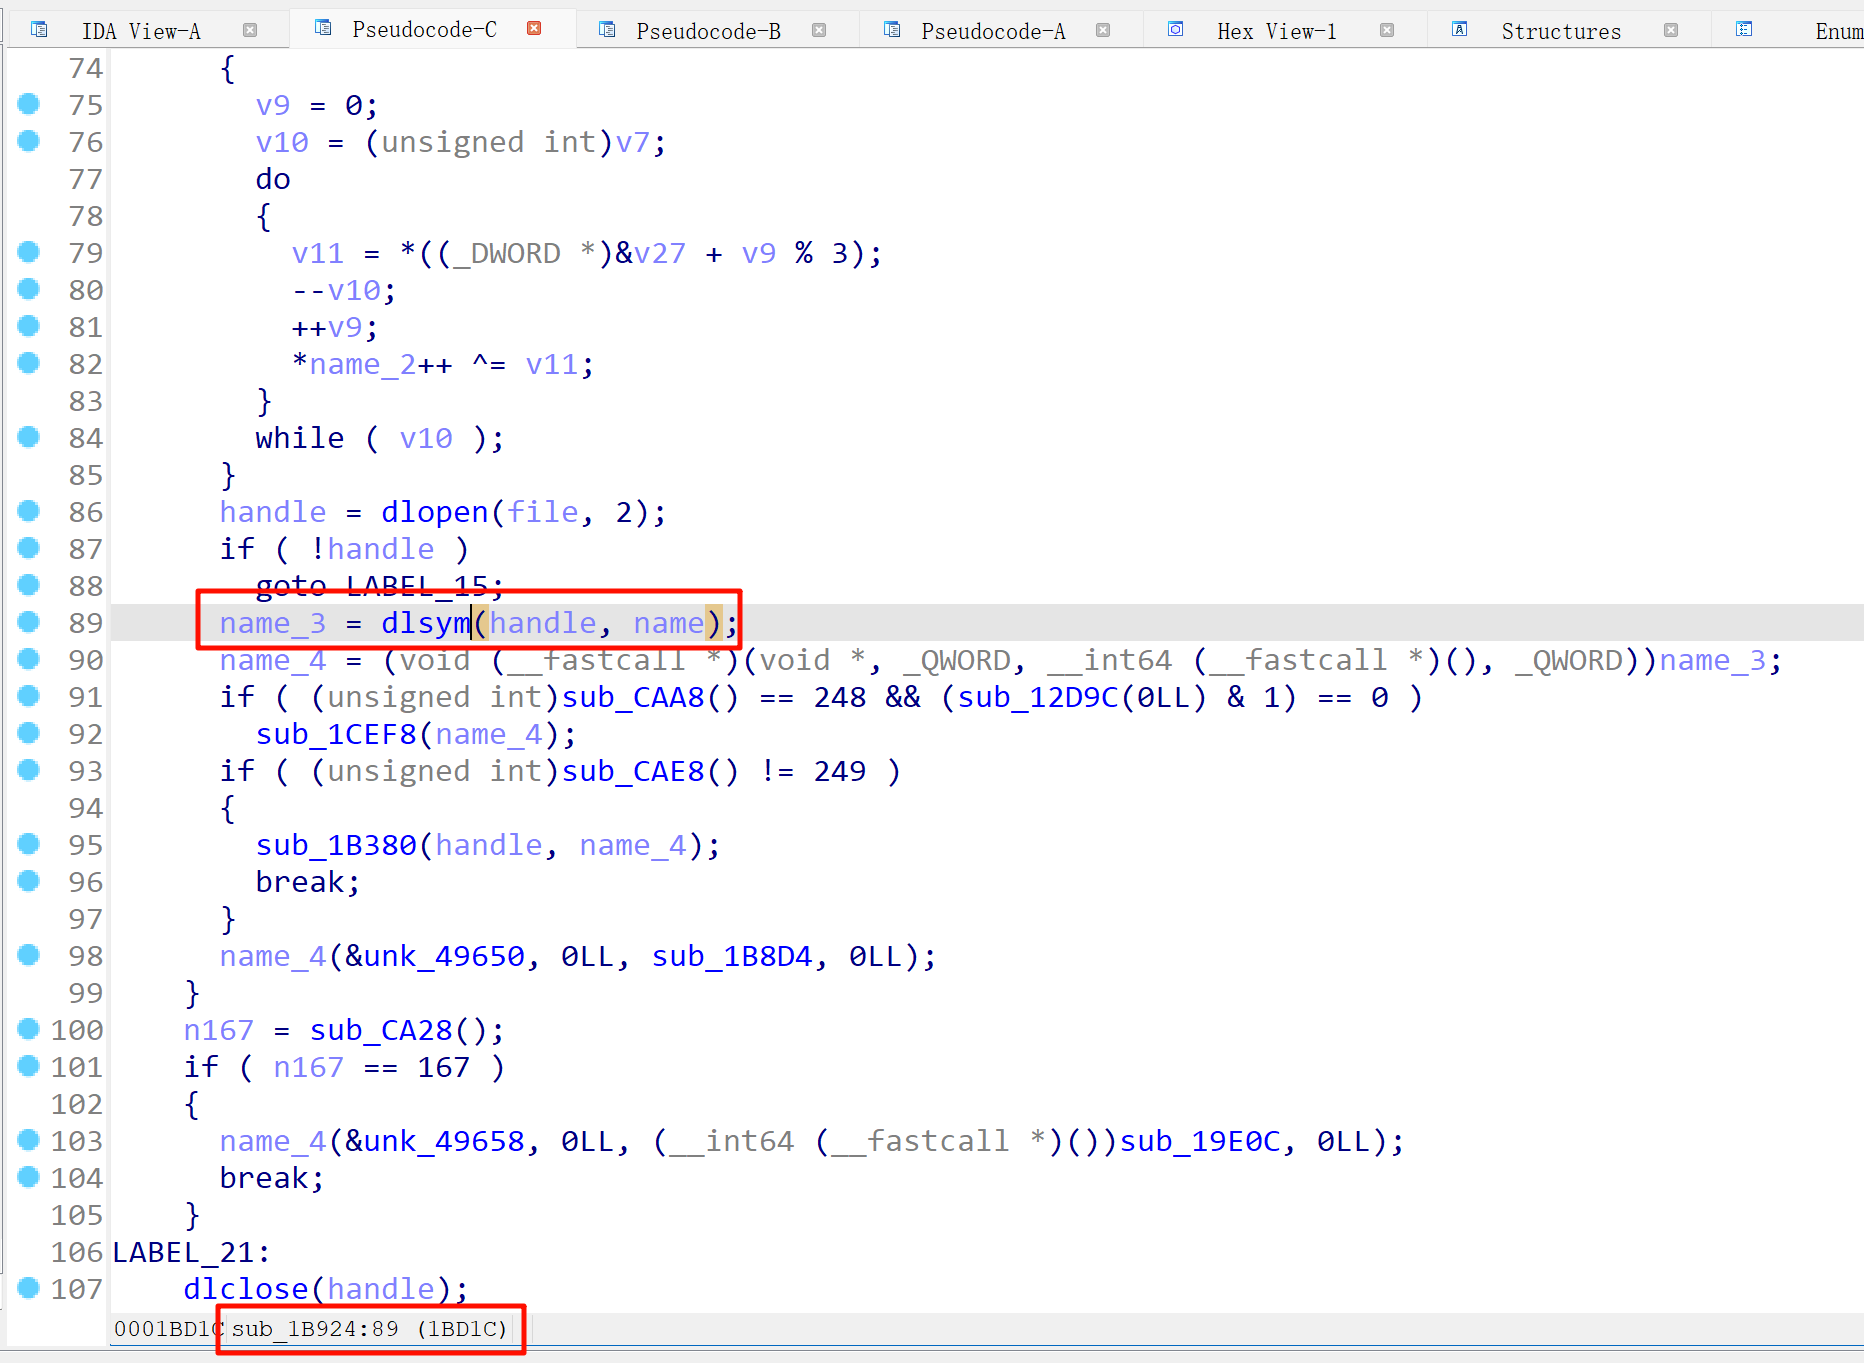
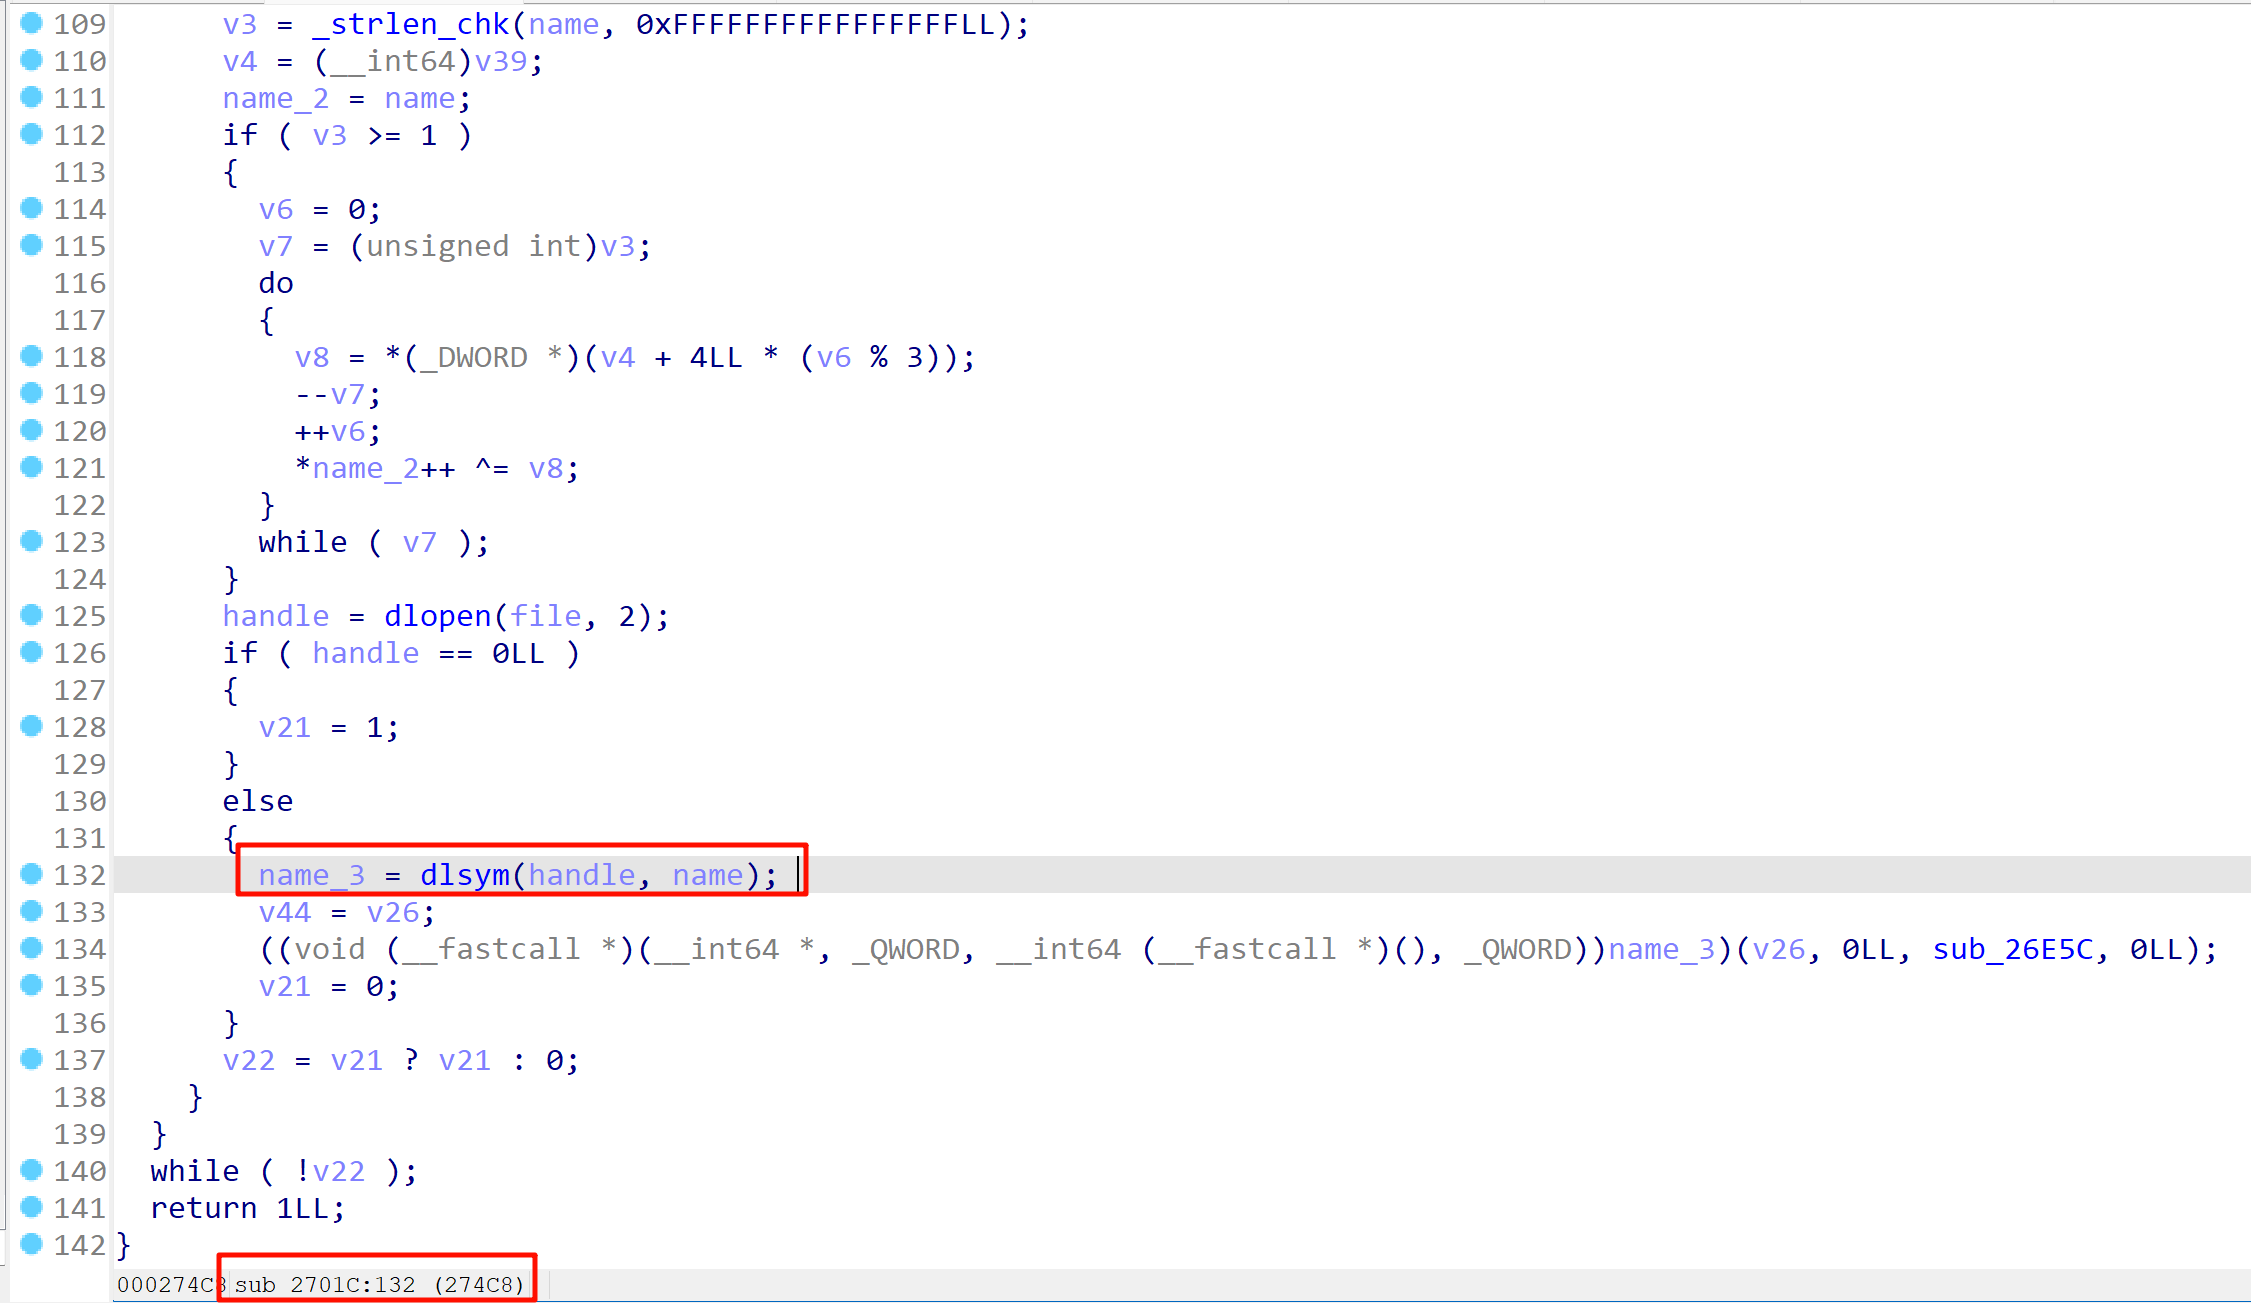
那么就可以在 hook_call_constructors 函数中,使用 Interceptor.replace 将 0x1BD1C 和 0x274C4 这两个函数替换为空函数。
完整脚本如下:
function hook_dlopen() {
Interceptor.attach(Module.findExportByName(null, "android_dlopen_ext"),
{
onEnter: function (args) {
const fn = args[0];
this.fileName = (fn && !fn.isNull()) ? fn.readCString() : "";
console.log(`dlopen onEnter: ${this.fileName}`)
if (this.fileName && this.fileName.indexOf("libmsaoaidsec.so") !== -1) {
hook_call_constructors()
hook_dlsym()
}
}, onLeave: function(retval){
console.log(`dlopen onLeave fileName: ${this.fileName}`)
if(this.fileName != null && this.fileName.indexOf("libmsaoaidsec.so") >= 0){
let JNI_OnLoad = Module.getExportByName(this.fileName, 'JNI_OnLoad')
console.log(`dlopen onLeave JNI_OnLoad: ${JNI_OnLoad}`)
}
}
}
);
}
function hook_call_constructors() {
let linker = null;
linker = Process.findModuleByName("linker64");
let call_constructors_addr, get_soname
let symbols = linker.enumerateSymbols();
for (let index = 0; index < symbols.length; index++) {
let symbol = symbols[index];
if (symbol.name === "__dl__ZN6soinfo17call_constructorsEv") {
console.log(symbol.name)
call_constructors_addr = symbol.address;
} else if (symbol.name === "__dl__ZNK6soinfo10get_sonameEv") {
console.log(symbol.name)
get_soname = new NativeFunction(symbol.address, "pointer", ["pointer"]);
}
}
console.log("call_constructors_addr: " + call_constructors_addr)
let hookCount = 0;
var listener = Interceptor.attach(call_constructors_addr, {
onEnter: function (args) {
var module = Process.findModuleByName("libmsaoaidsec.so")
if (module != null) {
console.log("libmsaoaidsec.so base address: " + module.base);
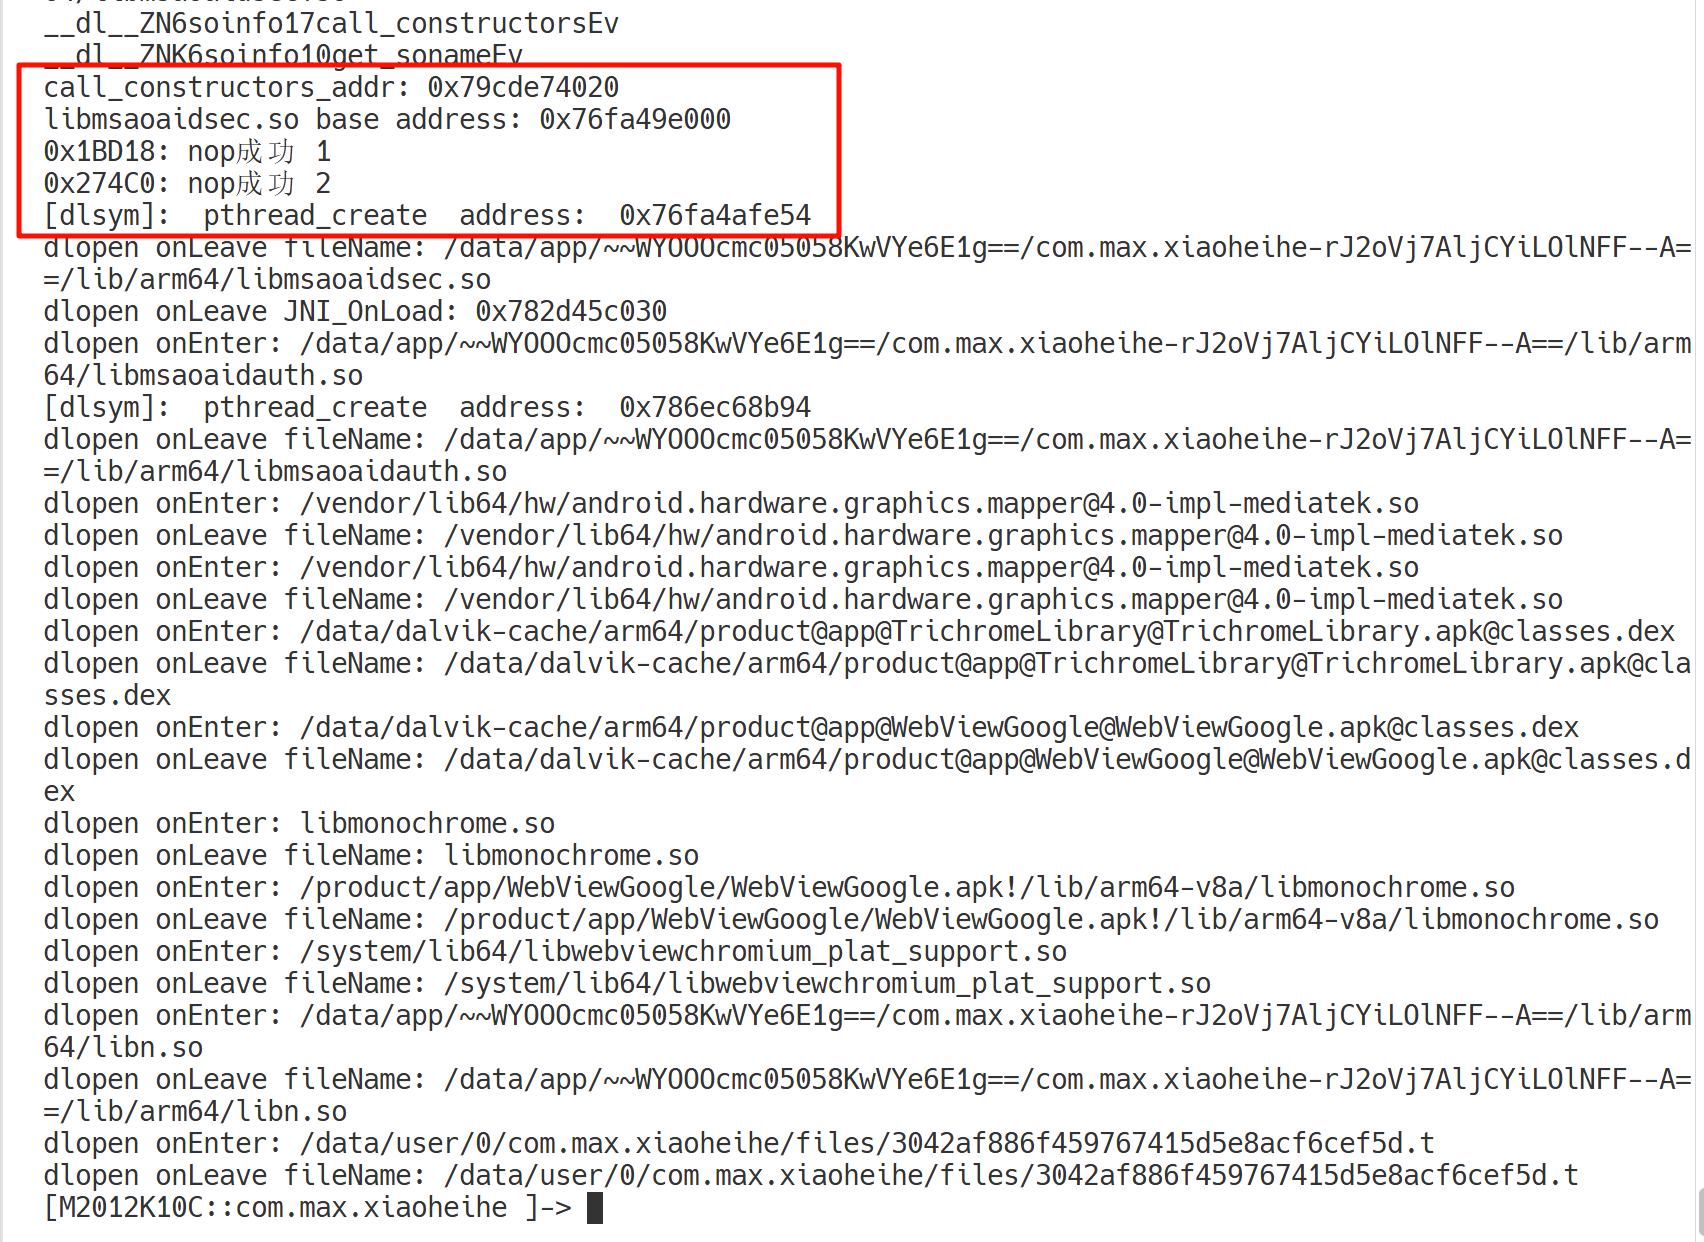
Interceptor.replace(module.base.add(0x1BD18), new NativeCallback(function () {
console.log("0x1BD18: nop成功", ++hookCount)
}, "void", []))
Interceptor.replace(module.base.add(0x274C0), new NativeCallback(function () {
console.log("0x274C0: nop成功", ++hookCount)
}, "void", []))
listener.detach()
}
},
onLeave: function (retval) {
console.log("hookCount", hookCount)
}
})
}
function hook_dlsym() {
var interceptor = Interceptor.attach(Module.findExportByName(null, "dlsym"),
{
onEnter: function (args) {
const name = ptr(args[1]).readCString()
if (name == "pthread_create") {
console.log("[dlsym]: ", name, " address: ", this.context.lr)
}
}
}
)
return Interceptor
}
setImmediate(hook_dlopen)
三、Java 层分析
直接搜 nonce 搜不到啥有用的信息,但是在资源文件里看到了 okhttp3 框架。然后参照文章中的方法直接搜接口

这样就可以看到一个接口的信息,这里的话看到接口传入了两个参数,一个是登录的电话号码,一个是密码,但是没有找到请求头和载荷的入参,去看看这个 m122877Z 的调用。


可以看到就是一个关于电话号码的拼接,然后传入到 m124367a 进行加密,继续跟进。
public class utils {
    public static ChangeQuickRedirect changeQuickRedirect;

    /* renamed from: a */
    public static String m124367a(String str) throws NoSuchPaddingException, NoSuchAlgorithmException, InvalidKeyException {
        PatchProxyResult patchProxyResultProxy = PatchProxy.proxy(new Object[]{str}, null, changeQuickRedirect, true, 52396, new Class[]{String.class}, String.class);
        if (patchProxyResultProxy.isSupported) {
            return (String) patchProxyResultProxy.result;
        }
        try {
            byte[] bytes = str.getBytes();
            RSAPublicKey rSAPublicKeyM124368b = m124368b(NDKTools.getrsakey(HeyBoxApplication.m103293M(), C35108a.f172116l, C35108a.f172122m0));
            Cipher cipher = Cipher.getInstance("RSA/ECB/PKCS1Padding");
            cipher.init(1, rSAPublicKeyM124368b);
            return Base64.encodeToString(cipher.doFinal(bytes), 0);
        } catch (Exception unused) {
            return null;
        }
    }

    /* renamed from: b */
    public static RSAPublicKey m124368b(String str) throws Exception {
        PatchProxyResult patchProxyResultProxy = PatchProxy.proxy(new Object[]{str}, null, changeQuickRedirect, true, 52395, new Class[]{String.class}, RSAPublicKey.class);
        if (patchProxyResultProxy.isSupported) {
            return (RSAPublicKey) patchProxyResultProxy.result;
        }
        try {
            return (RSAPublicKey) KeyFactory.getInstance(C35739d.f174485a).generatePublic(new X509EncodedKeySpec(Base64.decode(str, 0)));
        } catch (NullPointerException unused) {
            C15768d.m96188b("zzzzRSA", "----------公钥数据为空----------");
            throw new Exception("公钥数据为空");
        } catch (NoSuchAlgorithmException unused2) {
            C15768d.m96188b("zzzzRSA", "----------无此算法----------");
            throw new Exception("无此算法");
        } catch (InvalidKeySpecException unused3) {
            C15768d.m96188b("zzzzRSA", "----------公钥非法----------");
            throw new Exception("公钥非法");
        }
    }

    /* renamed from: c */
    public static String m124369c(String str) throws NoSuchPaddingException, NoSuchAlgorithmException, InvalidKeyException {
        PatchProxyResult patchProxyResultProxy = PatchProxy.proxy(new Object[]{str}, null, changeQuickRedirect, true, 52397, new Class[]{String.class}, String.class);
        if (patchProxyResultProxy.isSupported) {
            return (String) patchProxyResultProxy.result;
        }
        try {
            byte[] bArrDecode = Base64.decode(str, 0);
            RSAPublicKey rSAPublicKeyM124368b = m124368b(NDKTools.getrsakey(HeyBoxApplication.m103293M(), C35108a.f172116l, C35108a.f172122m0));
            Cipher cipher = Cipher.getInstance("RSA/ECB/PKCS1Padding");
            cipher.init(2, rSAPublicKeyM124368b);
            return new String(cipher.doFinal(bArrDecode));
        } catch (Exception unused) {
            return null;
        }
    }
}
很清晰,是一个没有混淆的 RSA,同时请求里面也可以 看到手机号码和密码都是加密了的。
然后看到文章中说该 App 用了 Retrofit 框架,然后也就上网查了一下了解学习一下。
- Retrofit 是 Android 开发中最常用的 网络请求框架 之一,基于 OkHttp 实现网络底层,通过 动态代理 + 注解解析,把接口调用自动转成网路请求。接口的每个方法调用,其实是通过动态代理被拦截并转成一个 HTTP 请求。
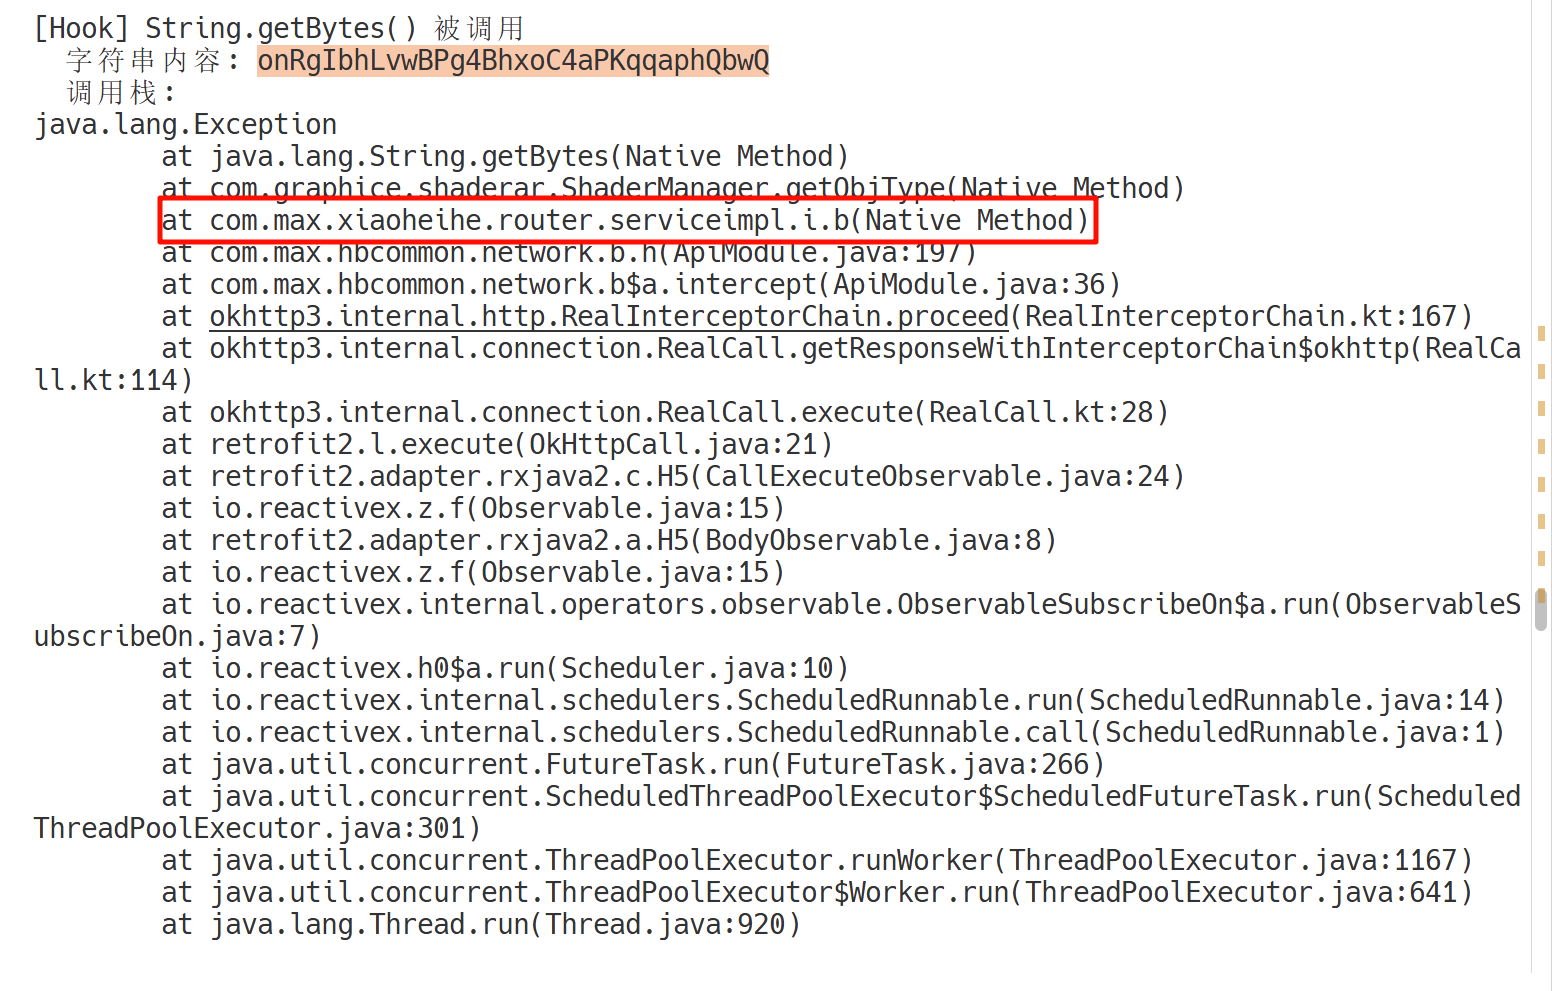
即文章中所说它是通过拦截器去添加请求头和载荷的,可以通过 hook getBytes 来找到生成位置堆栈信息。为什么可以通过 hook getBytes 来找到呢?
在分析加密请求或混淆过的 Retrofit 请求时,很多时候拦截器或加密逻辑都在 native 层或混淆代码里执行。此时想要知道 「到底是谁生成了这段被加密的 body」,可以通过 hook Java 关键函数。
String.getBytes()是加密链中的关键点
几乎所有的请求载荷在被加密之前,都会经历:- 原始 JSON 拼接(例如:
"{\"uid\":123,\"token\":\"abc\"}") - 调用
.getBytes()→ 生成 byte[] - 进入加密函数(AES/RSA/Base64 等)
- 写入请求体 →
RequestBody.create(MediaType, byte[])
所以,只要在 Java 层 hook String.getBytes() 就能在请求即将被加密的瞬间捕捉到原始明文内容。
- 原始 JSON 拼接(例如:
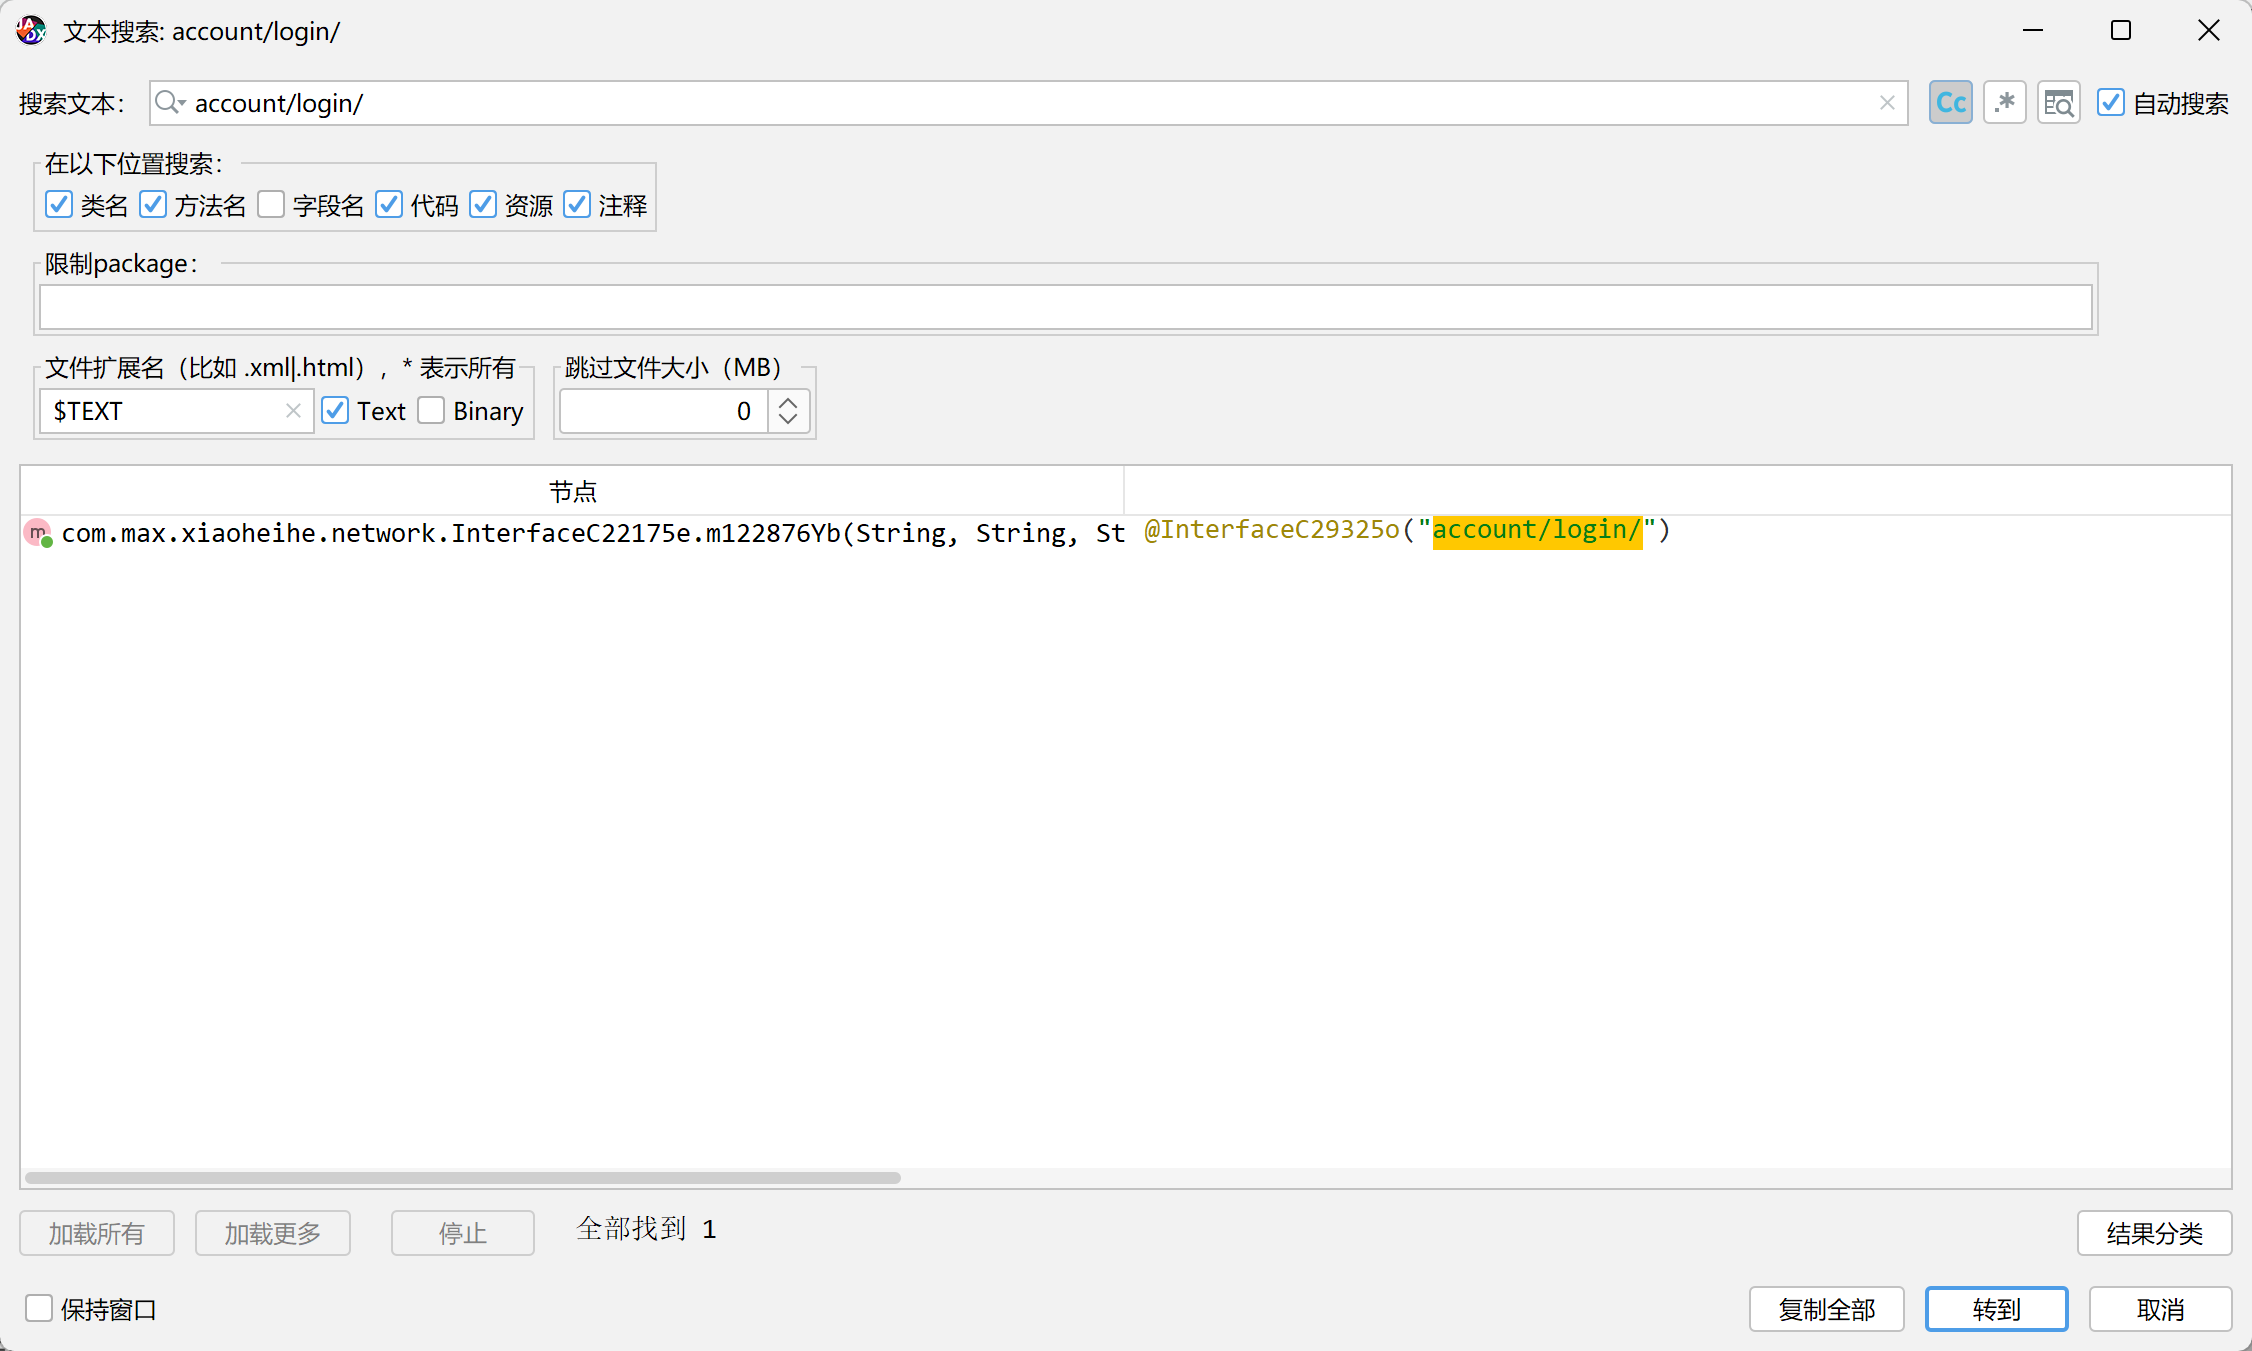
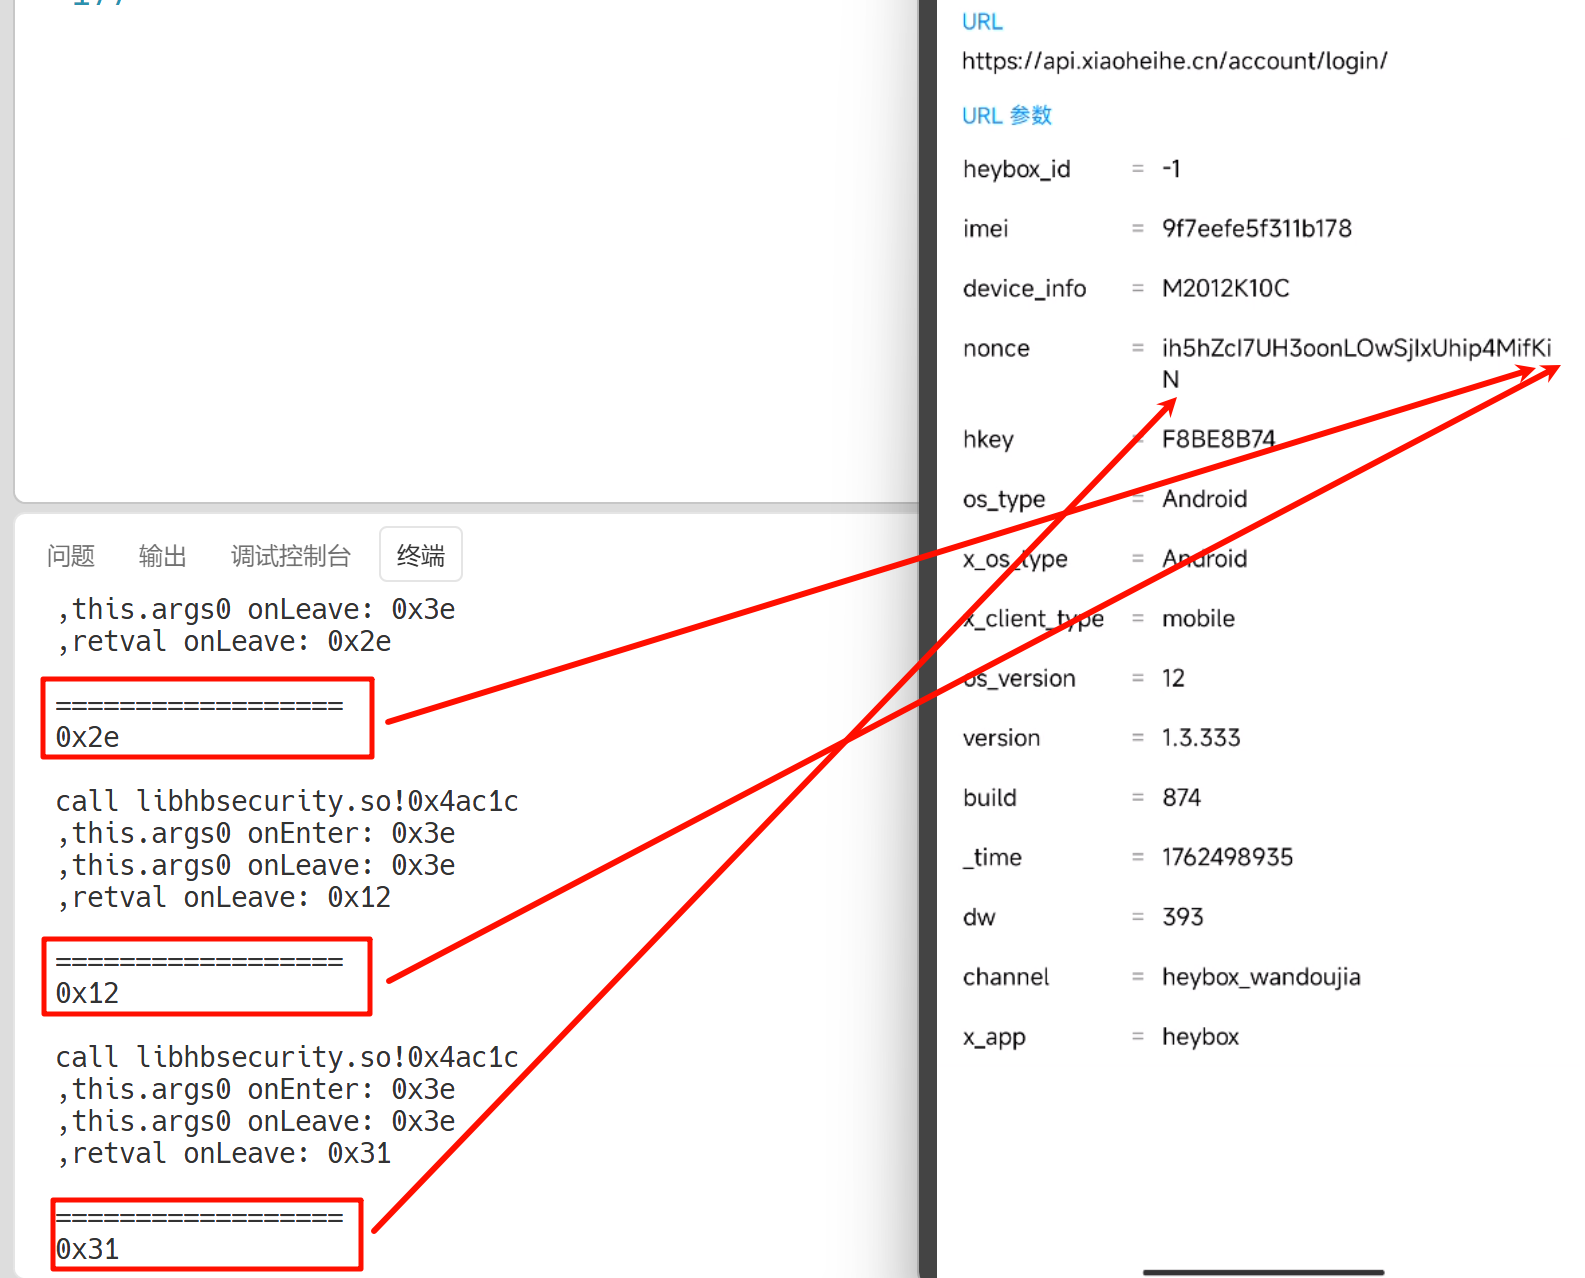
然后在注入脚本的时候,注入时机也很重要,这里要先将 libmsaoaidsec.so 中的检测给过掉,然后再注入 hook getBytes 的逻辑,然后再去小黄鸟中找到 *****://***.*********.**/account/login/,通过 nonce 的值去日志中搜,这样一来就可以精准定位到生成位置,位于com.max.xiaoheihe.router.serviceimpl.i.b。
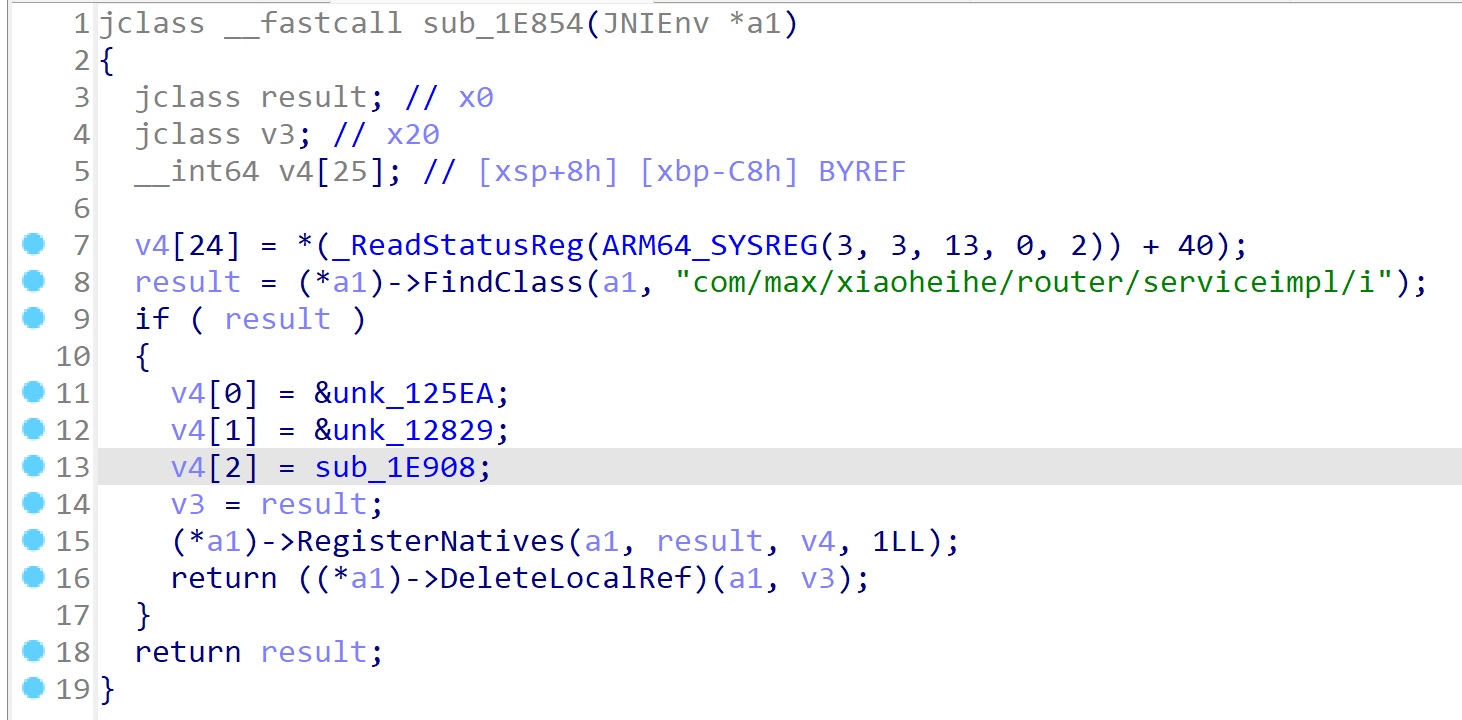
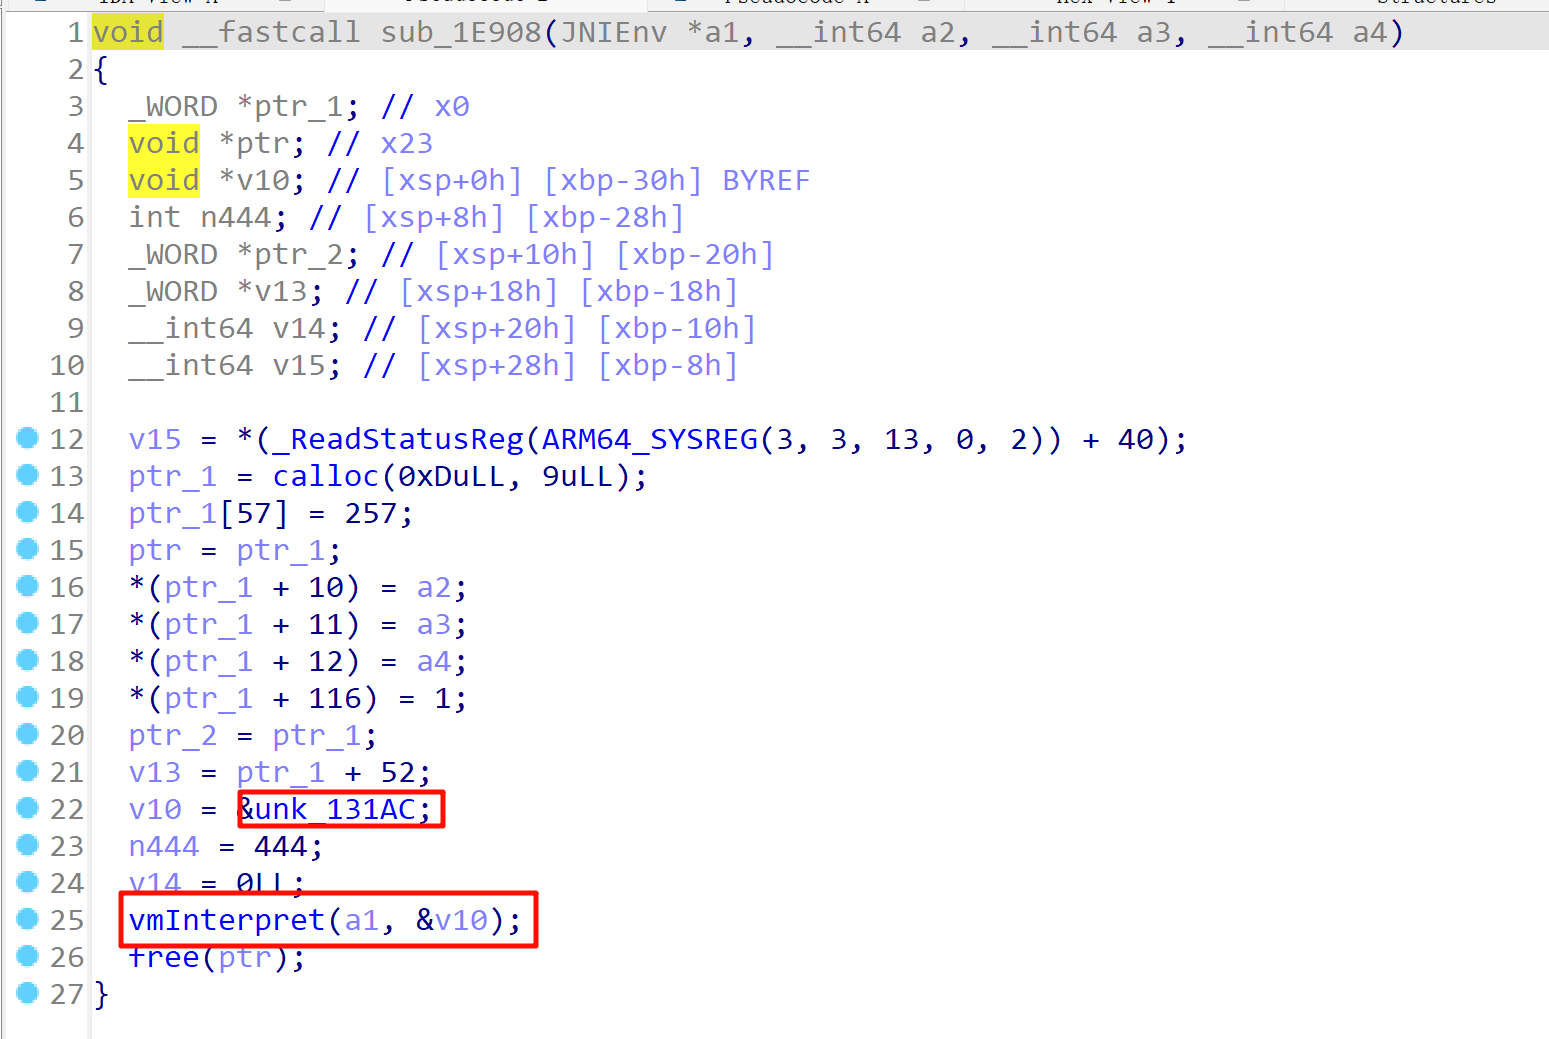
然后我们继续跟这个方法,结果发现最新版的 x黑盒 已经把这个方法写到 so 层去了,并且还写了个 vm。

很清晰,一点混淆都没做,到这一步,但还是想继续复现那篇文章,于是又上网找到了 1.3.333 版本的。
重新 hook

再跟踪定位
这就清晰很多了(
再往下走就是 getVD 和 getVX,先写一个 hook 脚本和抓包的信息联合一起分析一下,确定一下是不是这里,
function hook_getVD() {
  Java.perform(function () {
    var SecurityTool = Java.use("com.max.security.SecurityTool");
    SecurityTool["getVD"].implementation = function (context, str) {
      console.log(
        `SecurityTool.getVD is called: context=${context}, str=${str}`
      );
      let result = this["getVD"](context, str);
      console.log(`SecurityTool.getVD result=${result}`);
      return result;
    };
  });
}
然后也还是先只运行 hook_dlopen(),等程序正常启动成了,然后再挂载 hook_getVD(),再输入手机号并用密码登录。然后发现 hook 结果和抓包结果是对的上的。
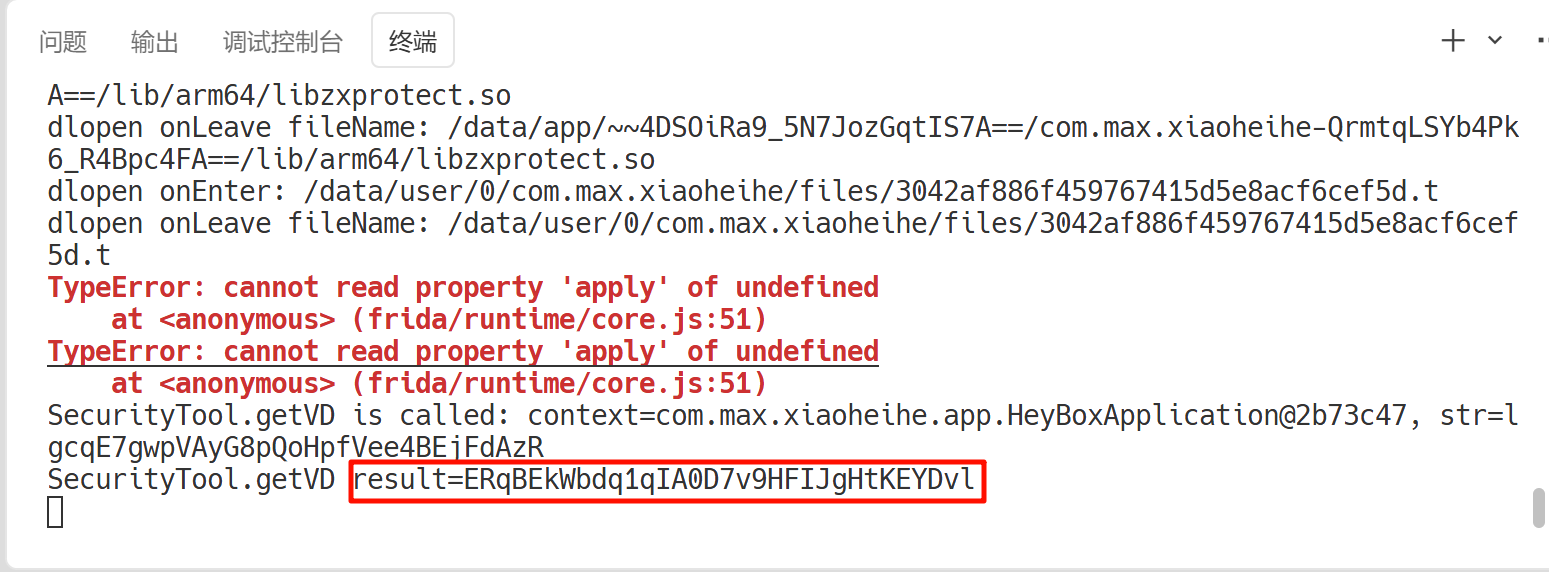
继续分析。
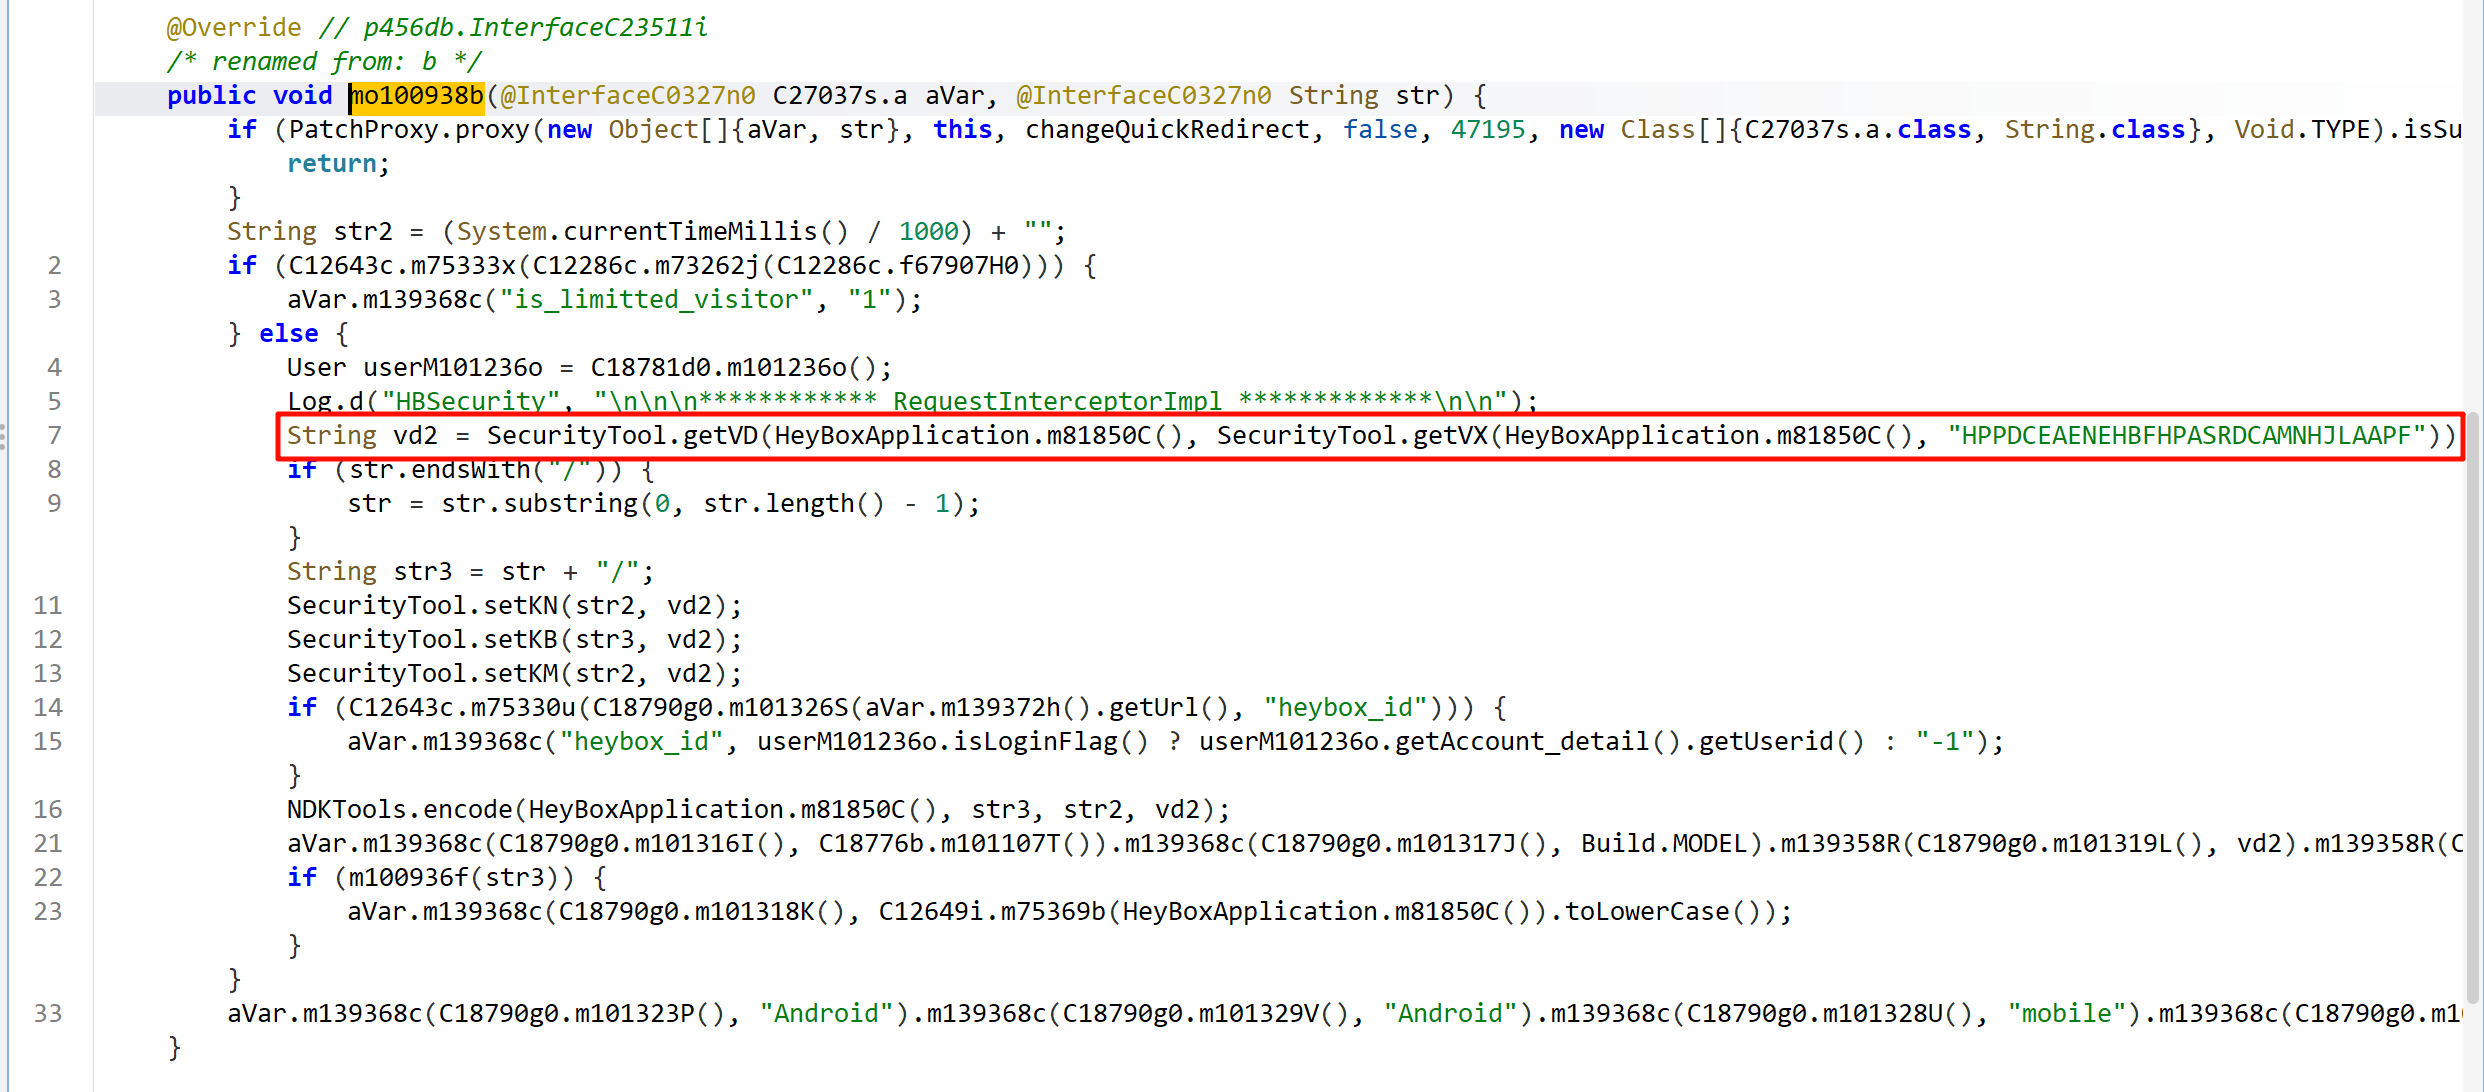
String vd2 = SecurityTool.getVD(HeyBoxApplication.m81850C(), SecurityTool.getVX(HeyBoxApplication.m81850C(), "HPPDCEAENEHBFHPASRDCAMNHJLAAPF"));
可以看到传入 getVD 方法的有两个参数,再看看打印出来的日志
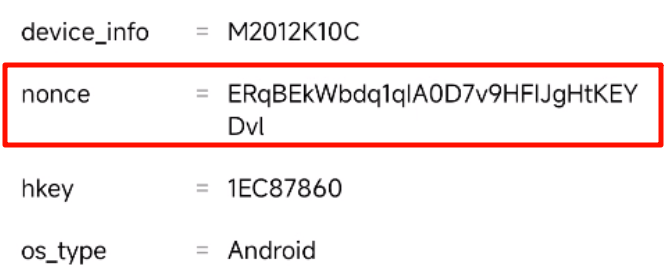
SecurityTool.getVD is called: context=com.max.xiaoheihe.app.HeyBoxApplication@2b73c47, str=lgcqE7gwpVAyG8pQoHpfVee4BEjFdAzR
SecurityTool.getVD result=ERqBEkWbdq1qIA0D7v9HFIJgHtKEYDvl
第一个参数是设备的上下文信息,第二个参数是 getVX 发给发生成的 32 位字符串。双击跟进可以看到一堆 so 层的 native 函数,找一个 so 文件的加载,然后去 so 层进行分析。
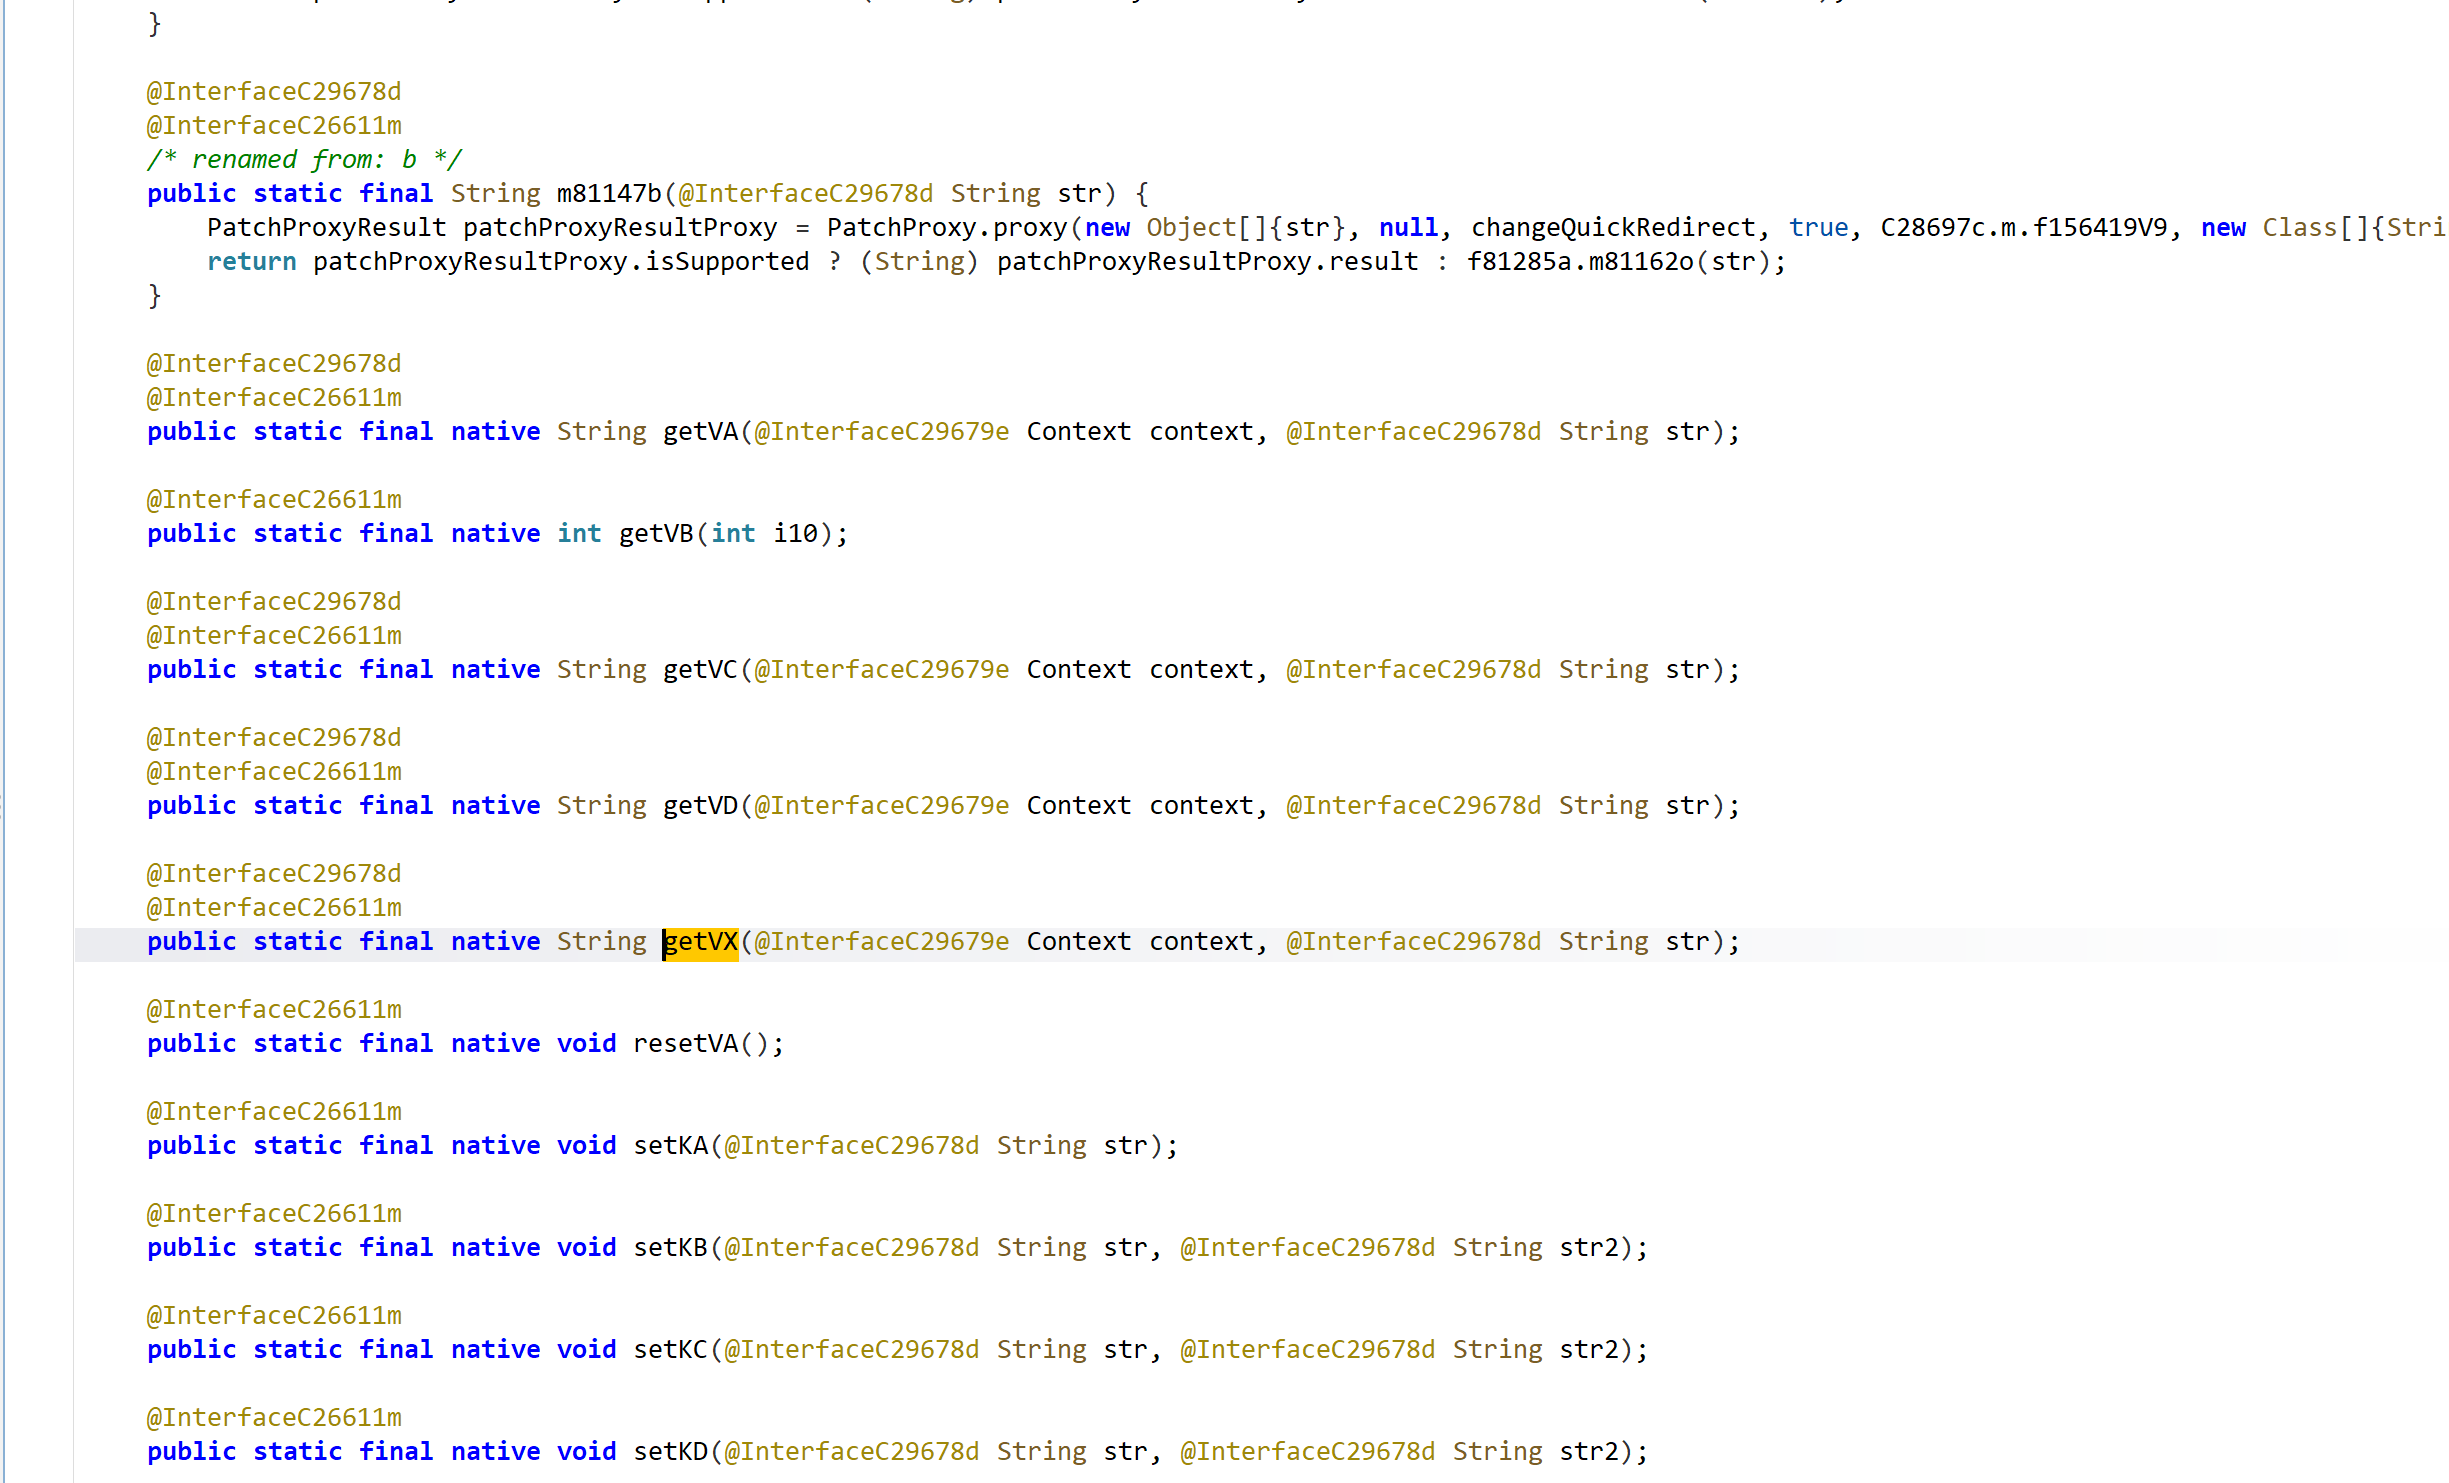
四、SO 层分析
1、getVX
先看导出函数里有没有该函数(一般大概率不是静态注册,所以应该在这找不到)。

那既然是动态注册的,直接去找 JNI_OnLoad 函数即可。
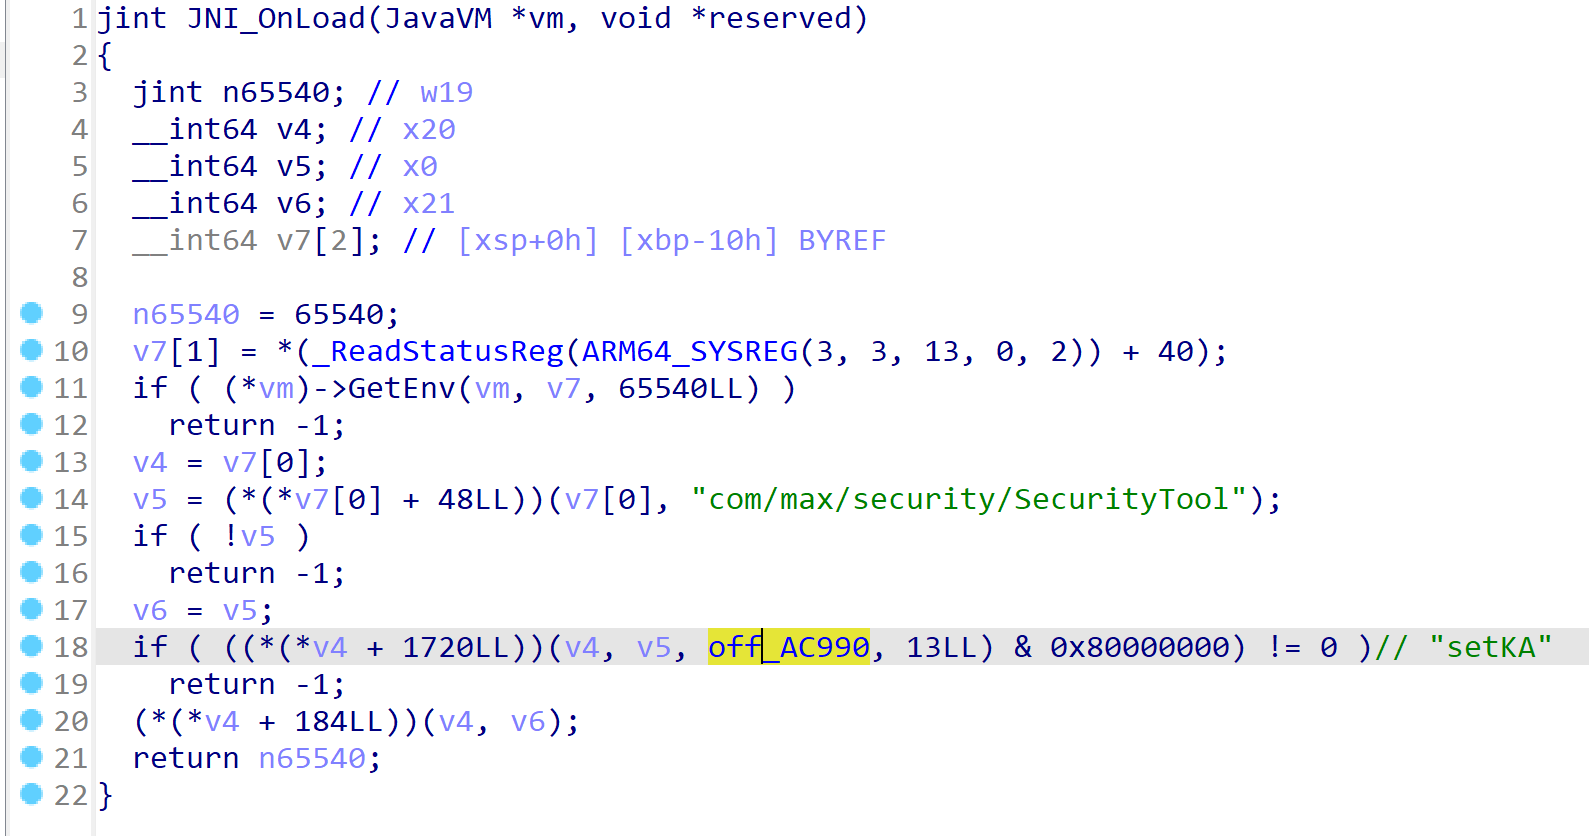
进到该结构体中,就可以找到了
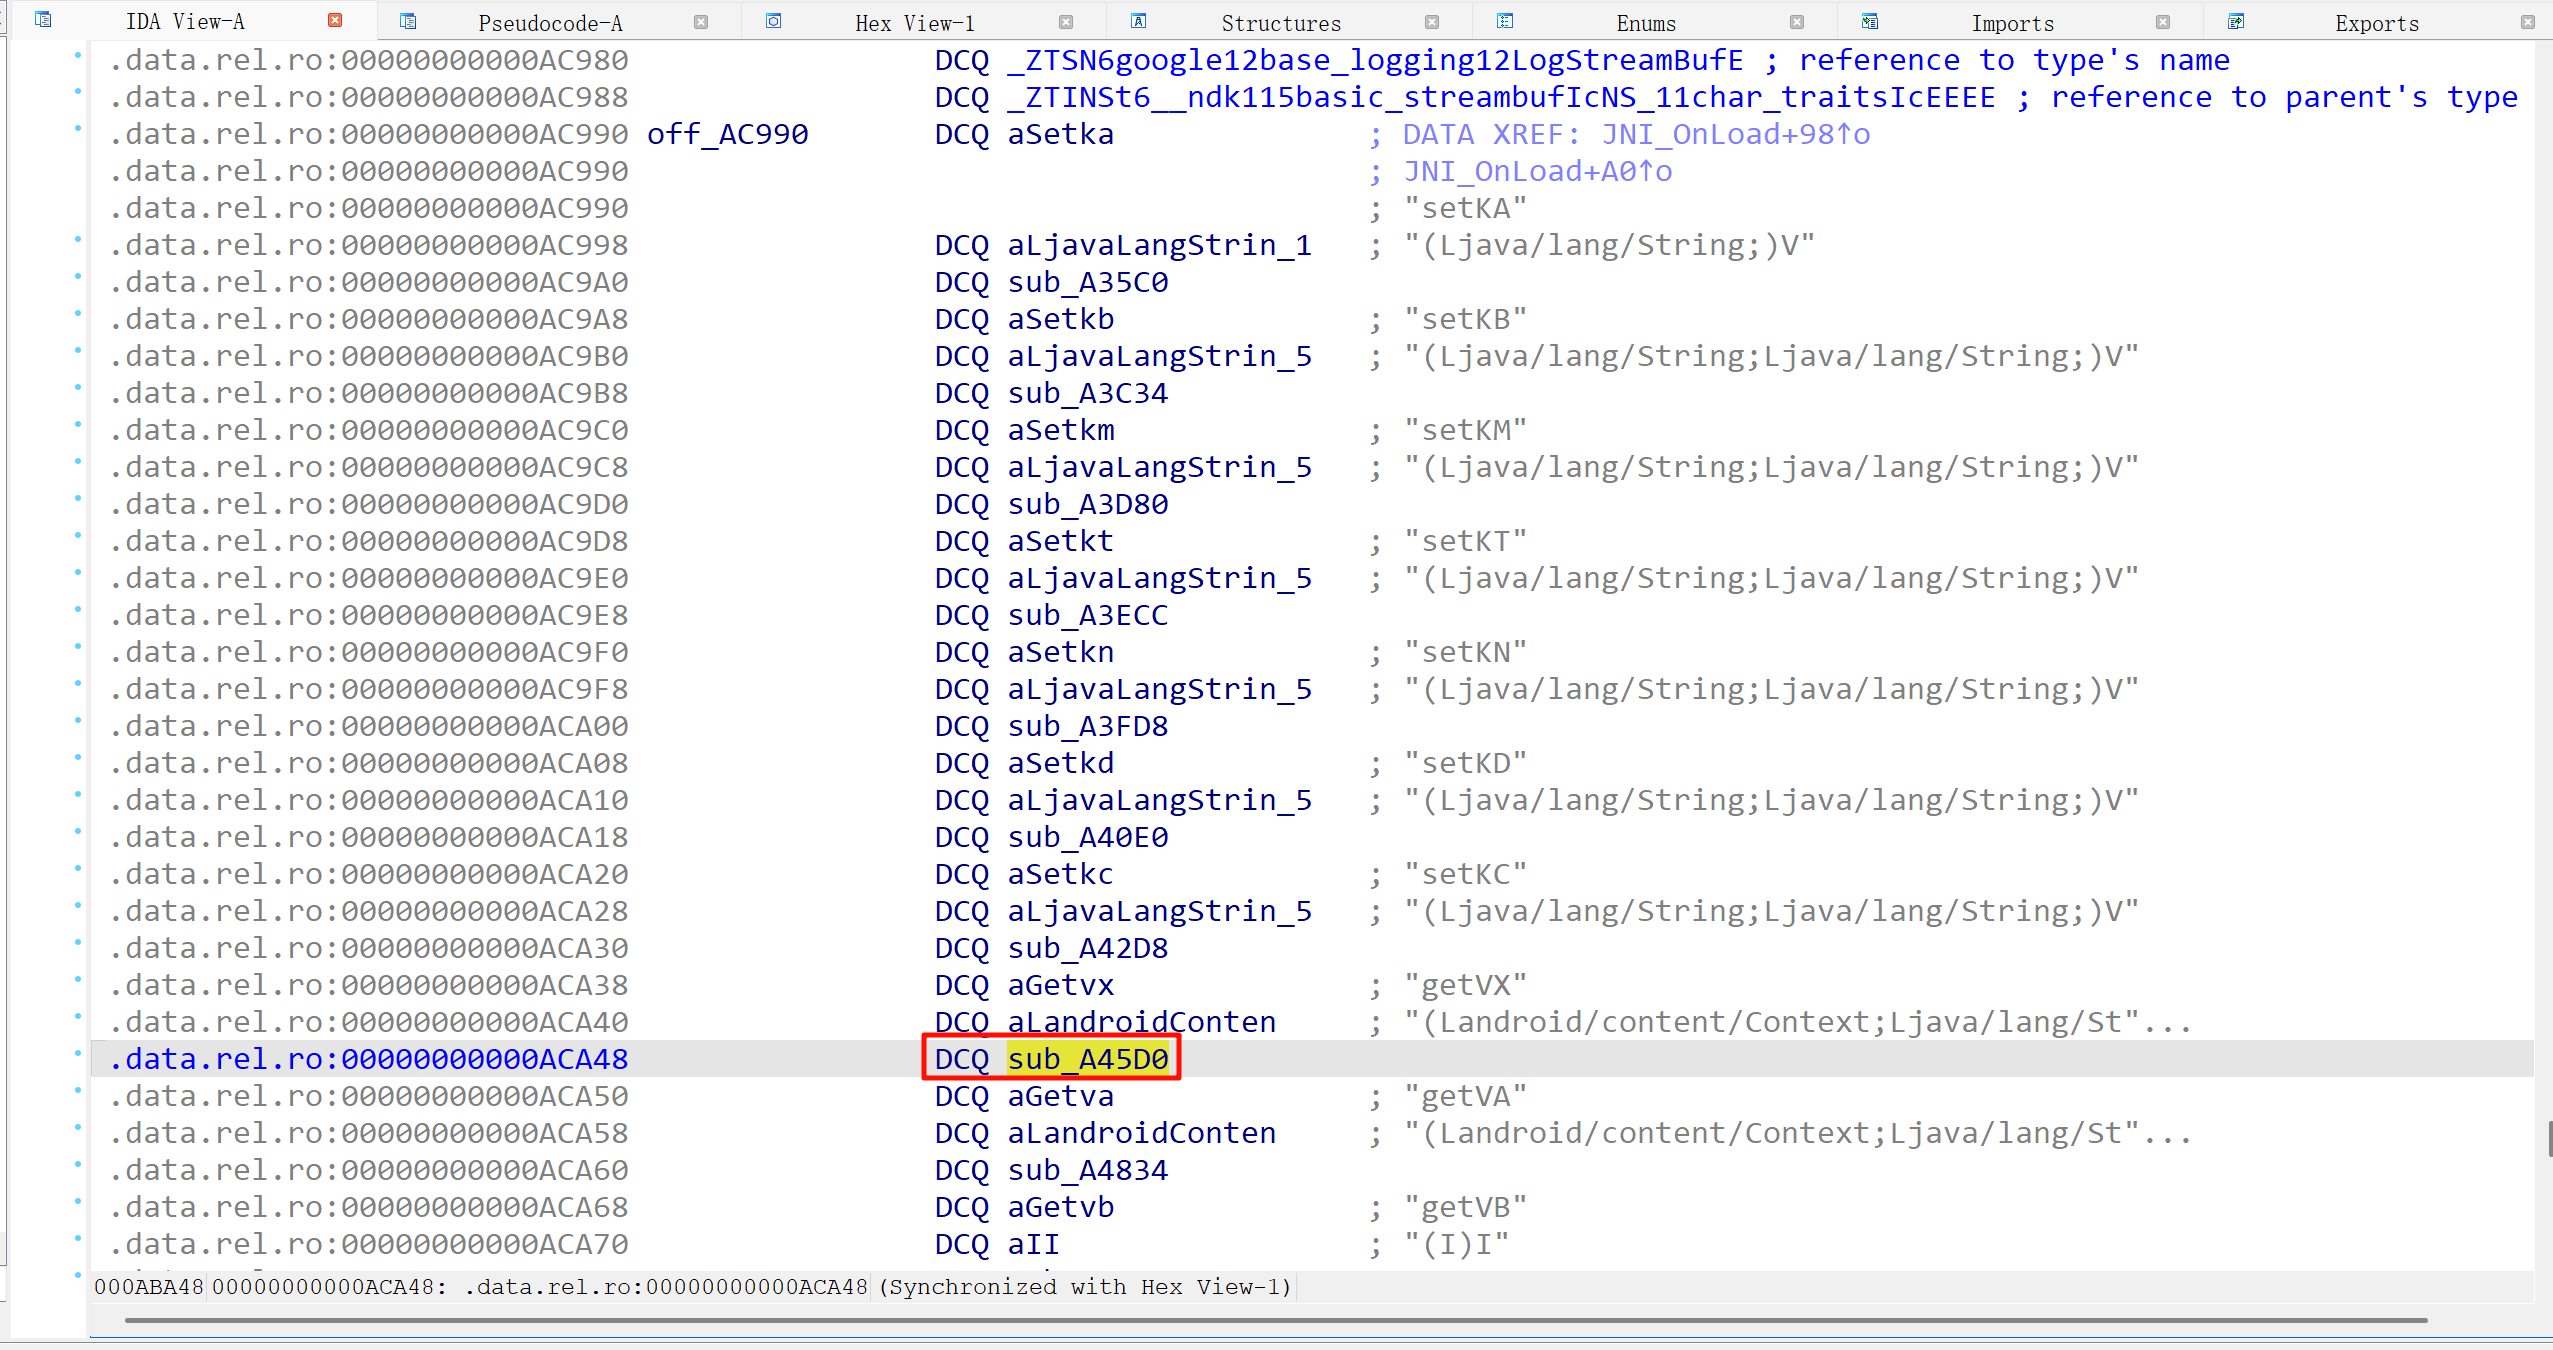
跟进查看逻辑
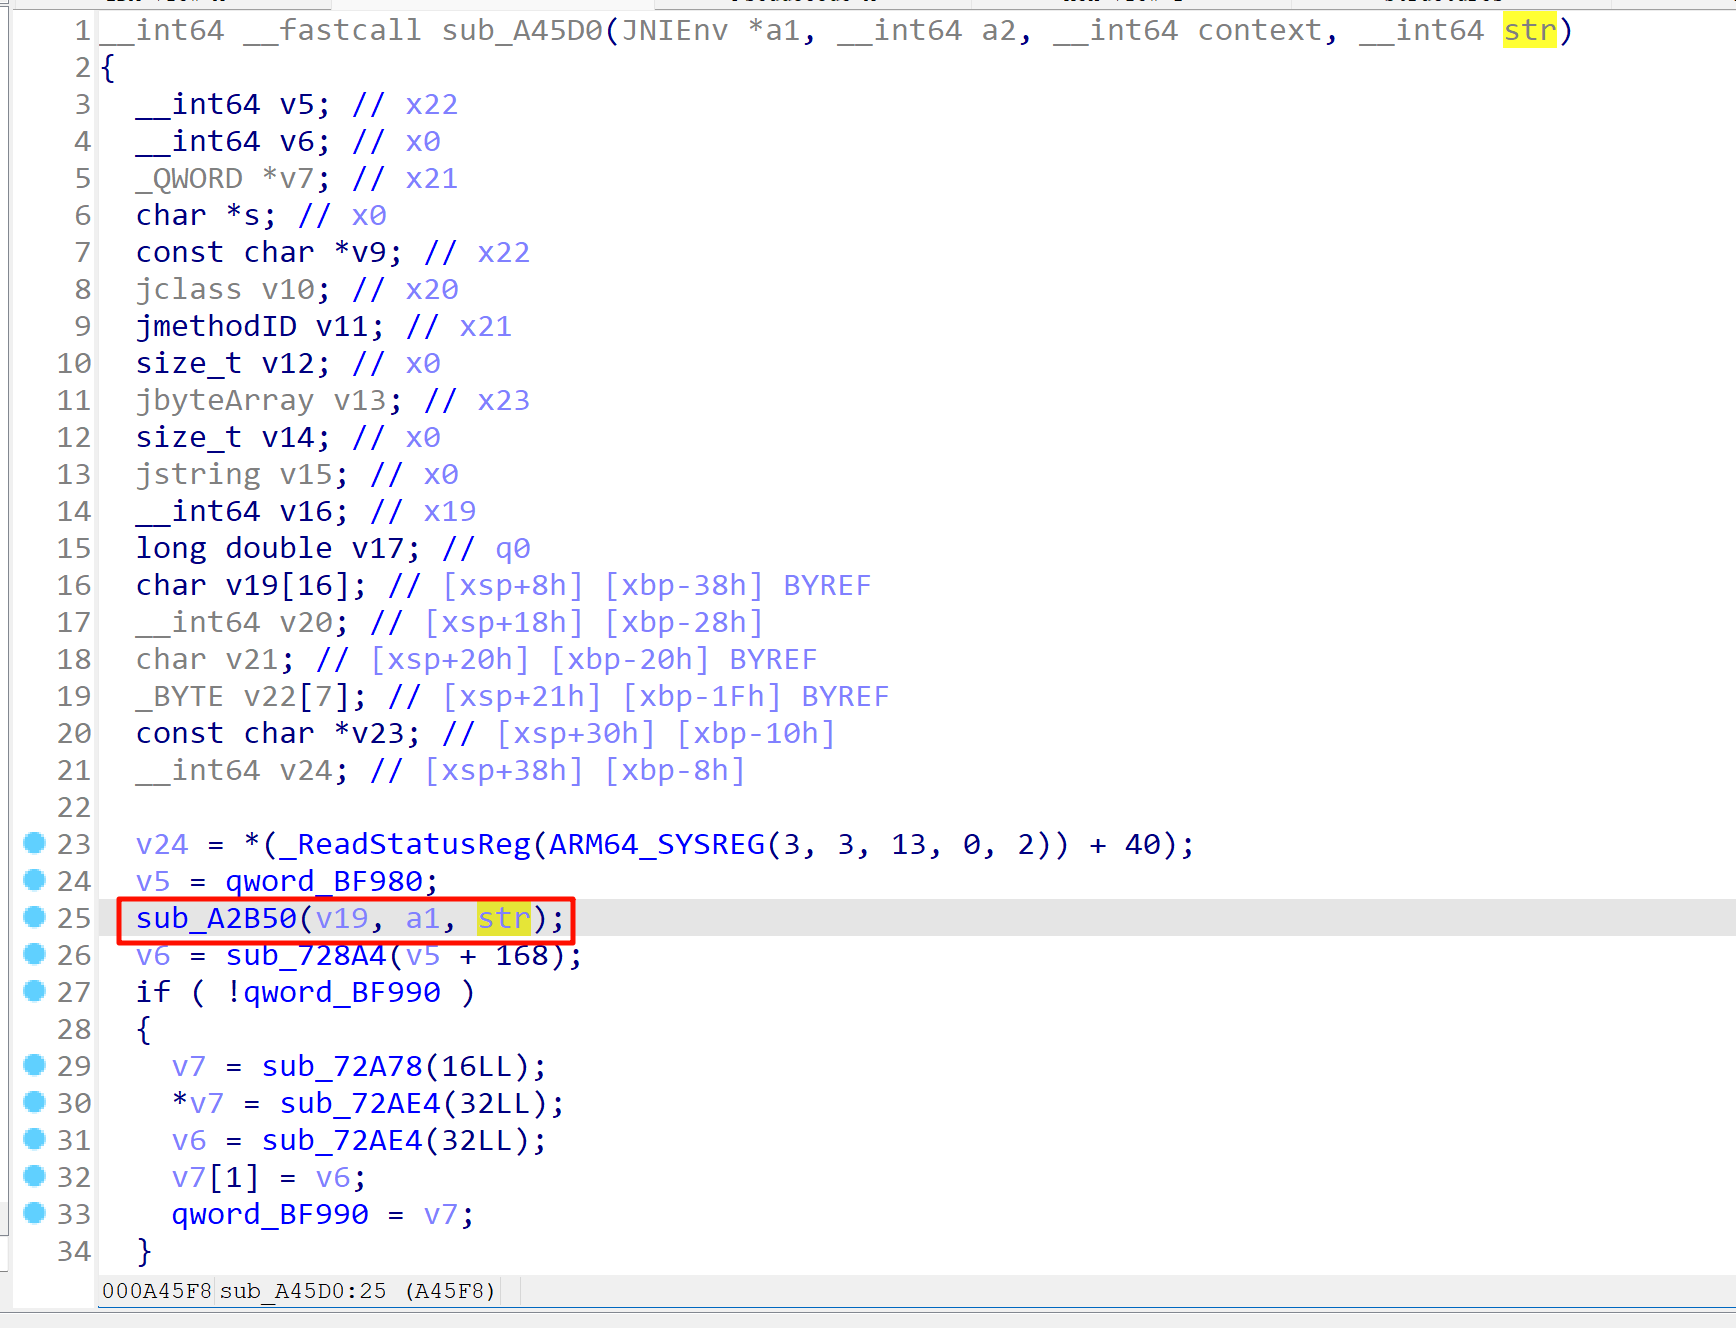
整个函数看下来就只有 sub_A2B50 函数对传进来的 str 进行了处理
,hook 一下看看
function print_arg(addr) {
  if (addr.isNull && addr.isNull()) return "NULL\n";
  var range = Process.findRangeByAddress(addr);
  if (range !== null) {
    return hexdump(addr, {length: 64}) + "\n";
  }
  return ptr(addr).toString() + "\n";
}

function hook_native_addr(funcPtr, paramsNum) {
  var module = Process.findModuleByAddress(funcPtr);
  Interceptor.attach(funcPtr, {
    onEnter: function (args) {
      try {
        this.logs = [];
        this.params = [];
        var prefix = "call ";
        if (module) {
          prefix += module.name + "!" + ptr(funcPtr).sub(module.base) + "\n";
        } else {
          prefix += ptr(funcPtr) + "\n";
        }
        this.logs.push(prefix);
        for (let i = 0; i < paramsNum; i++) {
          this.params.push(args[i]);
          this.logs.push("arg[" + i + "] onEnter: " + print_arg(args[i]));
        }
      } catch (e) {
        console.error("onEnter error:", e);
      }
    },
    onLeave: function (retval) {
      try {
        for (let i = 0; i < paramsNum; i++) {
          this.logs.push("arg[" + i + "] onLeave: " + print_arg(this.params[i]));
        }
        this.logs.push("retval: " + print_arg(retval));
        console.log(this.logs.join("\n"));
        console.log("================================");
      } catch (e) {
        console.error("onLeave error:", e);
      }
    }
  });
}

function hook_so_native_method() {
  var soAddr = Module.findBaseAddress("libhbsecurity.so");
  if (!soAddr) {
    console.error("libhbsecurity.so not found");
    return;
  }
  var funcAddr = soAddr.add(0xA2B50);
  hook_native_addr(funcAddr, 3);
}
从日志内容中没找到比较明显的加密字符串返回,故猜测这里不是一个一个加密逻辑的点。然后再往后分析,看到 v6 是对 v5 处理后的结果,同样 hook 一下看看。
function print_arg(addr) {
  if (addr.isNull && addr.isNull()) return "NULL\n";
  var range = Process.findRangeByAddress(addr);
  if (range !== null) {
    return hexdump(addr, {length: 64}) + "\n";
  }
  return ptr(addr).toString() + "\n";
}

function hook_native_addr(funcPtr, paramsNum) {
  var module = Process.findModuleByAddress(funcPtr);
  Interceptor.attach(funcPtr, {
    onEnter: function (args) {
      try {
        this.logs = [];
        this.params = [];
        var prefix = "call ";
        if (module) {
          prefix += module.name + "!" + ptr(funcPtr).sub(module.base) + "\n";
        } else {
          prefix += ptr(funcPtr) + "\n";
        }
        this.logs.push(prefix);
        for (let i = 0; i < paramsNum; i++) {
          this.params.push(args[i]);
          this.logs.push("arg[" + i + "] onEnter: " + print_arg(args[i]));
        }
      } catch (e) {
        console.error("onEnter error:", e);
      }
    },
    onLeave: function (retval) {
      try {
        for (let i = 0; i < paramsNum; i++) {
          this.logs.push("arg[" + i + "] onLeave: " + print_arg(this.params[i]));
        }
        this.logs.push("retval: " + print_arg(retval));
        console.log(this.logs.join("\n"));
        console.log("================================");
      } catch (e) {
        console.error("onLeave error:", e);
      }
    }
  });
}

function hook_so_native_method() {
  var soAddr = Module.findBaseAddress("libhbsecurity.so");
  if (!soAddr) {
    console.error("libhbsecurity.so not found");
    return;
  }
  var funcAddr = soAddr.add(0x728A4);
  hook_native_addr(funcAddr, 1);
}
打印出来的日志都是一些空值,都没啥用,可能是指针的一些值,不能直接用 hexdump 打印出来,那就继续看看 v6 又进行了哪些处理。
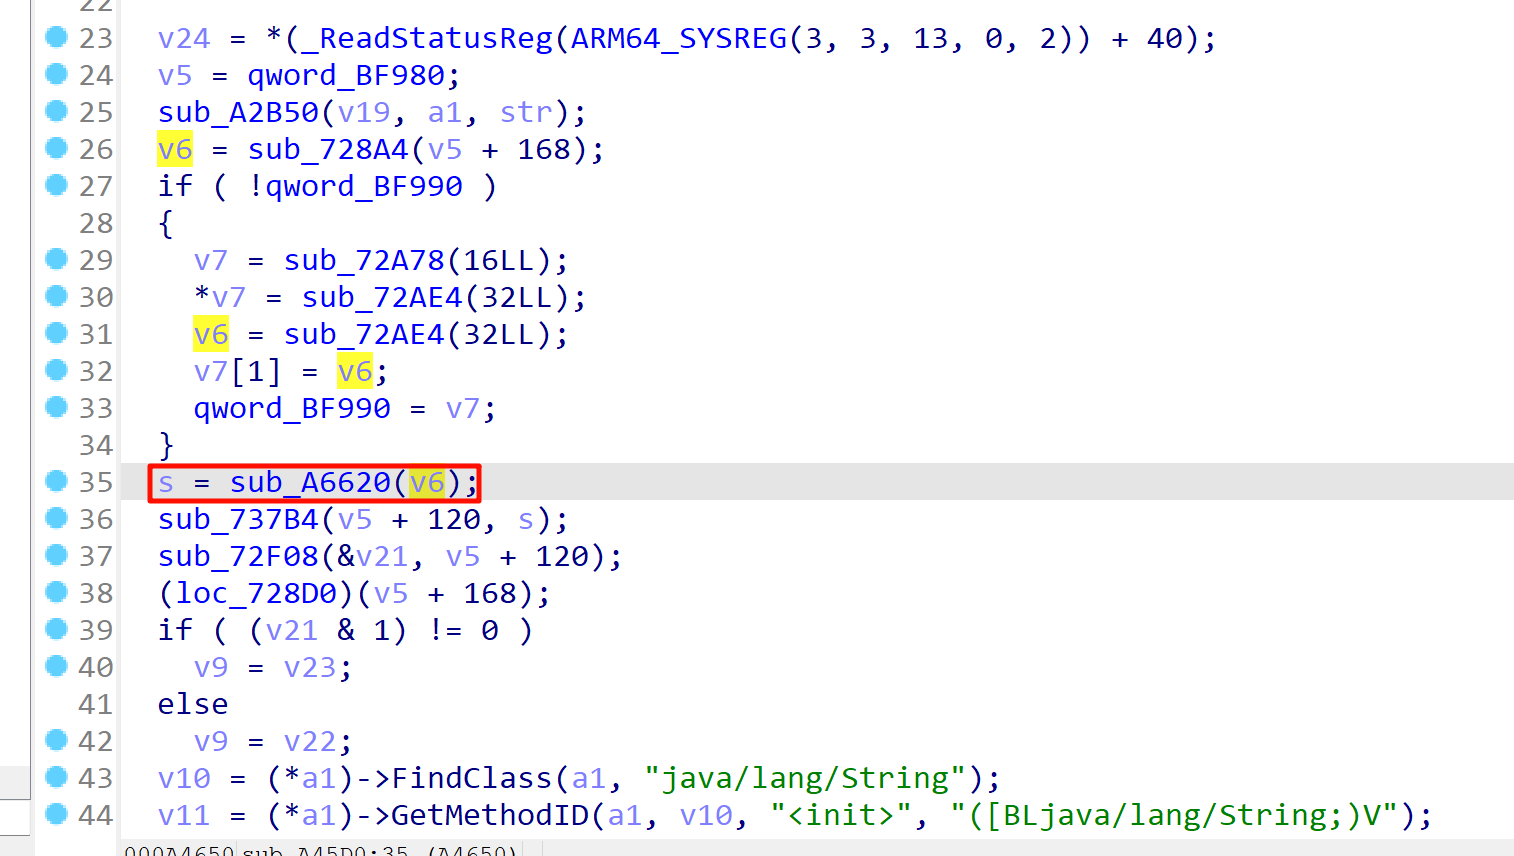
继续 hook 查看。不知道为什么,我在 hook sub_A6620 时,返回值依旧是指针的值,hexdump 打印不出来,不知道文章中的作者是咋写的 hook 的脚本…
跟进该函数,明显有问题。
__int64 sub_A6620()
{
  __int64 v0; // x19
  unsigned __int8 v1; // w8
  __int64 result; // x0

  v0 = sub_72AE4(33LL);
  *v0 = byte_230F4[sub_4AC1C(62LL)];
  *(v0 + 1) = byte_230F4[sub_4AC1C(62LL)];
  *(v0 + 2) = byte_230F4[sub_4AC1C(62LL)];
  *(v0 + 3) = byte_230F4[sub_4AC1C(62LL)];
  *(v0 + 4) = byte_230F4[sub_4AC1C(62LL)];
  *(v0 + 5) = byte_230F4[sub_4AC1C(62LL)];
  *(v0 + 6) = byte_230F4[sub_4AC1C(62LL)];
  *(v0 + 7) = byte_230F4[sub_4AC1C(62LL)];
  *(v0 + 8) = byte_230F4[sub_4AC1C(62LL)];
  *(v0 + 9) = byte_230F4[sub_4AC1C(62LL)];
  *(v0 + 10) = byte_230F4[sub_4AC1C(62LL)];
  *(v0 + 11) = byte_230F4[sub_4AC1C(62LL)];
  *(v0 + 12) = byte_230F4[sub_4AC1C(62LL)];
  *(v0 + 13) = byte_230F4[sub_4AC1C(62LL)];
  *(v0 + 14) = byte_230F4[sub_4AC1C(62LL)];
  *(v0 + 15) = byte_230F4[sub_4AC1C(62LL)];
  *(v0 + 16) = byte_230F4[sub_4AC1C(62LL)];
  *(v0 + 17) = byte_230F4[sub_4AC1C(62LL)];
  *(v0 + 18) = byte_230F4[sub_4AC1C(62LL)];
  *(v0 + 19) = byte_230F4[sub_4AC1C(62LL)];
  *(v0 + 20) = byte_230F4[sub_4AC1C(62LL)];
  *(v0 + 21) = byte_230F4[sub_4AC1C(62LL)];
  *(v0 + 22) = byte_230F4[sub_4AC1C(62LL)];
  *(v0 + 23) = byte_230F4[sub_4AC1C(62LL)];
  *(v0 + 24) = byte_230F4[sub_4AC1C(62LL)];
  *(v0 + 25) = byte_230F4[sub_4AC1C(62LL)];
  *(v0 + 26) = byte_230F4[sub_4AC1C(62LL)];
  *(v0 + 27) = byte_230F4[sub_4AC1C(62LL)];
  *(v0 + 28) = byte_230F4[sub_4AC1C(62LL)];
  *(v0 + 29) = byte_230F4[sub_4AC1C(62LL)];
  *(v0 + 30) = byte_230F4[sub_4AC1C(62LL)];
  v1 = byte_230F4[sub_4AC1C(62LL)];
  result = v0;
  *(v0 + 31) = v1;
  return result;
}

这里面又有一个函数 sub_4AC1C,hook 一下看看。貌似产生的都是一些“随机”数。
根据文章作者对 sub_A6620 函数结果的 hook,以及跟进之后对 sub_4AC1C 函数的 hook,可以确定一个映射关系。同时也可以进行验证。
- 大写字母:偏移 0x1D
- 小写字母:偏移 0x57
- 数字:偏移 0x30
2、getVD
依旧在 JNI_OnLoad 函数中的动态注册函数的结构体中找该函数。

跟进查看逻辑。发现有控制流混淆,然后就跟着文章中的 trace 项目进行 trace 了一下。
运行指令:python sktrace.py -m attach -l libhbsecurity.so -i 0xA5E44 *黑盒 > xhh1.log
完了点击登录调用一下。
可以通过 Frida脚本去 hook 方法返回值,也可以通过抓包看 nonce 的值,我这里测试时抓的值是
4qhGNlfFEsjKyRmNgYbteBW2K9xEmMEF
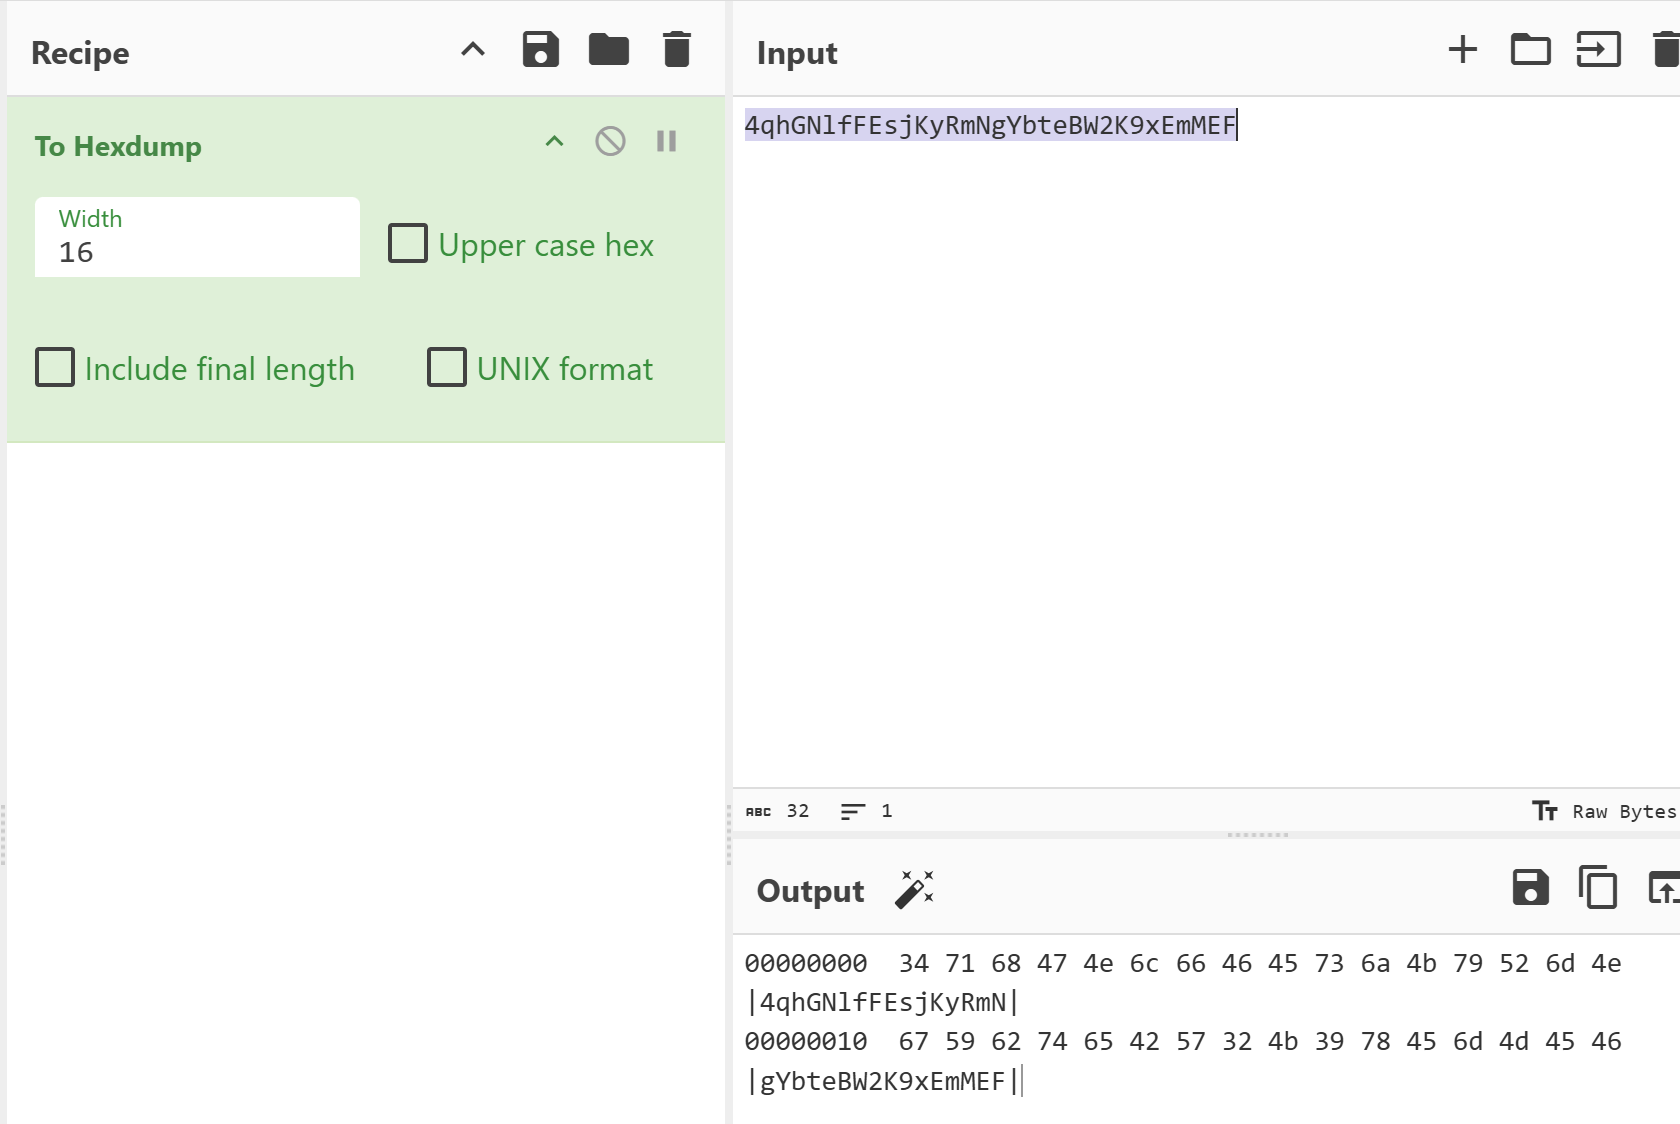
然后去日志中找第一次生成的地方,直接在 日志 中搜索 347168 即可。这样就找到了第一组数组,确定是在这个函数内生成的。再搜 0x34 查找它第一个生成位置。有两个,依次留下标记。
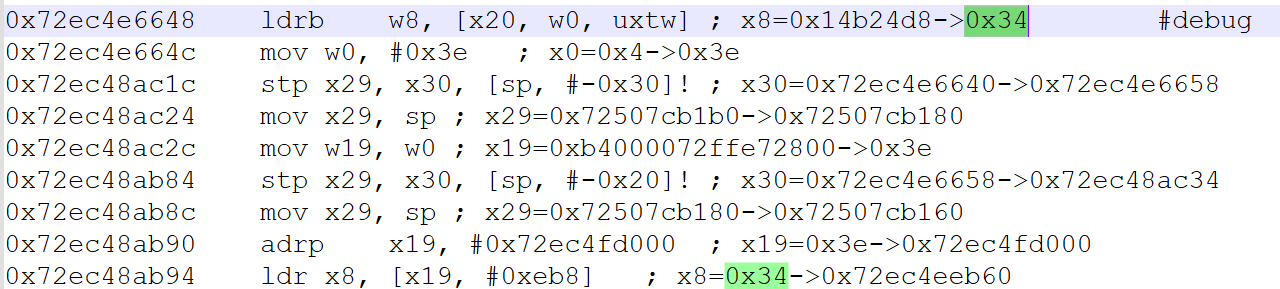
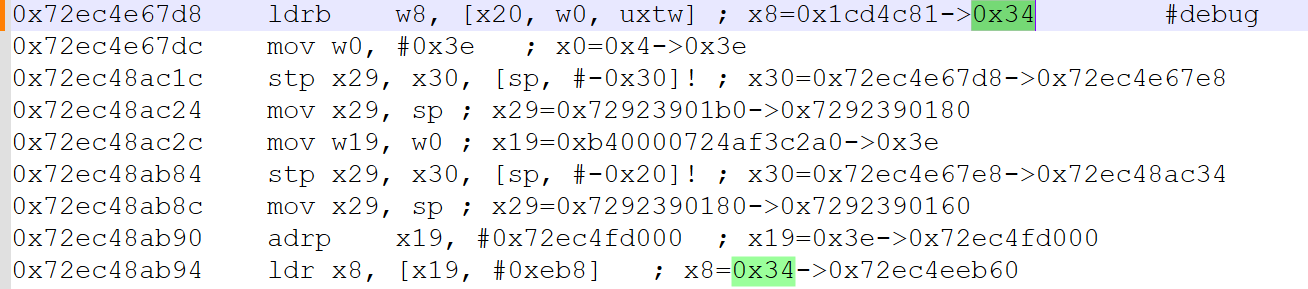
发现一个特征
ldrb w8, [x20, w0, uxtw]
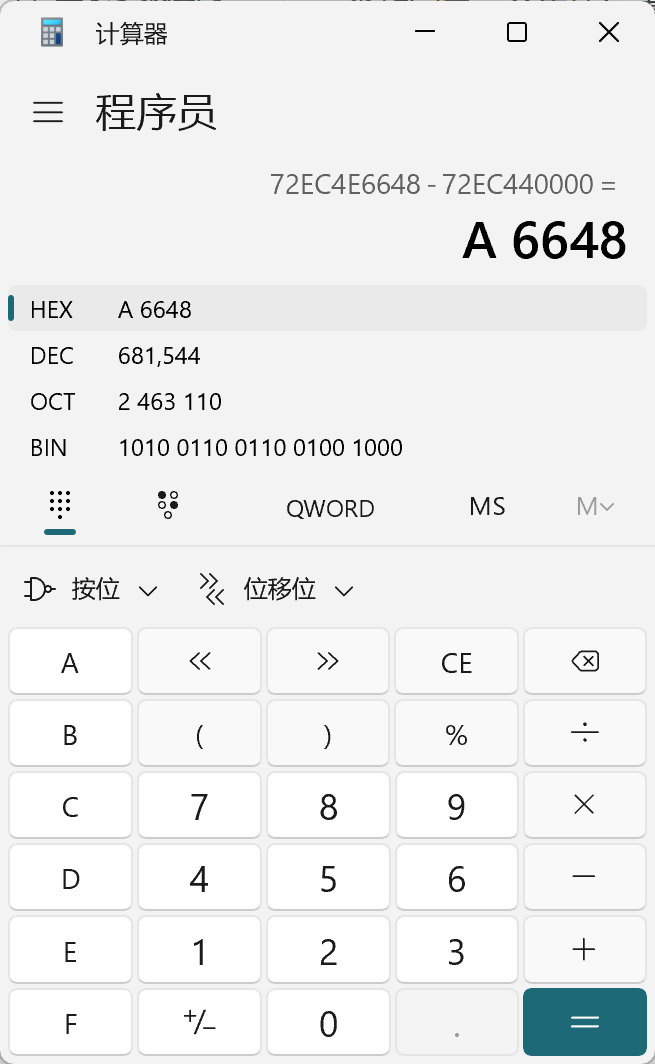
都是在这个汇编代码里,根据地址计算一下偏移,然后去 IDA 里找
发现又到这了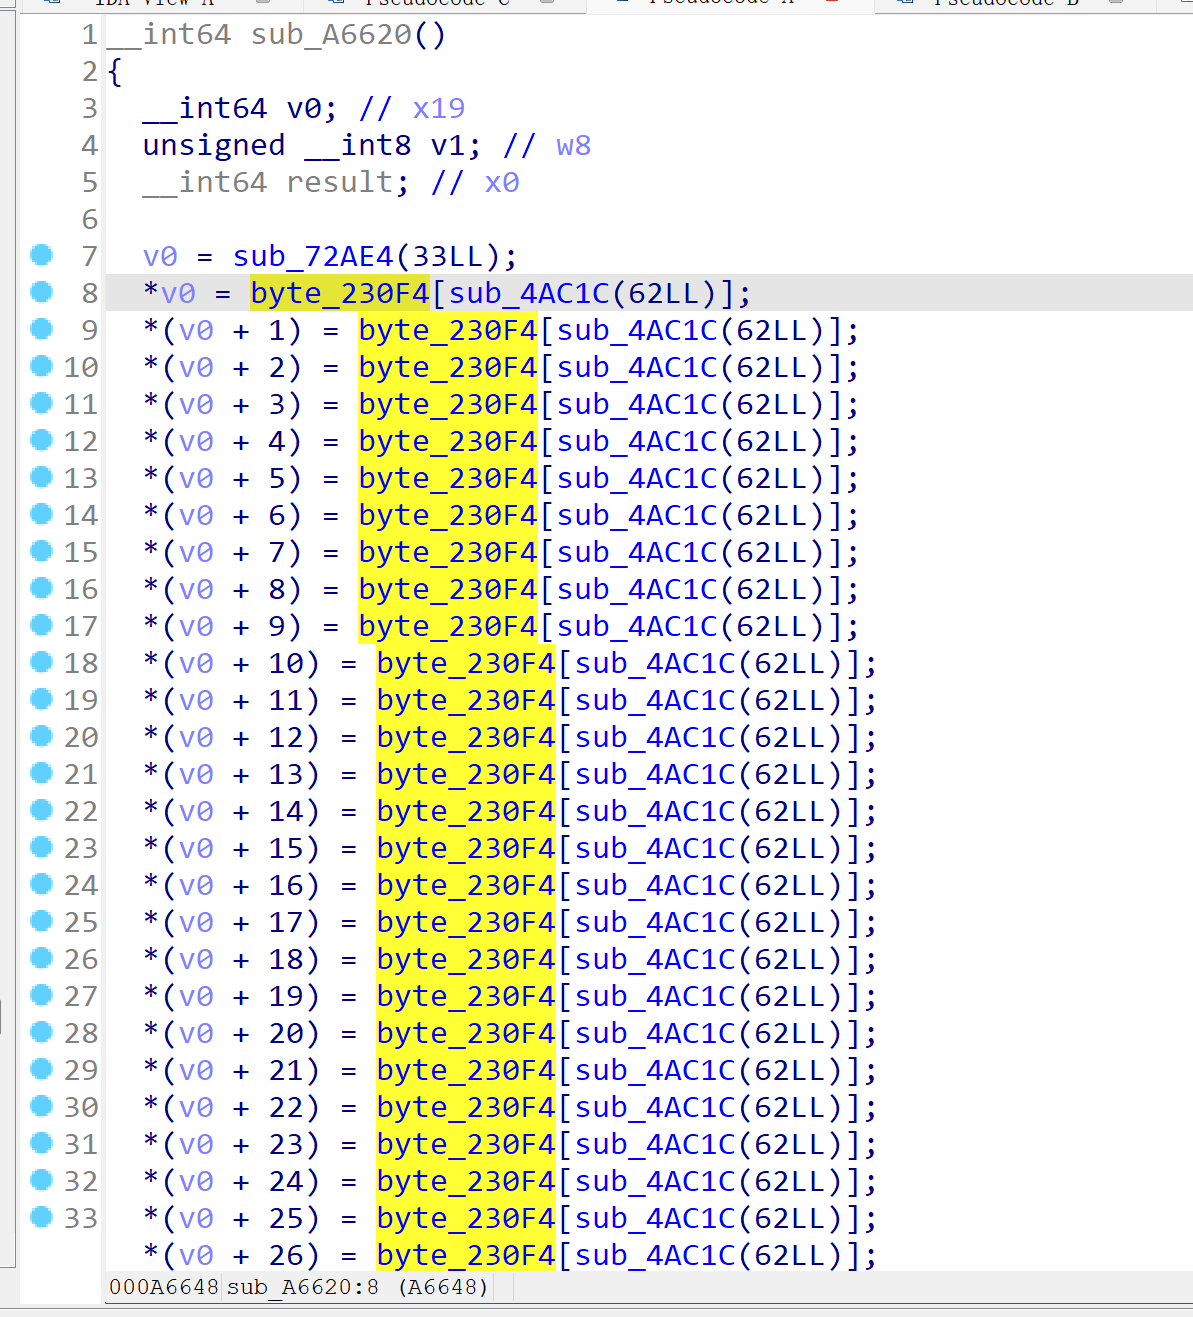
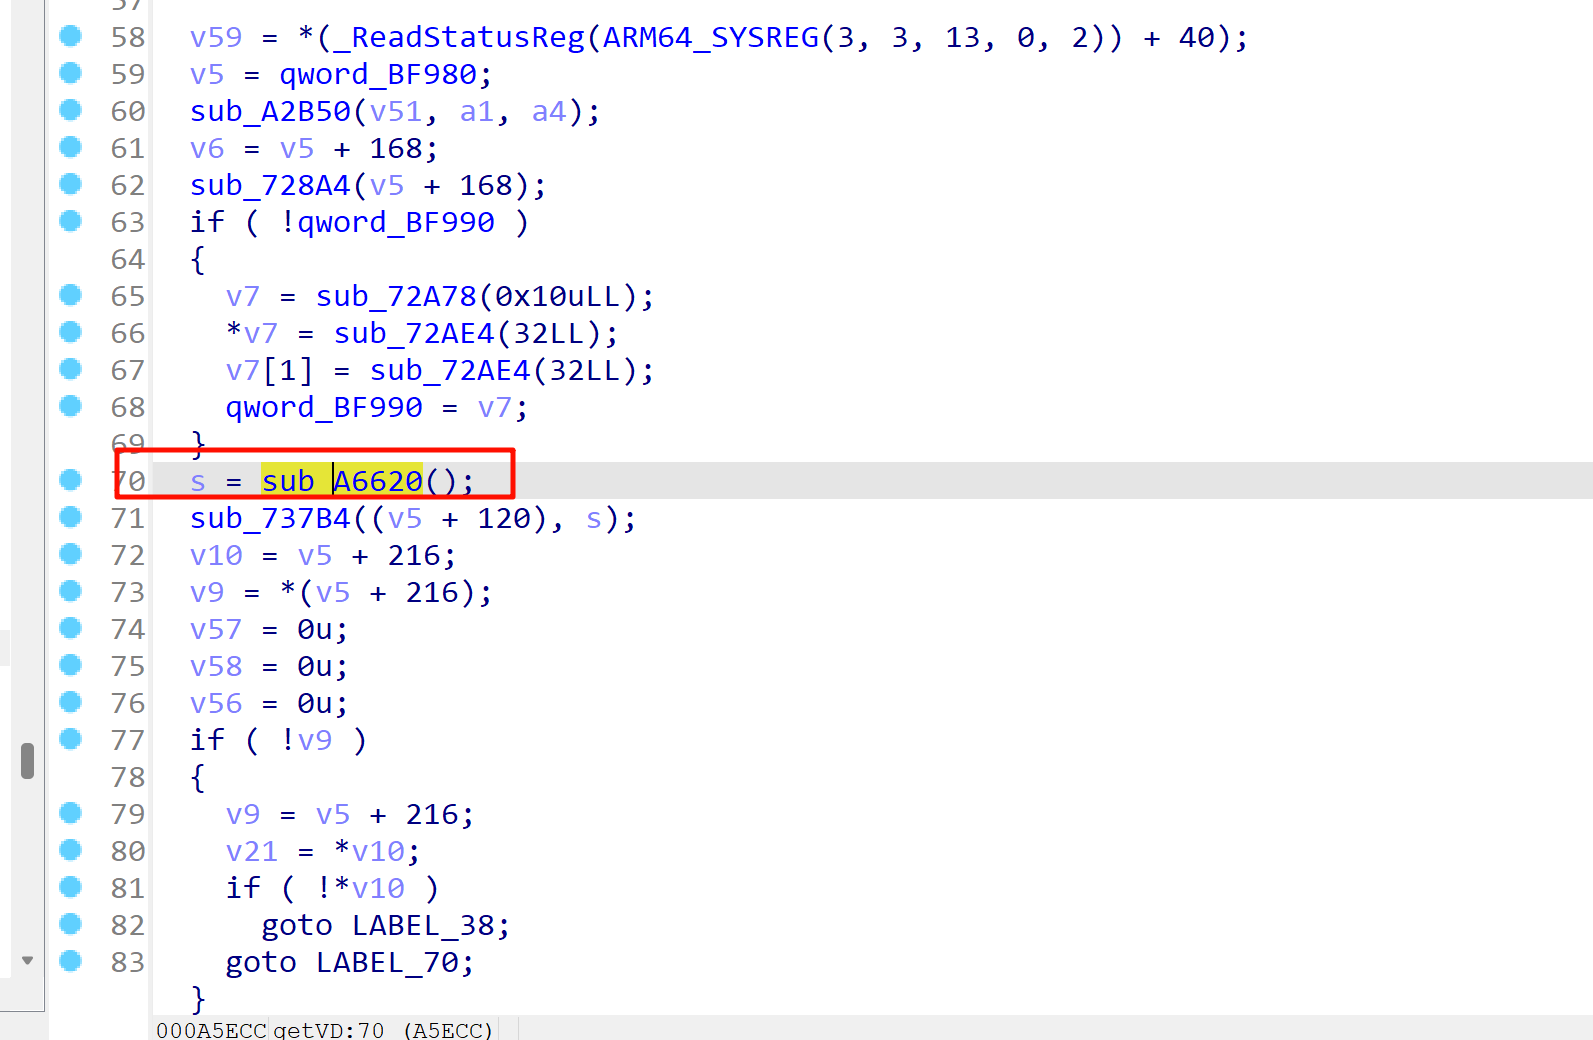
在 getVD 函数里同样调用了随机生成函数 sub_A6620,既然这样,就只需要再 hook 一下这个函数调用生成的值和最后的是否一样。最终测试结果是一样的。
五、结语
第一次较为完整的复现了一次实战文章并记录下来,体验了 trace 跟踪,并分析的这么一个过程。虽说整体过程没有很复杂,但为进一步的学习打下基础。
转载请注明来源,欢迎对文章中的引用来源进行考证,欢迎指出任何有错误或不够清晰的表达。可以在下面评论区评论,也可以邮件至 1621925986@qq.com

