安卓加固学习记录
一、前言
近期开始接触公司的加固业务——Android App 加固,由于之前在 CTF 中遇到的加固一是少,二是都不难,frida-dump 基本都能秒,所以也没有较为系统的去学习了解安卓加固这一块。所以在看雪上找了一些较为详细的文章进行学习并记录,同时也会补充一些个人的理解或者在原文章中讲的不那么详细的点加以补充。
二、第一、二代壳 Dex 整体加固
第一代壳主要是对 **dex/APK ** 文件整体进行加密,然后使用自定义加载器动态加载 dex/APK 文件并执行。而 动态加载 又分为 落地加载 和 不落地加载,落地加载就是通过 DexClassLoader 从磁盘加载 dex/APK 文件,不落地加载 就是通过 InMemoryDexClassLoader 从内存中加载 dex/APK 文件。
这里解释一下上面提到的 磁盘 和 内存 分别的含义,磁盘指的是 Android 文件系统上的存储空间,通常是应用的私有存储目录(/data/data/<package>/ 下),或者外部存储卡路径,使用 DexClassLoader 时,需要先把 .dex 或 .apk 文件以真实文件形式存放在磁盘上,然后 DexClassLoader 会通过文件路径去读取和加载字节码,故称之为 落地;内存 指的是 进程的堆内存(RAM),即由 Java 代码直接持有的 ByteBuffer 或 byte[],使用 InMemoryDexClassLoader 时,不需要在磁盘上生成 .dex 文件,而是可以直接把字节码存放在内存(通常是通过网络下载的字节流、解密后的字节数组、或 mmap 的 buffer),然后直接传给 InMemoryDexClassLoader 来加载,这样,整个过程中不会在磁盘中产生持久化的 dex 文件,故称之为 不落地。
Dex 文件结构
借用文章里的图
一代壳实现原理
App 的启动流程
通过将原 APK 进行加密后保存在加壳 APK 的 dex 文件尾部,在加壳 APK 运行时将 dex 文件尾部加密的原 APK 文件解密后进行动态加载。(这里提到的加壳 APK 也确实是一个真正的 APK 文件,包含完整的 APK 文件结构,但是并无业务代码,而是 负责加载、解密、再运行真正的原始 APK)。
壳代码需要最早回去到 加壳APK 的执行时机,所以 加壳APK 的 Application 实现了 attachContextApplication 函数,此函数在 handleBindApplication 函数中通过调用 makeApplication 进行调用,是一个 APP 进程最早的执行入口。(有关 Android 应用启动流程可以看这篇文章)。
加壳 APK 需要进行如下操作:
- attachContextApplication 解密原 APK 保存到磁盘文件中(不落地加载可以不保存磁盘文件),动态加载解密后的 APK 并替换掉 mClassLoader。
- Application::onCreate 重定位 Application,调用原 APK 的 Application 的 onCreate 函数。
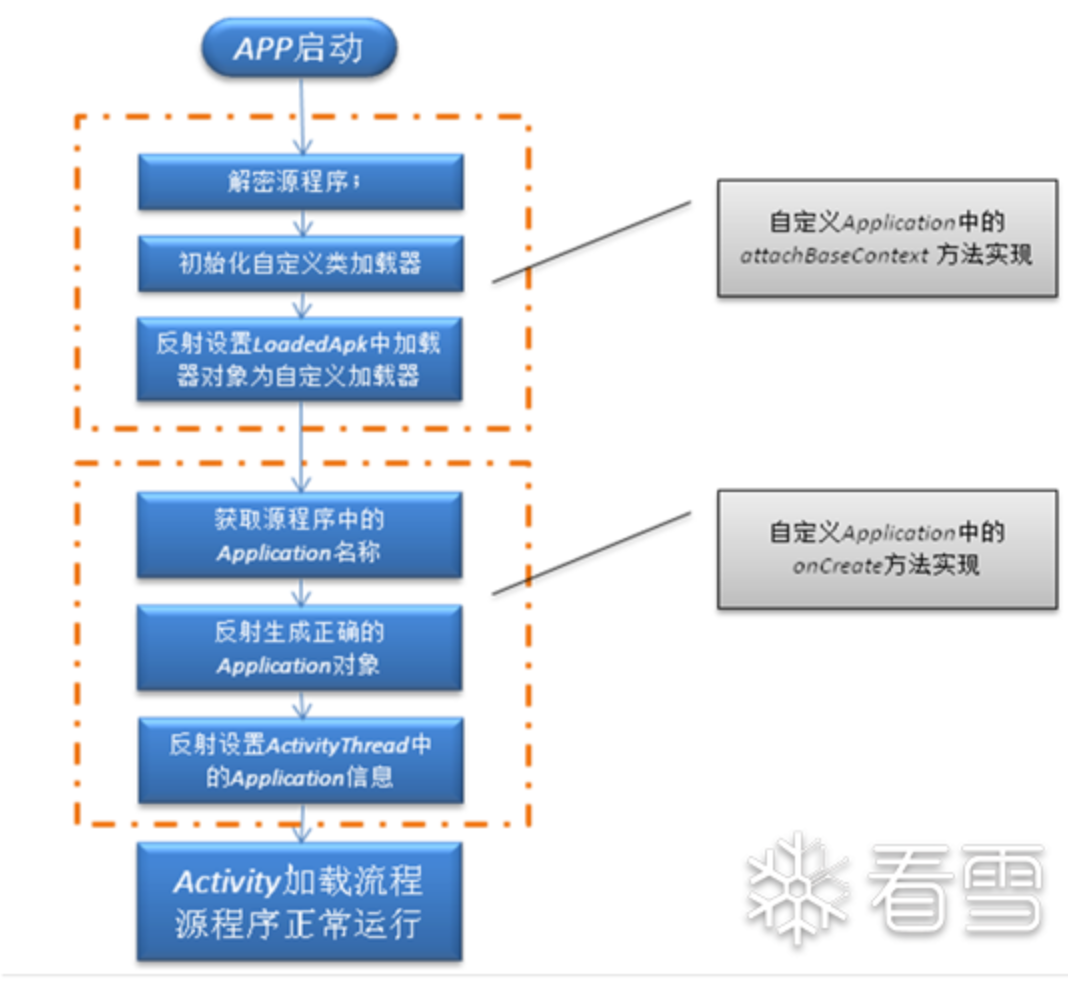
这里再补充解释一下 mClassLoader 和 Application::onCreate:
- mClassLoader 是 Android 系统内部 LoadedApk 对象的一个字段,它表示这个 APK 对应的 类加载器(ClassLoader);在 Android 中,每个 APK 都有一个 LoadedApk 对象,里面包含:APK 的路径、资源(Resources)、类加载器(ClassLoader)–> mClassLoader;功能:系统通过 mClassLoader 去加载 APK 里的类(Java/DEX 类),包括 Activity、Service、Application 等,默认情况下,mClassLoader 是 PathClassLoader,加载 APK 自带的 dex 文件。
- Application::onCreate() 是 Application 生命周期的第一个回调函数,在 attach() 后调用;功能:执行全局初始化逻辑,例如,初始化 SDK、设置全局单例、加载配置,这是应用在启动时的“第一个执行点”,比任何 Activity 的
onCreate()都早。
一代壳-整体加固(落地加载)
一代加固是所有加固的基础,了解一代加固的基本思路有助于理解后续加固技术的演进。
原理:
主要涉及三个对象:
1. 待加固的源程序APK;
1. (脱)壳程序APK 负责加载,解密和执行被保护的源程序;
1. 加壳程序 负责解析源程序并利用壳程序对其进行加固保护,将壳程序和源程序合并为新的程序。
加壳后的 壳 Dex 文件示意图如下: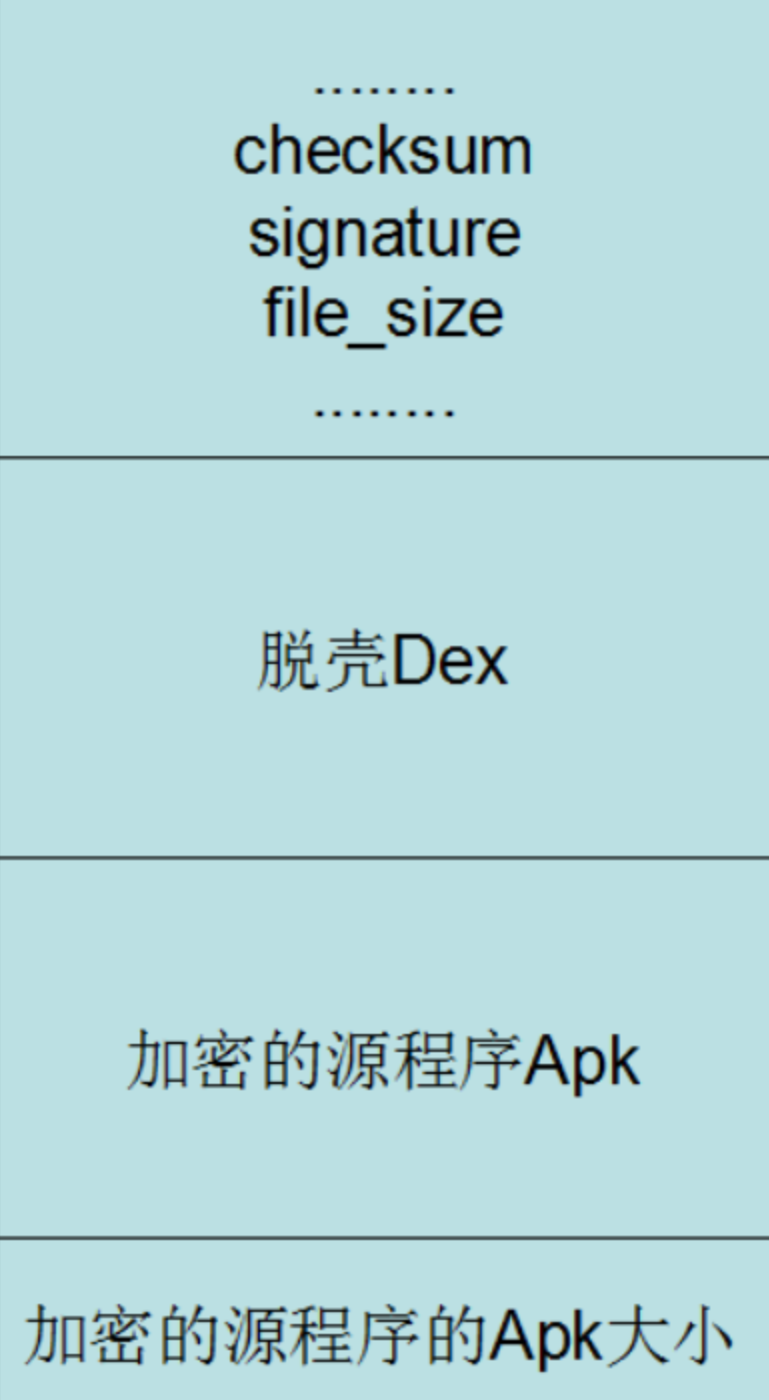
最终新 APK 中包括以下内容:
1. 修改过的 AndroidManifest.xml;
1. 由壳 Dex 和 源 APK 合并而来的 class.dex;
1. 源 APK 的所有其他资源文件(包括 lib、assets、resources 等)。
(脱)壳程序:
1. 在壳程序 dex 末尾追加源程序的所有 dex;
1. 在壳程序 Application 的 **attachBaseContext** 方法释放源程序所有 dex 并替换 mClassLoader;
1. 在壳程序 Application 的 onCreate 方法注册源程序 Application 并开始生命周期。
源程序
源程序即一般的用户程序,我们的主要目的是对源程序进行加固保护,所以需要注意源程序可能涉及到的技术点:
- 源程序自定义 Application
Application.attachBaseContext 是 APP 进程真正的入口点。如果源程序没有使用自定义Application,则可以直接复用壳程序 Application;如果源程序有自定义Application,则一定要在 AndroidManifest.xml 文件中 由
- Native
源程序使用NDK开发时会生成lib文件夹和对应so文件,需要进行处理;主要是创建lib库的释放文件夹,提供给新的 ClassLoader。
源程序主要包括以下文件:
	1. MainActivity.java
	2. MyApplication.java
	3. native-lib.cpp
	4. AndroidManifest.xml
	5. activity_main.xml
注意关闭Multidex支持,保证只编译出一个Dex文件
MainActivity.java
主要功能:
1. Java 层组件 TextView
1. Native 层 JNI 函数调用
注意点:
1. MainActivity 继承自 **Activity 类**而非 AppCompatActivity,这一步是为了方便资源处理;
1. 使用到了 native 函数,所以要处理 lib 文件夹;
1. 关闭 MultiDex 支持,只生成一个 dex 文件便于处理。
package com.example.sourcecodeforshell1;

import androidx.appcompat.app.AppCompatActivity;

import android.os.Bundle;
import android.util.Log;
import android.widget.TextView;

import com.example.sourcecodeforshell1.databinding.ActivityMainBinding;

public class MainActivity extends AppCompatActivity {

    static {
        System.loadLibrary("sourcecodeforshell1");
    }
    @Override
    protected void onCreate(Bundle savedInstanceState) {
        super.onCreate(savedInstanceState);
        setContentView(R.layout.activity_main);

        String hint = stringFromJNI();

        TextView tv = (TextView) findViewById(R.id.sample_text);
        tv.setText(hint);

        Log.d("NshIdE", "Run source MainActivity.onCreate " + this);
    }

    public native String stringFromJNI();
}
MyApplication.java
主要功能:log 输出便于定位执行流程
注意:
		1. 程序执行的顺序为 Application.attachBaseContext --> Application.onCreate() --> MainActivity.onCreate();
		2. 该类主要用于模拟存在自定义 Application 的情况。如果源程序不存在自定义 Application
		3. 使用默认的 Application 即可,否则需要解析 Application 并进行创建和替换。
package com.example.sourcecodeforshell1;

import android.app.Application;
import android.content.Context;
import android.util.Log;

public class MyApplication extends Application {

    @Override
    protected void attachBaseContext(Context base) {
        super.attachBaseContext(base);
        Log.d("NshIdE", "Run source MyApplication.attachBaseContext " + this);
    }

    @Override
    public void onCreate() {
        super.onCreate();
        Log.d("NshIdE", "Run source MyApplication.onCreate " + this);
    }

}
native-lib.cpp
定义了静态注册的方法 stringFromJNI
#include <jni.h>
#include <string>

extern "C" JNIEXPORT jstring JNICALL
Java_com_example_sourcecodeforshell1_MainActivity_stringFromJNI(
        JNIEnv* env,
        jobject /* this */) {
    std::string hello = "Hello from C++";
    return env->NewStringUTF(hello.c_str());
}
AndroidManifest.xml
主要功能:
	1. 指定根 activity 为 MainActivity
	1. 指定 android:name 为 MyApplication
<?xml version="1.0" encoding="utf-8"?>
<manifest xmlns:android="http://schemas.android.com/apk/res/android"
    xmlns:tools="http://schemas.android.com/tools">

    <application
        android:allowBackup="true"
        android:dataExtractionRules="@xml/data_extraction_rules"
        android:fullBackupContent="@xml/backup_rules"
        android:icon="@mipmap/ic_launcher"
        android:label="@string/app_name"
        android:roundIcon="@mipmap/ic_launcher_round"
        android:supportsRtl="true"
        android:theme="@style/Theme.SourceCodeForShell1"
        android:name=".MyApplication">
        <activity
            android:name=".MainActivity"
            android:exported="true">
            <intent-filter>
                <action android:name="android.intent.action.MAIN" />

                <category android:name="android.intent.category.LAUNCHER" />
            </intent-filter>
        </activity>
    </application>

</manifest>
activity_main.xml
这个就没改动了,就是 Android studio 默认初始化的
<?xml version="1.0" encoding="utf-8"?>
<androidx.constraintlayout.widget.ConstraintLayout xmlns:android="http://schemas.android.com/apk/res/android"
    xmlns:app="http://schemas.android.com/apk/res-auto"
    xmlns:tools="http://schemas.android.com/tools"
    android:layout_width="match_parent"
    android:layout_height="match_parent"
    tools:context=".MainActivity">

    <TextView
        android:id="@+id/sample_text"
        android:layout_width="wrap_content"
        android:layout_height="wrap_content"
        android:text="Hello World!"
        app:layout_constraintBottom_toBottomOf="parent"
        app:layout_constraintEnd_toEndOf="parent"
        app:layout_constraintStart_toStartOf="parent"
        app:layout_constraintTop_toTopOf="parent" />

</androidx.constraintlayout.widget.ConstraintLayout>
以上就是源程序。
加壳程序
加壳程序主要需要完成以下工作:
- 解包 壳程序和源程序。得到壳程序的 dex 以及源程序的 AndroidManifest.xml 和资源文件等;
- 复制源程序解包后的文件到新 APK 临时目录(忽略部分文件);
- 处理源程序 AndroidManifest.xml 写入新 APK 临时目录。判断是否存在 application 标签的 name 属性指定了自定义的 Application,若存在则添加 meta-data 标签保存原始 application,无论是否存在都要指定 name 值为壳的 Application;
- 合并壳 dex 和源程序 APK 写入新 APK 临时目录;
- 重打包新的 APK;
- 对新 APK 签名
- 删除临时目录。
FirstShell.py
- 封装 Path 类,保存全局使用到的路径,主要是 APK 路径和临时目录;
- 封装 Apkktool 类,通过 apktool 提供的 APK 解包和打包功能,通过 uber-apk-signer 提供 apk 签名功能;
- 封装 ManifestEditor 类,提供 ManifestEditor 解析功能,支持获取和修改标签属性,添加新标签;
- combineShellDexAndSrcApk 合并壳 dex 和源 APK。将原 APK 加密后填充到 壳 dex 后方,并添加 4 字节标识 APK 大小。故,新 dex = 壳dex + 加密后的原 APK + 原 APK 大小;
- handleManifest 处理 AndroidManifest.xml。分别提取原 APK 和壳的 AndroidManifest 文件,以源 manifest 为基准,根据原 APK 是否指定自定义 application 确定是否添加 meta-data 标签保存,最后修改 application:name 为 壳 application;
- start 完整的处理函数。
from zlib import adler32
from hashlib import sha1
from binascii import unhexlify
from lxml import etree
import subprocess
import shutil
from pathlib import Path
import argparse

#封装 path 类,保存全局需要用到的路径
class Paths:
    def __init__(self, srcApk:Path, shellApk:Path, outputApk:Path):
        # Apk file paths
        self.srcApkPath = srcApk.resolve()  #解析为绝对路径
        self.shellApkPath = shellApk.resolve()
        self.newApkPath = outputApk.resolve()

        # 临时目录路径为python文件路径
        self.tmpdir = Path(__file__).parent / 'temp'
        self.srcApkTempDir = self.tmpdir / 'srcApkTemp'
        self.shellApkTempDir = self.tmpdir / 'shellApkTemp'
        self.newApkTempDir = self.tmpdir / 'newApkTemp'

# ApkTool 类 提供解包,打包,签名功能
class Apktool:
    def __init__(self):
        self.apktool_path = Path(__file__).parent.parent / 'tools/apktool/apktool.bat'
        self.signer_path = Path(__file__).parent / 'tools/uber-apk-signer-1.3.0.jar'

    def signApk(self, unsignedApkPath:Path):
        self.runCommand(['java', '-jar', self.signer_path, '--apk', unsignedApkPath])

    # 使用 aoktool 解包 apk,只解包资源不解包 dex
    def extractApk(self, apkPath:Path, outputDir:Path):
        self.runCommand([self.apktool_path, 'd', apkPath, '-s', '-o', outputDir])

    # 重打包 apk
    def repackApk(self, inputDir:Path, outApk:Path):
        self.runCommand([self.apktool_path, 'b', inputDir, '-o', outApk])

    def runCommand(self, args):
        #仅调用工具,不需要输出,重定向stdout到os.devnull
        subprocess.run(args, stdout=subprocess.DEVNULL)
        #参数列表 捕获输出 输出转为字符串
        print(subprocess.run(args, capture_output=True).stdout)

# AndroidManifest.xml的editor 用于获取和修改标签属性以及添加标签
class ManifestEditor:
    def __init__(self, xml_content: bytes):
        self.ns = {'android': 'http://schemas.android.com/apk/res/android'}
        self.tree = etree.fromstring(xml_content)

    #获取指定标签的android属性值 examples: get_attr('application', 'name') get_attr('activity'. 'name')
    def getTagAttribute(self, tag_name: str, attr_name: str):
        if tag_name == 'manifest':  #根标签特殊处理
            elem = self.tree
            if elem is not None:
                return elem.get(f'{attr_name}')   # 寻找标签的属性
        else:
            elem = self.tree.find(f'.//{tag_name}', namespaces=self.ns)
            if elem is not None:
                #根标签之外的属性位于Android命名空间下
                return elem.get(f'{{{self.ns["android"]}}}{attr_name}')
        return None

    #设置指定标签的属性值
    #example set_attr('application', 'name', 'com.example.ProxyApplication')
    def setTagAttribute(self, tag_name: str, attr_name: str, new_value: str):
        if tag_name == 'manifest':   #根标签特殊处理
            elem = self.tree
            if elem is not None:
                return elem.set(f'{attr_name}', new_value)  #设置属性值
        else:
            elem = self.tree.find(f'.//{tag_name}', namespaces=self.ns)
            if elem is not None:
                elem.set(f'{{{self.ns["android"]}}}{attr_name}', new_value)
                return True
        return False

    # 在指定父标签下添加新子标签
    # example: add_tag('application',"meta-data",{'name': 'android.permission.CAMERA','value':'hello'})
    def addTagWithAttribute(self, parent_tag: str, new_tag: str, attrs: dict):
        if parent_tag == 'manifest':
            parent = self.tree
            if parent is not None:
                new_elem = etree.SubElement(parent, new_tag)
                for k, v in attrs.items(): #支持一次给添加的标签设置多个属性
                    new_elem.set(f'{k}', v)
                return True
        else:
            parent = self.tree.find(f'.//{parent_tag}', namespaces=self.ns)
            if parent is not None:
                new_elem = etree.SubElement(parent, new_tag)
                for k, v in attrs.items():
                    new_elem.set(f'{{{self.ns["android"]}}}{k}', v)
                return True
        return False

    # 不以壳manifest为基准操作则用不到该函数,以源apk的manifest为基准自带,无需额外设置
    def getMainActivity(self):
        activities = self.tree.findall('.//activity', namespaces=self.ns)
        for activity in activities:
            intent_filters = activity.findall('.//intent-filter', namespaces=self.ns)
            for intent_filter in intent_filters:
                action = intent_filter.find('.//action[@android:name="android.intent.action.MAIN"]', namespaces=self.ns)
                category = intent_filter.find('.//category[@android:name="android.intent.category.LAUNCHER"]',
                                              namespaces=self.ns)
                if action is not None and category is not None:
                    return activity.get(f'{{{self.ns["android"]}}}name')
        return None

    def getApplication(self):
        return self.getTagAttribute('application', 'name')

    def setApplication(self, application: str):
        self.setTagAttribute('application', 'name', application)

    def addMetaData(self, name: str, value: str):
        self.addTagWithAttribute('application', 'meta-data', {'name': name, 'value': value})

    def getManifestData(self):
        """返回XML字符串"""
        return etree.tostring(self.tree, pretty_print=True, encoding='utf-8', xml_declaration=True).decode()

# 合并壳dex和源apk
def combineShellDexAndSrcApk(sourceApkPath:Path, shellApkTempDir:Path, newApkTempDir:Path):
    def fixCheckSum(dexBytesArray):
        # dexfile[8:12]
        # 小端存储
        value = adler32(bytes(dexBytesArray[12:]))
        valueArray = bytearray(value.to_bytes(4, 'little'))
        for i in range(len(valueArray)):
            dexBytesArray[8 + i] = valueArray[i]

    def fixSignature(dexBytesArray):
        # dexfile[12:32]
        sha_1 = sha1()
        sha_1.update(bytes(dexBytesArray[32:]))
        value = sha_1.hexdigest()
        valueArray = bytearray(unhexlify(value))
        for i in range(len(valueArray)):
            dexBytesArray[12 + i] = valueArray[i]

    def fixFileSize(dexBytesArray, fileSize):
        # dexfile[32:36]
        # 小端存储
        fileSizeArray = bytearray(fileSize.to_bytes(4, "little"))
        for i in range(len(fileSizeArray)):
            dexBytesArray[32 + i] = fileSizeArray[i]

    def encrypto(file):
        for i in range(len(file)):
            file[i] ^= 0xff
        return file

    # 获取源apk
    with open(sourceApkPath, 'rb') as f:
        SourceApkArray = bytearray(f.read())
    # 获取shelldex
    with open(shellApkTempDir / 'classes.dex', 'rb') as f:
        shellDexArray = bytearray(f.read())

    SourceApkLen = len(SourceApkArray)
    shellDexLen = len(shellDexArray)

    # 新的dex文件长度
    newDexLen = shellDexLen + SourceApkLen + 4
    # 加密源文件
    enApkArray = encrypto(SourceApkArray)
    # 新的dex文件内容 = 壳dex + 加密的源apk + 四字节标识加密后源apk大小长度
    newDexArray = shellDexArray + enApkArray + bytearray(SourceApkLen.to_bytes(4, 'little'))

    # 修改filesize
    fixFileSize(newDexArray, newDexLen)
    # 修改signature
    fixSignature(newDexArray)
    # 修改checksum
    fixCheckSum(newDexArray)
    # 导出文件
    with open(newApkTempDir / 'classes.dex', 'wb') as f:
        f.write(newDexArray)


# 提取源apk的Manifest文件,修改application为壳application(可能添加meta-data标签),输出新的Manifest文件
def handleManifest(srcApkTempDir: Path, shellApkTempDir: Path, newApkTempDir: Path):
    # 从源apk提取AndroidManifest.xml
    with open(srcApkTempDir / 'AndroidManifest.xml', 'r') as f:
        srcManifestEditor = ManifestEditor(f.read().encode())
    srcApplication = srcManifestEditor.getApplication()

    # 从壳apk提取AndroidManifest.xml
    with open(shellApkTempDir / 'AndroidManifest.xml', 'r') as f:
        shellManifestEditor = ManifestEditor(f.read().encode())
    print('ShellApplication:', shellManifestEditor.getApplication())

    # 修改源AndroidManifest.xml的application为壳的代理application
    srcManifestEditor.setApplication(shellManifestEditor.getApplication())

    # 写入meta-data标签 保存源apk的原始application
    if srcApplication != None:
        print('Source application:', srcApplication)
        srcManifestEditor.addMetaData('APPLICATION_CLASS_NAME', srcApplication)

    # 输出新的AndroidManifest.xml
    with open(newApkTempDir / 'AndroidManifest.xml', 'w') as f:
        f.write(srcManifestEditor.getManifestData())


def start(paths: Paths):
    apktool = Apktool()
    # 1.分别解包源文件和壳文件到临时目录
    print('Extracting source and shell apk...')
    apktool.extractApk(paths.srcApkPath, paths.srcApkTempDir)
    print('Extract source apk success!')

    print('Extracting shell apk...')
    apktool.extractApk(paths.shellApkPath, paths.shellApkTempDir)
    print('Extract shell apk success!')

    # 2.复制源apk所有文件到新apk临时目录中
    print('Copying source apk files to new apk temp dir...')
    shutil.copytree(paths.srcApkTempDir, paths.newApkTempDir)
    print('Copy source apk files success!')

    # 3.处理AndroidManifest.xml
    print('Handling AndroidManifest.xml...')
    handleManifest(paths.srcApkTempDir, paths.shellApkTempDir, paths.newApkTempDir)
    print('Handle AndroidManifest.xml success!')

    # 4.合并壳dex和源apk并导出文件
    print('Combining shell dex and source apk...')
    combineShellDexAndSrcApk(paths.srcApkPath, paths.shellApkTempDir, paths.newApkTempDir)
    print('Combine shell dex and source apk success!')

    # 5.重打包apk
    print('Repacking apk...')
    apktool.repackApk(paths.newApkTempDir, paths.newApkPath)
    print('Repack apk success!')

    # 6.签名apk
    print('Signing apk...')
    apktool.signApk(paths.newApkPath)
    print('Resign apk success!')

    # 7.删除临时目录
    print('Deleting temp directories...')
    shutil.rmtree(paths.tmpdir)  # 删除临时目录
    print('Delete temp directories success!')


def main():
    parser = argparse.ArgumentParser(description="Android APK Packer")
    parser.add_argument('-src', '--src-apk', required=True, type=Path, help='Path to source APK file')
    parser.add_argument('-shell', '--shell-apk', required=True, type=Path, help='Path to shell APK file')
    parser.add_argument('-o', '-out', '--output-apk', type=Path,
                        help='Output path for packed APK (Default: ./out/<src-apk>_protected.apk)')
    args = parser.parse_args()
    if args.output_apk == None:
        args.output_apk = Path('./out') / (args.src_apk.stem + '_protected.apk')  # 默认新apk名称及输出路径
    paths = Paths(args.src_apk, args.shell_apk, args.output_apk)

    print('Source APK:', paths.srcApkPath)
    print('Shell APK:', paths.shellApkPath)
    print('Output APK:', paths.newApkPath)
    start(paths)


if __name__ == "__main__":
    main()
脱壳程序
FirstProxyApplication.java
注意关闭Multidex支持,保证只生成一个Dex文件。
attachBaseContext 中执行以下操作:
1. 创建私有目录,用于保存释放的 dex,lib,源 APK;
1. 调用 **readDexFromApk**, 从壳 APK 中提取壳 dex 文件,保存为字节数组;
1. 调用 **extractSrcApkFromShellDex** 从壳 dex 文件提取源程序 APK 文件,解包 lib 文件到 lib 私有目录;
1. 调用 **replaceClassLoader** 替换壳程序的 ClassLoader;新的 ClassLoader 指定了原 APK dex文件,lib 文件,odex 路径,也就是前面释放的原 APK 和原 lib
onCreate 调用了 replaceApplication
- 判断 manifest 文件是否通过 meta-data 标签保存了原 APK 的 application,如果原 APK 未指定 application,则使用默认的 application(即壳 application);
- 如果原 APK 指定了自定义 application,则创建对应实例,替换掉壳的 application,之后调用 onCreate 方法。
package com.example.androidshell1;

import android.app.Application;
import android.app.Instrumentation;
import android.content.Context;
import android.content.pm.ApplicationInfo;
import android.content.pm.PackageManager;
import android.os.Bundle;
import android.util.ArrayMap;
import android.util.Log;

import java.io.BufferedInputStream;
import java.io.ByteArrayOutputStream;
import java.io.File;
import java.io.FileInputStream;
import java.io.FileOutputStream;
import java.io.IOException;
import java.lang.ref.WeakReference;
import java.nio.ByteBuffer;
import java.nio.ByteOrder;
import java.util.ArrayList;
import java.util.Iterator;
import java.util.zip.ZipEntry;
import java.util.zip.ZipInputStream;

import dalvik.system.DexClassLoader;

public class FirstProxyApplication extends  Application {
    private static final String TAG = "NshIdE";
    private String apkPath;
    private String dexPath;
    private String libPath;
    public void log(String message){Log.d(TAG, message);}
    @Override
    protected void attachBaseContext(Context base) {
        super.attachBaseContext(base);
        log("FirstProxyApplication.attachBaseContext() running!");
        try {
            //1.创建私有目录,保存dex,lib和源apk 具体路径为data/user/0/<package_name>/app_tmp_dex
            File dex = getDir("tmp_dex", MODE_PRIVATE);
            File lib = getDir("tmp_lib", MODE_PRIVATE);
            dexPath = dex.getAbsolutePath();
            libPath = lib.getAbsolutePath();
            apkPath = dex.getAbsolutePath() + File.separator + "Source.apk";
            log("dexPath: " + dexPath);
            log("libPath: " + libPath);
            log("apkPath: " + apkPath);

            // 根据文件路径创建File对象
            File apkFile = new File(apkPath);
            // 只有首次运行时需要创建相关文件
            if (!apkFile.exists()) {
                // 根据路径创建文件
                apkFile.createNewFile();
                //读取Classes.dex文件
                byte[] shellDexData = readDexFromApk();
                //从中分离出源apk文件
                extractSrcApkFromShellDex(shellDexData);
            }
            //配置加载源程序的动态环境,即替换mClassLoader
            replaceClassLoader();
        } catch (Exception e) {
            Log.getStackTraceString(e);
        }
    }
    // 从当前程序的apk读取dex文件并存储为字节数组
    private byte[] readDexFromApk() throws IOException {
        //1.获取当前应用程序的源码路径(apk),一般是data/app目录下,该目录用于存放用户安装的软件
        String sourceDir = this.getApplicationInfo().sourceDir;
        log("this.getApplicationInfo().sourceDir: " +sourceDir);

        //2.创建相关输入流
        FileInputStream fileInputStream = new FileInputStream(sourceDir);
        BufferedInputStream bufferedInputStream = new BufferedInputStream(fileInputStream);
        ZipInputStream zipInputStream = new ZipInputStream(bufferedInputStream); //用于解析apk文件

        ByteArrayOutputStream byteArrayOutputStream = new ByteArrayOutputStream(); //用于存放dex文件

        //3.遍历apk的所有文件并提取dex文件
        ZipEntry zipEntry;
        while((zipEntry = zipInputStream.getNextEntry()) != null){ //存在下一个文件
            // 将classes.dex文件存储到bytearray中 壳dex和源apk合并后只保留一个dex便于处理
            if (zipEntry.getName().equals("classes.dex")){
                byte[] bytes = new byte[1024];
                int num;
                while((num = zipInputStream.read(bytes))!=-1){      //每次读取1024byte,返回读取到的byte数
                    byteArrayOutputStream.write(bytes,0, num); //存放到开辟的byteArrayOutputStream中
                }
            }
            zipInputStream.closeEntry(); //关闭当前文件
        }
        zipInputStream.close();

        log("Read dex from apk succeed!");
        return byteArrayOutputStream.toByteArray(); //将读取到的dex文件以字节数组形式返回
    }

    // 从壳dex文件中提取源apk并解析
    private void extractSrcApkFromShellDex(byte[] shellDexData) throws IOException {
        int shellDexLen = shellDexData.length;
        //开始解析dex文件
        //1.读取源apk的大小
        byte[] srcApkSizeBytes = new byte[4];
        System.arraycopy(shellDexData, shellDexLen - 4, srcApkSizeBytes,0,4);
        int srcApkSize =ByteBuffer.wrap(srcApkSizeBytes).order(ByteOrder.LITTLE_ENDIAN).getInt();//转成bytebuffer,方便4 bytes转int 将bytes转成int,加壳时,长度按小端存储

        //2.读取源apk
        byte[] sourceApkData = new byte[srcApkSize];
        System.arraycopy(shellDexData, shellDexLen - srcApkSize - 4, sourceApkData, 0, srcApkSize);//注意减4

        //3.解密源apk
        sourceApkData = decrypt(sourceApkData);
        //写入新建的apk文件中
        File apkfile = new File(apkPath);
        try {
            FileOutputStream apkfileOutputStream = new FileOutputStream(apkfile);
            apkfileOutputStream.write(sourceApkData);
            apkfileOutputStream.close();
        }catch (IOException e){
            throw new IOException(e);
        }

        //分析源apk,取出so文件放入libPath目录中
        FileInputStream fileInputStream = new FileInputStream(apkfile);
        BufferedInputStream bufferedInputStream = new BufferedInputStream(fileInputStream);
        ZipInputStream zipInputStream = new ZipInputStream(bufferedInputStream);
        ZipEntry nextEntry;
        while ((nextEntry=zipInputStream.getNextEntry())!=null){
            String name = nextEntry.getName();
            if (name.startsWith("lib/") && name.endsWith(".so")){
                //获取文件名并创建相应文件
                String[] nameSplit = name.split("/");
                String soFileStorePath = libPath + File.separator + nameSplit[nameSplit.length - 1];
                File storeFile = new File(soFileStorePath);
                storeFile.createNewFile();

                //读数据到相应so文件中
                FileOutputStream fileOutputStream = new FileOutputStream(storeFile);
                byte[] bytes = new byte[1024];
                int num;
                while((num = zipInputStream.read(bytes))!=-1){
                    fileOutputStream.write(bytes,0,num);
                }
                fileOutputStream.flush();
                fileOutputStream.close();
            }
            zipInputStream.closeEntry();
        }
        zipInputStream.close();
    }

    // 解密函数
    private byte[] decrypt(byte[] data) {
        for (int i = 0; i < data.length; i++){
            data[i] ^= (byte) 0xff;
        }
        return data;
    }

    // 替换壳App的ClassLoader为源App的ClassLoader
    private void replaceClassLoader() {
        //1.获取当前的classloader
        ClassLoader classLoader = this.getClassLoader();
        log("Current ClassLoader: " + classLoader.toString());
        log("Parent ClassLoader: " + classLoader.getParent().toString());

        //2.反射获取ActivityThread
        Object sCurrentActivityThreadObj = Reflection.getStaticField("android.app.ActivityThread","sCurrentActivityThread");
        log("ActivityThread.sCurrentActivity: " + sCurrentActivityThreadObj.toString());

        //3.反射获取LoadedApk
        //获取当前ActivityThread实例的mPackages字段 类型为ArrayMap<String, WeakReference<LoadedApk>>, 里面存放了当前应用的LoadedApk对象
        ArrayMap mPackagesObj = (ArrayMap) Reflection.getField("android.app.ActivityThread",sCurrentActivityThreadObj,"mPackages");
        log( "mPackagesObj: " + mPackagesObj.toString());

        //获取mPackages中的当前应用包名
        String currentPackageName = this.getPackageName();
        log("currentPackageName: " + currentPackageName);

        // 获取loadedApk实例也有好几种,mInitialApplication mAllApplications mPackages
        // 通过包名获取当前应用的loadedApk实例
        WeakReference weakReference = (WeakReference) mPackagesObj.get(currentPackageName);
        Object loadedApkObj = weakReference.get();
        log( "LoadedApk: " + loadedApkObj.toString());

        //4.替换ClassLoader
        DexClassLoader dexClassLoader = new DexClassLoader(apkPath,dexPath,libPath, classLoader.getParent()); //动态加载源程序的dex文件,以当前classloader的父加载器作为parent
        Reflection.setField("android.app.LoadedApk","mClassLoader",loadedApkObj,dexClassLoader); //替换当前loadedApk实例中的mClassLoader字段
        log("New DexClassLoader: " + dexClassLoader);
    }

    //替换壳程序LoadedApk的Application为源程序Application,并调用其onCreate方法
    public boolean replaceApplication(){
        // Application实例存在于: LoadedApk.mApplication
        // 以及ActivityThread的mInitialApplication和mAllApplications和mBoundApplication

        //判断源程序是否使用自定义Application 若使用则需要进行替换,若未使用则直接返回,使用壳的默认Application即可

        String appClassName = null; //源程序的Application类名
        try {
            //获取AndroidManifest.xml 文件中的 <meta-data> 元素
            ApplicationInfo applicationInfo = getPackageManager().getApplicationInfo(this.getPackageName(), PackageManager.GET_META_DATA);
            Bundle metaData = applicationInfo.metaData;
            //获取xml文件声明的Application类
            if (metaData != null && metaData.containsKey("APPLICATION_CLASS_NAME")){
                appClassName = metaData.getString("APPLICATION_CLASS_NAME");
            } else {
                log("源程序中没有自定义Application");
                return false; //如果不存在直接返回,使用壳的application即可
            }
        } catch (PackageManager.NameNotFoundException e) {
            log(Log.getStackTraceString(e));
        }

        //源程序存在自定义application类,开始替换
        log("Try to replace Application");

        //1.反射获取ActivityThread实例
        Object sCurrentActivityThreadObj = Reflection.getStaticField("android.app.ActivityThread","sCurrentActivityThread");
        log("ActivityThread: " + sCurrentActivityThreadObj.toString());

        //2.获取并设置LoadedApk
        //获取mBoundApplication (AppBindData对象)
        Object mBoundApplicationObj = Reflection.getField("android.app.ActivityThread",sCurrentActivityThreadObj,"mBoundApplication") ;
        log("mBoundApplication: "+mBoundApplicationObj.toString());
        //获取mBoundApplication.info (即LoadedApk)
        Object infoObj = Reflection.getField("android.app.ActivityThread$AppBindData",mBoundApplicationObj,"info");
        log( "LoadedApk: " + infoObj.toString());
        //把LoadedApk的mApplication设置为null,这样后续才能调用makeApplication() 否则由于已存在Application,无法进行替换
        Reflection.setField("android.app.LoadedApk","mApplication",infoObj,null);

        //3.获取ActivityThread.mInitialApplication 即拿到旧的Application(对于要加载的Application来讲)
        Object mInitialApplicationObj = Reflection.getField("android.app.ActivityThread",sCurrentActivityThreadObj,"mInitialApplication");
        log("mInitialApplicationObj: " + mInitialApplicationObj.toString());

        //4.获取ActivityThread.mAllApplications并删除旧的application
        ArrayList<Application> mAllApplicationsObj = (ArrayList<Application>) Reflection.getField("android.app.ActivityThread",sCurrentActivityThreadObj,"mAllApplications");
        mAllApplicationsObj.remove(mInitialApplicationObj);
        log("mInitialApplication 从 mAllApplications 中移除成功");

        //5.重置相关类的Application类名 便于后续创建Application
        //获取LoadedApk.mApplicationInfo
        ApplicationInfo applicationInfo = (ApplicationInfo) Reflection.getField("android.app.LoadedApk",infoObj,"mApplicationInfo");
        log( "LoadedApk.mApplicationInfo: " + applicationInfo.toString());
        //获取mBoundApplication.appInfo
        ApplicationInfo appinfoInAppBindData = (ApplicationInfo) Reflection.getField("android.app.ActivityThread$AppBindData",mBoundApplicationObj,"appInfo");
        log("ActivityThread.mBoundApplication.appInfo: " + appinfoInAppBindData.toString());
        //此处通过引用修改值,虽然后续没有使用,但是实际上是修改其指向的LoadedApk相关字段的值
        //设置两个appinfo的classname为源程序的application类名,以便后续调用makeApplication()创建源程序的application
        applicationInfo.className = appClassName;
        appinfoInAppBindData.className = appClassName;
        log("Source Application name: " + appClassName);


        //6.反射调用makeApplication方法创建源程序的application
        Application application = (Application) Reflection.invokeMethod("android.app.LoadedApk","makeApplication",infoObj,new Class[]{boolean.class, Instrumentation.class},new Object[]{false,null}); //使用源程序中的application
        //Application app = (Application)ReflectionMethods.invokeMethod("android.app.LoadedApk","makeApplication",infoObj,new Class[]{boolean.class, Instrumentation.class},new Object[]{true,null}); //使用自定义的application 强制为系统默认
        log("Create source Application succeed: "+application);

        //7.重置ActivityThread.mInitialApplication为新的Application
        Reflection.setField("android.app.ActivityThread","mInitialApplication",sCurrentActivityThreadObj,application);
        log("Reset ActivityThread.mInitialApplication by new Application succeed!");

        //8.ContentProvider会持有代理的Application,需要特殊处理一下
        ArrayMap mProviderMap = (ArrayMap) Reflection.getField("android.app.ActivityThread",sCurrentActivityThreadObj,"mProviderMap");
        log("ActivityThread.mProviderMap: " + mProviderMap);

        //获取所有provider,装进迭代器中遍历
        Iterator iterator = mProviderMap.values().iterator();
        while(iterator.hasNext()){
            Object providerClientRecord = iterator.next();
            //获取ProviderClientRecord.mLocalProvider,可能为空
            Object mLocalProvider = Reflection.getField("android.app.ActivityThread$ProviderClientRecord",providerClientRecord,"mLocalProvider") ;
            if(mLocalProvider != null){
                log("ProviderClientRecord.mLocalProvider: " + mLocalProvider);
                //获取ContentProvider中的mContext字段,设置为新的Application
                Reflection.setField("android.content.ContentProvider","mContext",mLocalProvider,application);
            }
        }

        log( "Run Application.onCreate" );
        application.onCreate(); //源程序,启动!
        return true;
    }
    @Override
    public void onCreate() {
        super.onCreate();
        log("ProxyApplication.onCreate() is running!");
        if(replaceApplication())
            log("Replace application succeed!");
    }
}
Reflection.java
package com.example.androidshell1;

import android.util.Log;

import java.lang.reflect.Field;
import java.lang.reflect.Method;

public class Reflection {
    private static final String TAG = "NshIdE";
    public static Object invokeStaticMethod(String class_name,String method_name,Class<?>[] parameterTypes,Object[] parameterValues){
        try {
            Class<?> clazz = Class.forName(class_name); //反射获取Class类对象
            Method method = clazz.getMethod(method_name,parameterTypes);//反射获取方法
            method.setAccessible(true);//突破权限访问控制
            return method.invoke(null,parameterValues);//反射调用,静态方法无需指定所属实例,直接传参即可
        }catch (Exception e){
            Log.d(TAG, e.toString());
            return null;
        }
    }

    public static Object invokeMethod(String class_name,String method_name,Object obj,Class<?>[] parameterTypes,Object[] parameterValues)
    {
        try {
            Class<?> clazz = Class.forName(class_name);
            Method method = clazz.getMethod(method_name,parameterTypes);
            method.setAccessible(true);//突破权限访问控制
            return method.invoke(obj,parameterValues);// 反射调用,动态方法需要指定所属实例
        }catch (Exception e)
        {
            Log.d(TAG, e.toString());
            return null;
        }
    }

    public static Object getField(String class_name,Object obj,String field_name)
    {
        try {
            Class<?> clazz = Class.forName(class_name);
            Field field = clazz.getDeclaredField(field_name);
            field.setAccessible(true);
            return field.get(obj);  //获取实例字段,需要指定实例对象
        }catch(Exception e)
        {
            Log.d(TAG, e.toString());
            return null;
        }
    }

    public static Object getStaticField(String class_name,String field_name)
    {
        try {
            Class<?> clazz = Class.forName(class_name);
            Field field = clazz.getDeclaredField(field_name);
            field.setAccessible(true);
            return field.get(null);
        }catch (Exception e)
        {
            Log.d(TAG, e.toString());
            return null;
        }
    }

    public static void setField(String class_name,String field_name,Object obj,Object value)
    {
        try {
            Class<?> clazz = Class.forName(class_name);
            Field field = clazz.getDeclaredField(field_name);
            field.setAccessible(true);
            field.set(obj,value);
        }catch (Exception e)
        {
            Log.d(TAG, e.toString());
        }
    }

    public static void setStaticField(String class_name,String field_name,Object value)
    {
        try {
            Class<?> clazz = Class.forName(class_name);
            Field field = clazz.getDeclaredField(field_name);
            field.setAccessible(true);
            field.set(null,value);
        }catch (Exception e){
            Log.d(TAG, e.toString());
        }
    }
}
AndroidManifest.xml
<?xml version="1.0" encoding="utf-8"?>
<manifest xmlns:android="http://schemas.android.com/apk/res/android"
    xmlns:tools="http://schemas.android.com/tools">

    <application
        android:allowBackup="true"
        android:dataExtractionRules="@xml/data_extraction_rules"
        android:fullBackupContent="@xml/backup_rules"
        android:icon="@mipmap/ic_launcher"
        android:label="@string/app_name"
        android:roundIcon="@mipmap/ic_launcher_round"
        android:supportsRtl="true"
        android:theme="@style/Theme.AndroidShell1"
        android:name="com.example.androidshell1.FirstProxyApplication">
    </application>

</manifest>
但是这里脚本略有问题,就是在加载原 APK 的 so 的时候,会存在覆盖的情况,也就是说每次打包加壳生成的 APK,只支持一种 ABI,尽管该 APK 的 lib 目录下有四种 ABI 对应的 so,但是在运行动态加载的时候 会出问题。
总结
整体加固——落地加载的核心思路就是将源程序 APK 和 壳 dex 进行合并,运行时动态解密并执行相关环境处理操作,重新执行原 APK 的代码。
优点:易于实现;
缺点:由于文件落地加载,所以非常容易在文件系统中获取到源程序 APK;两次加载原程序 APK 到内存,效率低。
二代壳-整体加固(不落地加载)
原理
针对落地加载的部分问题,引申出了不落地加载的思路: 即直接加载内存中的dex字节码,避免释放文件。
如何在内存中加载dex?Android 8 及以上系统中,可以使用系统提供的 InMemoryDexClassLoader 实现内存加载,Android7及以下则需要手动实现。
另外需要针对第一代加固不支持Multidex进行优化:源apk每个 dex 文件前添加 4 字节标识其大小,之后全部合并成一个文件再合并到壳 dex,最后添加 4 字节标识文件总大小。
结构如下: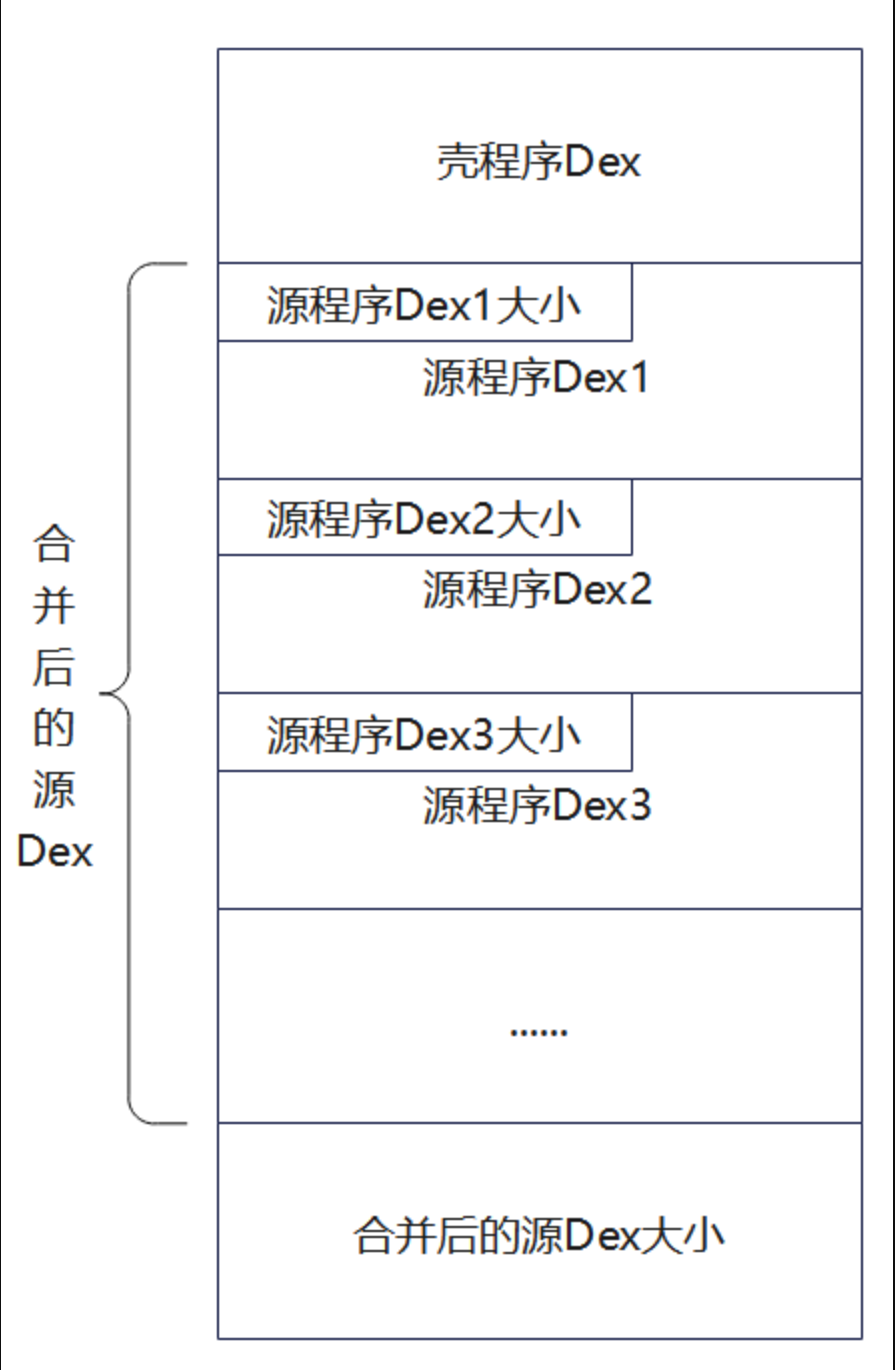
源程序
同一代加固,可开启Multidex支持,其他部分不变。
加壳程序
主要改动如下:
调用 combineShellAndSourceDexs 合并壳 dex 和源dex。内部调用 readAndCombineDexs 读取并合并源 apk 的多个 dex 为一个文件。
复制原 APK 文件时忽略 Manifest 和 dex 文件。
shutil.copytree(paths.srcApkTempDir,paths.newApkTempDir,ignore=shutil.ignore_patterns('AndroidManifest.xml','classes*.dex'))ManifeseEditor。添加 getEtractNativeLibs,获取application 标签的 android:extractNativeLibs 属性值
添加 resetExtractNativeLibs,重置extractNativeLibs=true 强制释放 lib 文件。
handleManifest。判断源程序 Manifest 是否设置了android:extractNativeLibs=”true”,若为 false(默认)则改为true。
from zlib import adler32
from hashlib import sha1
from binascii import unhexlify
from lxml import etree
import subprocess
import shutil
from pathlib import Path
import argparse


# 封装path类,保存全局用到的路径
class Paths:
    def __init__(self, srcApk: Path, shellApk: Path, outputApk: Path):
        # Apk file paths
        self.srcApkPath = srcApk.resolve()  # 解析为绝对路径
        self.shellApkPath = shellApk.resolve()
        self.newApkPath = outputApk.resolve()

        # Temp directories default python file path
        self.tmpdir = Path(__file__).parent / 'temp'
        self.srcApkTempDir = self.tmpdir / 'srcApkTemp'
        self.shellApkTempDir = self.tmpdir / 'shellApkTemp'
        self.newApkTempDir = self.tmpdir / 'newApkTemp'


# Apktool类 提供解包,打包,签名功能
class Apktool:
    def __init__(self):
        self.apktool_path = Path(__file__).parent.parent / 'tools/apktool/apktool.bat'
        self.signer_path = Path(__file__).parent / 'tools/uber-apk-signer-1.3.0.jar'

    def signApk(self, unsignedApkPath: Path):
        self.runCommand(['java', '-jar', self.signer_path, '--apk', unsignedApkPath])

    # 使用apktool解包apk 只解包资源不解包dex
    def extractApk(self, apkPath: Path, outputDir: Path):
        self.runCommand([self.apktool_path, 'd', apkPath, '-s', '-o', outputDir])

    # 重打包apk
    def repackApk(self, inputDir: Path, outApk: Path):
        self.runCommand([self.apktool_path, 'b', inputDir, '-o', outApk])

    def runCommand(self, args):
        subprocess.run(args, stdout=subprocess.DEVNULL)  # 仅调用工具,不需要输出,重定向stdout到os.devnull
        # 参数列表 捕获输出 输出转为字符串
        # print(subprocess.run(args,  capture_output=True,text=True).stdout)


# AndroidManifest.xml的editor 用于获取和修改标签属性,以及添加标签
class ManifestEditor:
    def __init__(self, xml_content: bytes):
        self.ns = {'android': 'http://schemas.android.com/apk/res/android'}
        self.tree = etree.fromstring(xml_content)

    # 获取指定标签的android属性值 examples: get_attr('application', 'name') get_attr('activity', 'name')
    def getTagAttribute(self, tag_name: str, attr_name: str):
        if tag_name == 'manifest':  # 根标签特殊处理
            elem = self.tree
            if elem is not None:
                return elem.get(f'{attr_name}')  # 寻找标签的属性
        else:
            elem = self.tree.find(f'.//{tag_name}', namespaces=self.ns)
            if elem is not None:
                return elem.get(f'{{{self.ns["android"]}}}{attr_name}')  # 根标签之外的属性位于android命名空间下
        return None

    # 设置指定标签的属性值 example:set_attr('application','name',"com.example.ProxyApplication")
    def setTagAttribute(self, tag_name: str, attr_name: str, new_value: str):
        if tag_name == 'manifest':  # 根标签特殊处理
            elem = self.tree
            if elem is not None:
                return elem.set(f'{attr_name}', new_value)  # 设置属性值
        else:
            elem = self.tree.find(f'.//{tag_name}', namespaces=self.ns)
            if elem is not None:
                elem.set(f'{{{self.ns["android"]}}}{attr_name}', new_value)
                return True
        return False

    # 在指定父标签下添加新子标签 example: add_tag('application',"meta-data",{'name': 'android.permission.CAMERA','value':'hello'})
    def addTagWithAttributes(self, parent_tag: str, new_tag: str, attrs: dict):
        if parent_tag == 'manifest':
            parent = self.tree
            if parent is not None:
                new_elem = etree.SubElement(parent, new_tag)
                for k, v in attrs.items():  # 支持一次给添加的标签设置多个属性
                    new_elem.set(f'{k}', v)
                return True
        else:
            parent = self.tree.find(f'.//{parent_tag}', namespaces=self.ns)
            if parent is not None:
                new_elem = etree.SubElement(parent, new_tag)
                for k, v in attrs.items():
                    new_elem.set(f'{{{self.ns["android"]}}}{k}', v)
                return True
        return False

    # 不以壳manifest为基准操作则用不到该函数,以源apk的manifest为基准自带,无需额外设置
    def getMainActivity(self):
        activities = self.tree.findall('.//activity', namespaces=self.ns)
        for activity in activities:
            intent_filters = activity.findall('.//intent-filter', namespaces=self.ns)
            for intent_filter in intent_filters:
                action = intent_filter.find('.//action[@android:name="android.intent.action.MAIN"]', namespaces=self.ns)
                category = intent_filter.find('.//category[@android:name="android.intent.category.LAUNCHER"]',
                                              namespaces=self.ns)
                if action is not None and category is not None:
                    return activity.get(f'{{{self.ns["android"]}}}name')
        return None

    def getApplication(self):
        return self.getTagAttribute('application', 'name')

    def setApplication(self, application: str):
        self.setTagAttribute('application', 'name', application)

    def addMetaData(self, name: str, value: str):
        self.addTagWithAttributes('application', 'meta-data', {'name': name, 'value': value})

    def getManifestData(self):
        """返回XML字符串"""
        return etree.tostring(self.tree, pretty_print=True, encoding='utf-8', xml_declaration=True).decode()

    def getEtractNativeLibs(self):
        """返回是否释放so文件"""
        return self.getTagAttribute('application', 'extractNativeLibs')

    def resetExtractNativeLibs(self):
        """重置etractNativeLibs属性为true"""
        self.setTagAttribute('application', 'extractNativeLibs', 'true')


# 合并壳dex和源apk的dex
def combineShellAndSourceDexs(shellApkTempDir: Path, srcApkTempDir: Path, newApkTempDir: Path):
    def fixCheckSum(dexBytesArray):
        # dexfile[8:12]
        # 小端存储
        value = adler32(bytes(dexBytesArray[12:]))
        valueArray = bytearray(value.to_bytes(4, 'little'))
        for i in range(len(valueArray)):
            dexBytesArray[8 + i] = valueArray[i]

    def fixSignature(dexBytesArray):
        # dexfile[12:32]
        sha_1 = sha1()
        sha_1.update(bytes(dexBytesArray[32:]))
        value = sha_1.hexdigest()
        valueArray = bytearray(unhexlify(value))
        for i in range(len(valueArray)):
            dexBytesArray[12 + i] = valueArray[i]

    def fixFileSize(dexBytesArray, fileSize):
        # dexfile[32:36]
        # 小端存储
        fileSizeArray = bytearray(fileSize.to_bytes(4, "little"))
        for i in range(len(fileSizeArray)):
            dexBytesArray[32 + i] = fileSizeArray[i]

    def encrypto(file):
        for i in range(len(file)):
            file[i] ^= 0xff
        return file

    def readAndCombineDexs(unpackedApkDir: Path):
        # 读取解包后的apk的所有dex文件,并合并为一个dex文件
        combinedDex = bytearray()
        # glob方法返回包含所有匹配文件的生成器
        for dex in unpackedApkDir.glob('classes*.dex'):
            print('Source Apk Dex file:', dex)
            with open(dex, 'rb') as f:
                data = bytearray(f.read())
                combinedDex += bytearray(len(data).to_bytes(4, 'little'))  # dex文件的长度,小端序
                combinedDex += data  # dex文件内容
        return combinedDex

    # 获取shelldex
    with open(shellApkTempDir / 'classes.dex', 'rb') as f:
        shellDexArray = bytearray(f.read())

    # 获取源apk的dex文件
    srcDexArray = readAndCombineDexs(srcApkTempDir)
    # 新的dex文件长度
    newDexLen = len(srcDexArray) + len(shellDexArray) + 4
    # 加密源文件
    encSrcDexArray = encrypto(srcDexArray)
    # 新的dex文件内容 = 壳dex + 加密的源dex + 四字节标识加密后源dex大小长度
    newDexArray = shellDexArray + encSrcDexArray + bytearray(len(encSrcDexArray).to_bytes(4, 'little'))

    # 修改filesize
    fixFileSize(newDexArray, newDexLen)
    # 修改signature
    fixSignature(newDexArray)
    # 修改checksum
    fixCheckSum(newDexArray)
    # 导出文件
    with open(newApkTempDir / 'classes.dex', 'wb') as f:
        f.write(newDexArray)


# 提取源apk的Manifest文件,修改application为壳application(可能添加meta-data标签),输出新的Manifest文件
def handleManifest(srcApkTempDir: Path, shellApkTempDir: Path, newApkTempDir: Path):
    # 从源apk提取AndroidManifest.xml
    with open(srcApkTempDir / 'AndroidManifest.xml', 'r') as f:
        srcManifestEditor = ManifestEditor(f.read().encode())
    srcApplication = srcManifestEditor.getApplication()
    srcExtractNativeLibs = srcManifestEditor.getEtractNativeLibs()
    print('SourceApplication:', srcApplication)
    print('SourceExtractNativeLibs:', srcExtractNativeLibs)

    # 从壳apk提取AndroidManifest.xml
    with open(shellApkTempDir / 'AndroidManifest.xml', 'r') as f:
        shellManifestEditor = ManifestEditor(f.read().encode())
    print('ShellApplication:', shellManifestEditor.getApplication())

    # 修改源AndroidManifest.xml的application为壳的代理application
    srcManifestEditor.setApplication(shellManifestEditor.getApplication())

    # 写入meta-data标签 保存源apk的原始application
    if srcApplication != None:
        print('Source application:', srcApplication)
        srcManifestEditor.addMetaData('APPLICATION_CLASS_NAME', srcApplication)

    # 如果源apk的manifest中默认设置etractNativeLibs=false,则重置为true,确保释放lib文件
    if srcExtractNativeLibs == 'false':
        srcManifestEditor.resetExtractNativeLibs()

    # 输出新的AndroidManifest.xml
    with open(newApkTempDir / 'AndroidManifest.xml', 'w') as f:
        f.write(srcManifestEditor.getManifestData())


def start(paths: Paths):
    apktool = Apktool()
    # 1.分别解包源文件和壳文件到临时目录
    print('Extracting source and shell apk...')
    apktool.extractApk(paths.srcApkPath, paths.srcApkTempDir)
    print('Extract source apk success!')

    print('Extracting shell apk...')
    apktool.extractApk(paths.shellApkPath, paths.shellApkTempDir)
    print('Extract shell apk success!')

    # 2.复制源apk所有文件到新apk临时目录中,忽略源dex和manifest文件
    print('Copying source apk files to new apk temp dir...')
    shutil.copytree(paths.srcApkTempDir, paths.newApkTempDir,
                    ignore=shutil.ignore_patterns('AndroidManifest.xml', 'classes*.dex'))
    print('Copy source apk files success!')

    # 3.处理AndroidManifest.xml
    print('Handling AndroidManifest.xml...')
    handleManifest(paths.srcApkTempDir, paths.shellApkTempDir, paths.newApkTempDir)
    print('Handle AndroidManifest.xml success!')

    # 4.合并壳dex和源apk并导出文件
    print('Combining shell dex and source dexs...')
    combineShellAndSourceDexs(paths.shellApkTempDir, paths.srcApkTempDir, paths.newApkTempDir)
    print('Combine shell dex and source dexs success!')

    # 5.重打包apk
    print('Repacking apk...')
    apktool.repackApk(paths.newApkTempDir, paths.newApkPath)
    print('Repack apk success!')

    # 6.签名apk
    print('Signing apk...')
    apktool.signApk(paths.newApkPath)
    print('Resign apk success!')

    # 7.删除临时目录
    print('Deleting temp directories...')
    shutil.rmtree(paths.tmpdir)  # 删除临时目录
    print('Delete temp directories success!')


def main():
    parser = argparse.ArgumentParser(description="Android APK Packer")
    parser.add_argument('-src', '--src-apk', required=True, type=Path, help='Path to source APK file')
    parser.add_argument('-shell', '--shell-apk', required=True, type=Path, help='Path to shell APK file')
    parser.add_argument('-o', '-out', '--output-apk', type=Path,
                        help='Output path for packed APK (Default: ./out/<src-apk>_protected.apk)')
    args = parser.parse_args()
    if args.output_apk == None:
        args.output_apk = Path('./out') / (args.src_apk.stem + '_protected.apk')  # 默认新apk名称及输出路径
    paths = Paths(args.src_apk, args.shell_apk, args.output_apk)

    print('Source APK:', paths.srcApkPath)
    print('Shell APK:', paths.shellApkPath)
    print('Output APK:', paths.newApkPath)
    start(paths)


if __name__ == "__main__":
    main()
脱壳程序
SecondProxyApplication.java 相比 FirstProxyApplication.java改动如下:
- attachBaseContext。读取壳 dex 文件后,提取源程序 dex 文件,之后替换 ClassLoader,没有设置私有目录和释放文件等操作。
- extractDexFilesFromShellDex。替代splitSourceApkFromShellDex,从壳 dex 提取源程序dex 文件并存储为 ByteBuffer[]。
- replaceClassLoader。一代加固使用 DexClassLoader 从文件加载,二代加固使用 InMemoryDexClassLoader。
注意:
- 在 Android 8.0 以下不支持 InMemoryDexClassLoader,需要手动实现;
- 在 Android 10.0 以下不支持 InMemoryDexClassLoader 指定 lib 目录的重载;默认搜索路径为nativeLibraryDirectories=[/system/lib64, /product/lib64]]]。
可参考以下文章修复 lib 目录的问题:
https://blog.csdn.net/q610098308/article/details/105246355
http://www.yxhuang.com/2020/03/28/android-so-load/
- 若源程序设置了 android:extractNativeLibs=”false”,则不会释放 lib 文件到文件系统,而是直接映射 APK 文件的 lib 数据。如果遇到这种情况则需要手动处理,模拟映射加载 so 的操作,背后的逻辑比较复杂,并且需要考虑兼容性。为了简化处理可以将加壳后 APK 的 android:extractNativeLibs 属性改为 true,强行指定释放 lib。
package com.example.androidshell2;

import android.app.Application;
import android.app.Instrumentation;
import android.content.Context;
import android.content.pm.ApplicationInfo;
import android.content.pm.PackageManager;
import android.os.Build;
import android.os.Bundle;
import android.util.ArrayMap;
import android.util.Log;

import java.io.BufferedInputStream;
import java.io.ByteArrayOutputStream;
import java.io.FileInputStream;
import java.io.IOException;
import java.lang.ref.WeakReference;
import java.nio.ByteBuffer;
import java.nio.ByteOrder;
import java.util.ArrayList;
import java.util.Iterator;
import java.util.zip.ZipEntry;
import java.util.zip.ZipInputStream;

import dalvik.system.InMemoryDexClassLoader;

public class SecondProxyApplication extends Application {
    private final String TAG="NshIdE";
    public void log(String message){Log.d(TAG,message);}
    @Override
    protected void attachBaseContext(Context base) {
        super.attachBaseContext(base);
        log("SecondProxyApplication.attachBaseContext is running!");
        try {
            byte[] shellDexData = readDexFromApk();
            log("成功从源APK中读取classes.dex");
            //从中分理出源dex文件
            ByteBuffer[] byteBuffers = extractDexFilesFromShellDex(shellDexData);
            log("成功分离出源dex集合");
            //配置加载源程序的动态环境,即替换mClassLoader
            replaceClassLoader(byteBuffers);
        } catch (Exception e) {
            log( Log.getStackTraceString(e));
        }
    }
    @Override
    public void onCreate() {
        super.onCreate();
        log("SecondProxyApplication.onCreate is running!");
        if(replaceApplication())
            log("替换Application成功");
    }
    // 从壳dex文件中提取源apk的dex并封装为ByteBuffer
    private ByteBuffer[] extractDexFilesFromShellDex(byte[] shellDexData) throws IOException {
        int shellDexlength = shellDexData.length;
        //开始解析dex文件
        byte[] sourceDexsSizeByte = new byte[4];
        //读取源dexs的大小
        System.arraycopy(shellDexData,shellDexlength - 4, sourceDexsSizeByte,0,4);
        //转成bytebuffer,方便4byte转int
        ByteBuffer wrap = ByteBuffer.wrap(sourceDexsSizeByte);
        //将byte转成int, 加壳时,长度按小端存储
        int sourceDexsSizeInt = wrap.order(ByteOrder.LITTLE_ENDIAN).getInt();
        Log.d(TAG, "源dex集合的大小: " + sourceDexsSizeInt);
        //读取源dexs
        byte[] sourceDexsData = new byte[sourceDexsSizeInt];
        System.arraycopy(shellDexData,shellDexlength - sourceDexsSizeInt - 4, sourceDexsData, 0, sourceDexsSizeInt);
        //解密源dexs
        sourceDexsData = decrypt(sourceDexsData);

        //更新部分
        //从源dexs中分离dex
        ArrayList<byte[]> sourceDexList = new ArrayList<>();
        int pos = 0;
        while(pos < sourceDexsSizeInt){
            //先提取四个字节,描述当前dex的大小
            //开始解析dex文件
            byte[] singleDexSizeByte = new byte[4];
            //读取源dexs的大小
            System.arraycopy(sourceDexsData, pos, singleDexSizeByte,0,4);
            //转成bytebuffer,方便4byte转int
            ByteBuffer singleDexwrap = ByteBuffer.wrap(singleDexSizeByte);
            int singleDexSizeInt = singleDexwrap.order(ByteOrder.LITTLE_ENDIAN).getInt();
            Log.d(TAG, "当前singleDex的大小: " + singleDexSizeInt);
            //读取单独dex
            byte[] singleDexData = new byte[singleDexSizeInt];
            System.arraycopy(sourceDexsData,pos + 4, singleDexData, 0, singleDexSizeInt);
            //加入到dexlist中
            sourceDexList.add(singleDexData);
            //更新pos
            pos += 4 + singleDexSizeInt;
        }

        //将dexlist包装成ByteBuffer
        int dexNum = sourceDexList.size();
        Log.d(TAG, "源dex的数量: " + dexNum);
        ByteBuffer[] dexBuffers = new ByteBuffer[dexNum];
        for (int i = 0; i < dexNum; i++){
            dexBuffers[i] = ByteBuffer.wrap(sourceDexList.get(i));
        }

        return dexBuffers;

    }
    // 从apk读取dex文件并返回dex对应字节数组
    // 从当前程序的apk读取dex文件并存储为字节数组
    private byte[] readDexFromApk() throws IOException {
        //1.获取当前应用程序的源码路径(apk),一般是data/app目录下,该目录用于存放用户安装的软件
        String sourceDir = this.getApplicationInfo().sourceDir;
        log("this.getApplicationInfo().sourceDir: " +sourceDir);

        //2.创建相关输入流
        FileInputStream fileInputStream = new FileInputStream(sourceDir);
        BufferedInputStream bufferedInputStream = new BufferedInputStream(fileInputStream);
        ZipInputStream zipInputStream = new ZipInputStream(bufferedInputStream); //用于解析apk文件

        ByteArrayOutputStream byteArrayOutputStream = new ByteArrayOutputStream(); //用于存放dex文件

        //3.遍历apk的所有文件并提取dex文件
        ZipEntry zipEntry;
        while((zipEntry = zipInputStream.getNextEntry()) != null){ //存在下一个文件
            // 将classes.dex文件存储到bytearray中 壳dex和源apk合并后只保留一个dex便于处理
            if (zipEntry.getName().equals("classes.dex")){
                byte[] bytes = new byte[1024];
                int num;
                while((num = zipInputStream.read(bytes))!=-1){      //每次读取1024byte,返回读取到的byte数
                    byteArrayOutputStream.write(bytes,0, num); //存放到开辟的byteArrayOutputStream中
                }
            }
            zipInputStream.closeEntry(); //关闭当前文件
        }
        zipInputStream.close();

        log("Read dex from apk succeed!");
        return byteArrayOutputStream.toByteArray(); //将读取到的dex文件以字节数组形式返回
    }
    private byte[] decrypt(byte[] sourceApkdata) {
        for (int i = 0; i < sourceApkdata.length; i++){
            sourceApkdata[i] ^= (byte) 0xff;
        }
        return sourceApkdata;

    }
    //替换壳程序LoadedApk的Application为源程序Application,并调用其onCreate方法
    public boolean replaceApplication(){
        // Application实例存在于: LoadedApk.mApplication
        // 以及ActivityThread的mInitialApplication和mAllApplications和mBoundApplication

        //判断源程序是否使用自定义Application 若使用则需要进行替换,若未使用则直接返回,使用壳的默认Application即可

        String appClassName = null; //源程序的Application类名
        try {
            //获取AndroidManifest.xml 文件中的 <meta-data> 元素
            ApplicationInfo applicationInfo = getPackageManager().getApplicationInfo(this.getPackageName(), PackageManager.GET_META_DATA);
            Bundle metaData = applicationInfo.metaData;
            //获取xml文件声明的Application类
            if (metaData != null && metaData.containsKey("APPLICATION_CLASS_NAME")){
                appClassName = metaData.getString("APPLICATION_CLASS_NAME");
            } else {
                log("源程序中没有自定义Application");
                return false; //如果不存在直接返回,使用壳的application即可
            }
        } catch (PackageManager.NameNotFoundException e) {
            log(Log.getStackTraceString(e));
        }

        //源程序存在自定义application类,开始替换
        log("Try to replace Application");

        //1.反射获取ActivityThread实例
        Object sCurrentActivityThreadObj = Reflection.getStaticField("android.app.ActivityThread","sCurrentActivityThread");
        log("ActivityThread: " + sCurrentActivityThreadObj.toString());

        //2.获取并设置LoadedApk
        //获取mBoundApplication (AppBindData对象)
        Object mBoundApplicationObj = Reflection.getField("android.app.ActivityThread",sCurrentActivityThreadObj,"mBoundApplication") ;
        log("mBoundApplication: "+mBoundApplicationObj.toString());
        //获取mBoundApplication.info (即LoadedApk)
        Object infoObj = Reflection.getField("android.app.ActivityThread$AppBindData",mBoundApplicationObj,"info");
        log( "LoadedApk: " + infoObj.toString());
        //把LoadedApk的mApplication设置为null,这样后续才能调用makeApplication() 否则由于已存在Application,无法进行替换
        Reflection.setField("android.app.LoadedApk","mApplication",infoObj,null);

        //3.获取ActivityThread.mInitialApplication 即拿到旧的Application(对于要加载的Application来讲)
        Object mInitialApplicationObj = Reflection.getField("android.app.ActivityThread",sCurrentActivityThreadObj,"mInitialApplication");
        log("mInitialApplicationObj: " + mInitialApplicationObj.toString());

        //4.获取ActivityThread.mAllApplications并删除旧的application
        ArrayList<Application> mAllApplicationsObj = (ArrayList<Application>) Reflection.getField("android.app.ActivityThread",sCurrentActivityThreadObj,"mAllApplications");
        mAllApplicationsObj.remove(mInitialApplicationObj);
        log("mInitialApplication 从 mAllApplications 中移除成功");

        //5.重置相关类的Application类名 便于后续创建Application
        //获取LoadedApk.mApplicationInfo
        ApplicationInfo applicationInfo = (ApplicationInfo) Reflection.getField("android.app.LoadedApk",infoObj,"mApplicationInfo");
        log( "LoadedApk.mApplicationInfo: " + applicationInfo.toString());
        //获取mBoundApplication.appInfo
        ApplicationInfo appinfoInAppBindData = (ApplicationInfo) Reflection.getField("android.app.ActivityThread$AppBindData",mBoundApplicationObj,"appInfo");
        log("ActivityThread.mBoundApplication.appInfo: " + appinfoInAppBindData.toString());
        //此处通过引用修改值,虽然后续没有使用,但是实际上是修改其指向的LoadedApk相关字段的值
        //设置两个appinfo的classname为源程序的application类名,以便后续调用makeApplication()创建源程序的application
        applicationInfo.className = appClassName;
        appinfoInAppBindData.className = appClassName;
        log("Source Application name: " + appClassName);


        //6.反射调用makeApplication方法创建源程序的application
        Application application = (Application) Reflection.invokeMethod("android.app.LoadedApk","makeApplication",infoObj,new Class[]{boolean.class, Instrumentation.class},new Object[]{false,null}); //使用源程序中的application
        //Application app = (Application)ReflectionMethods.invokeMethod("android.app.LoadedApk","makeApplication",infoObj,new Class[]{boolean.class, Instrumentation.class},new Object[]{true,null}); //使用自定义的application 强制为系统默认
        log("Create source Application succeed: "+application);

        //7.重置ActivityThread.mInitialApplication为新的Application
        Reflection.setField("android.app.ActivityThread","mInitialApplication",sCurrentActivityThreadObj,application);
        log("Reset ActivityThread.mInitialApplication by new Application succeed!");

        //8.ContentProvider会持有代理的Application,需要特殊处理一下
        ArrayMap mProviderMap = (ArrayMap) Reflection.getField("android.app.ActivityThread",sCurrentActivityThreadObj,"mProviderMap");
        log("ActivityThread.mProviderMap: " + mProviderMap);

        //获取所有provider,装进迭代器中遍历
        Iterator iterator = mProviderMap.values().iterator();
        while(iterator.hasNext()){
            Object providerClientRecord = iterator.next();
            //获取ProviderClientRecord.mLocalProvider,可能为空
            Object mLocalProvider = Reflection.getField("android.app.ActivityThread$ProviderClientRecord",providerClientRecord,"mLocalProvider") ;
            if(mLocalProvider != null){
                log("ProviderClientRecord.mLocalProvider: " + mLocalProvider);
                //获取ContentProvider中的mContext字段,设置为新的Application
                Reflection.setField("android.content.ContentProvider","mContext",mLocalProvider,application);
            }
        }

        log( "Run Application.onCreate" );
        application.onCreate(); //源程序,启动!
        return true;
    }
    // 替换壳App的ClassLoader为源App的ClassLoader
    private void replaceClassLoader(ByteBuffer[] byteBuffers) throws Exception{
        //1.获取当前的classloader
        ClassLoader classLoader = this.getClassLoader();
        log("Current ClassLoader: " + classLoader.toString());
        log("Parent ClassLoader: " + classLoader.getParent().toString());

        //2.反射获取ActivityThread
        Object sCurrentActivityThreadObj = Reflection.getStaticField("android.app.ActivityThread","sCurrentActivityThread");
        log("ActivityThread.sCurrentActivity: " + sCurrentActivityThreadObj.toString());

        //3.反射获取LoadedApk
        //获取当前ActivityThread实例的mPackages字段 类型为ArrayMap<String, WeakReference<LoadedApk>>, 里面存放了当前应用的LoadedApk对象
        ArrayMap mPackagesObj = (ArrayMap) Reflection.getField("android.app.ActivityThread",sCurrentActivityThreadObj,"mPackages");
        log( "mPackagesObj: " + mPackagesObj.toString());

        //获取mPackages中的当前应用包名
        String currentPackageName = this.getPackageName();
        log("currentPackageName: " + currentPackageName);

        // 获取loadedApk实例也有好几种,mInitialApplication mAllApplications mPackages
        // 通过包名获取当前应用的loadedApk实例
        WeakReference weakReference = (WeakReference) mPackagesObj.get(currentPackageName);
        Object loadedApkObj = weakReference.get();
        log( "LoadedApk: " + loadedApkObj.toString());

        //动态加载源程序的dex文件
        if(Build.VERSION.SDK_INT>=29){
            Log.d(TAG,"Library path:"+this.getApplicationInfo().nativeLibraryDir);
            InMemoryDexClassLoader dexClassLoader=new InMemoryDexClassLoader(byteBuffers,this.getApplicationInfo().nativeLibraryDir,classLoader.getParent());
            Log.d(TAG, "New InMemoryDexClassLoader: " + dexClassLoader);
            //替换当前loadedApk实例中的mClassLoader字段
            Reflection.setField("android.app.LoadedApk","mClassLoader",loadedApkObj,dexClassLoader);
        }
        else{

            Log.d(TAG,"不支持Android 8.0以下版本");
        }
    }
}
总结
二代加固使用不落地加载技术,可在内存中直接加载dex,实际上是对落地加载的更新。
第一代和第二代加固统称为整体加固,在部分资料中将他们合称为一代加固,将代码抽取加固称为二代加固。
- 优点:相对一代加固更加高效,不容易从文件系统获取 dex 文件从而得到关键代码;
- 缺点:兼容性问题: 源程序的libso处理起来比较复杂;低版本需要手动实现InMemoryDexClassLoader。
当然,总的来说,整体加固现在都能一把梭,用 frida-dexdump。
三、第三代壳-抽取加固
基于整体加固遇到的部分问题,引申出了第三代加固——代码抽取加固。
思路:将关键方法的指令抽空,替换为 nop 指令,运行时动态回填指令执行,回填的核心是对 Android 系统核心函数进行 hook。
- Hook 点
- 常用的 Hook 点有 ClassLinker::LoadMethod 和 ClassLinker:DefineClass,二者都可以获取 DexFile 对象;
- LoadMethod:可获取 Method 对象,从而获取 codeOff,方便回填处理,但兼容性差;
- DefineClass:可获取 ClassDef 对象,需要解析得到 codeOff,更复杂但兼容性更好,变化不大。
- 如何抽取代码(可参考这篇文章中的 Dex 文件结构和代码抽取部分)
- Dex 文件结构中的 DexClassDef 结构定义了各个类的信息,其中的 DexClassData 结构记录了类的 字段 和 方法数据;
- 方法由 DexMethod 结构保存,其 codeOff 成员保存了方法的字节码数据在文件中的偏移,根据该偏移可以进行抽取。
LoadMethod 声明如下
//Android 7及以前
  void LoadMethod(Thread* self,
                  const DexFile& dex_file,
                  const ClassDataItemIterator& it,
                  Handle<mirror::Class> klass, ArtMethod* dst)
//Android 8-9
  void LoadMethod(const DexFile& dex_file,
                  const ClassDataItemIterator& it,
                  Handle<mirror::Class> klass, ArtMethod* dst)
//Android 10-14
    void LoadMethod(const DexFile& dex_file,
                  const ClassAccessor::Method& method,
                  Handle<mirror::Class> klass,
                  ArtMethod* dst)

//Android 15
  void LoadMethod(const DexFile& dex_file,
                  const ClassAccessor::Method& method,
                  ObjPtr<mirror::Class> klass,
                  /*inout*/ MethodAnnotationsIterator* mai,
                  /*out*/ ArtMethod* dst)
DefineClass 声明如下
// Android 5.0 Level 21 及之前使用该声明
static void* (*g_originDefineClassV21)(void* thiz,
                                       const char* descriptor,
                                       void* class_loader,
                                       const void* dex_file,
                                       const void* dex_class_def);
/*
//原始声明
mirror::Class* DefineClass(const char* descriptor,
                            Handle<mirror::ClassLoader> class_loader,
                            const DexFile& dex_file,
                            const DexFile::ClassDef& dex_class_def)
*/

// Android 5.1-14 Level22-34使用该声明
static void* (*g_originDefineClassV22)(void* thiz,
                                       void* self,
                                       const char* descriptor,
                                       size_t hash,
                                       void* class_loader,
                                       const void* dex_file,
                                       const void* dex_class_def);
/*
//原始声明
ObjPtr<mirror::Class> DefineClass(Thread* self,
                                  const char* descriptor,
                                  size_t hash,
                                  Handle<mirror::ClassLoader> class_loader,
                                  const DexFile& dex_file,
                                  const dex::ClassDef& dex_class_def)
*/

//Android 15 Level 35 以后使用该声明
static void* (*g_originDefineClassV35)(void* thiz,
                                       void* self,
                                       const char* descriptor,
                                       size_t descriptor_length,
                                       size_t hash,
                                       void* class_loader,
                                       const void* dex_file,
                                       const void* dex_class_def);
//原始声明
/*
ObjPtr<mirror::Class> DefineClass(Thread* self,
                                  const char* descriptor,
                                  size_t descriptor_length,
                                  size_t hash,
                                  Handle<mirror::ClassLoader> class_loader,
                                  const DexFile& dex_file,
                                  const dex::ClassDef& dex_class_def)
*/
原理
源程序3
主要包括 3 个技术点(同上):
- Native 层 NDK 开发;
- Multidex
- 自定义 Application
加壳程序
加壳程序主要分为三个模块
- APK 处理模块:提供解包 APK、打包 APK、签名 APK 的功能;
- XML 处理模块:提供读取标签、修改标签、添加标签的功能;
- DEX 处理模块:提供合并多 Dex,加密 Dex,代码抽取、文件修复的功能。

加壳程序工作基本流程图如下: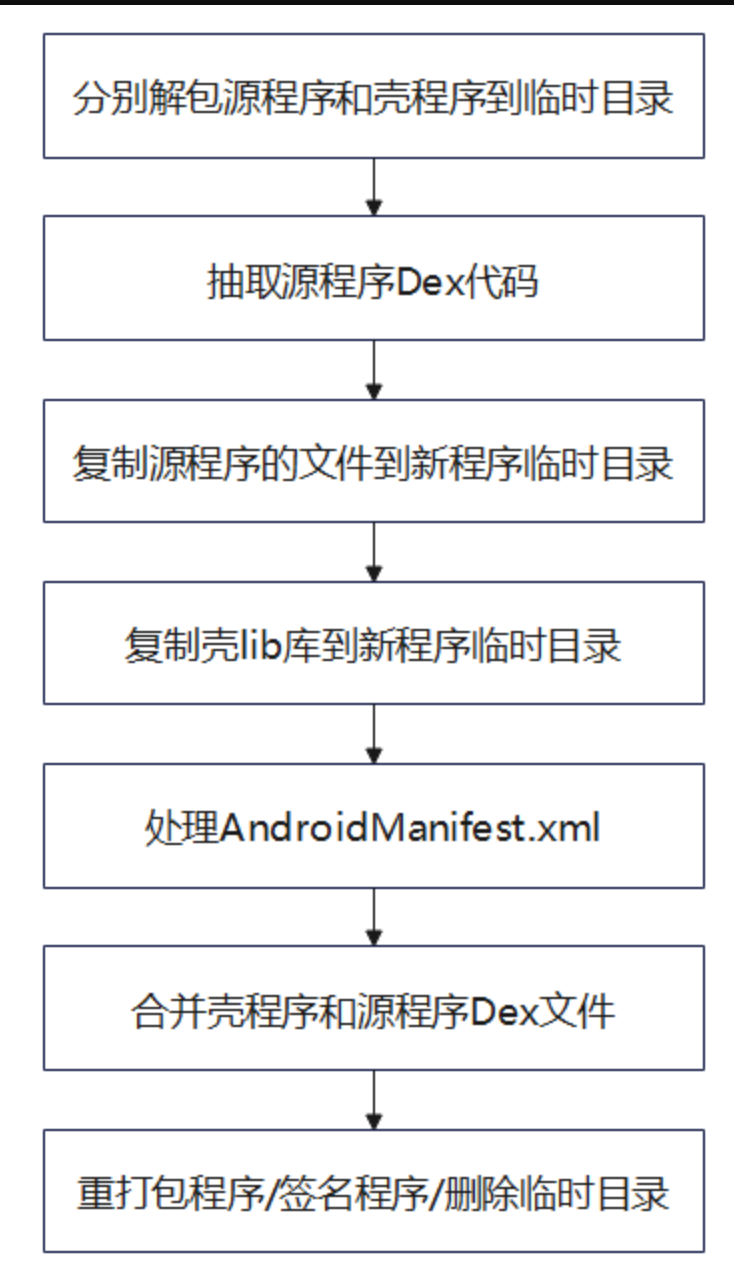
加壳程序工作流程总览图如下: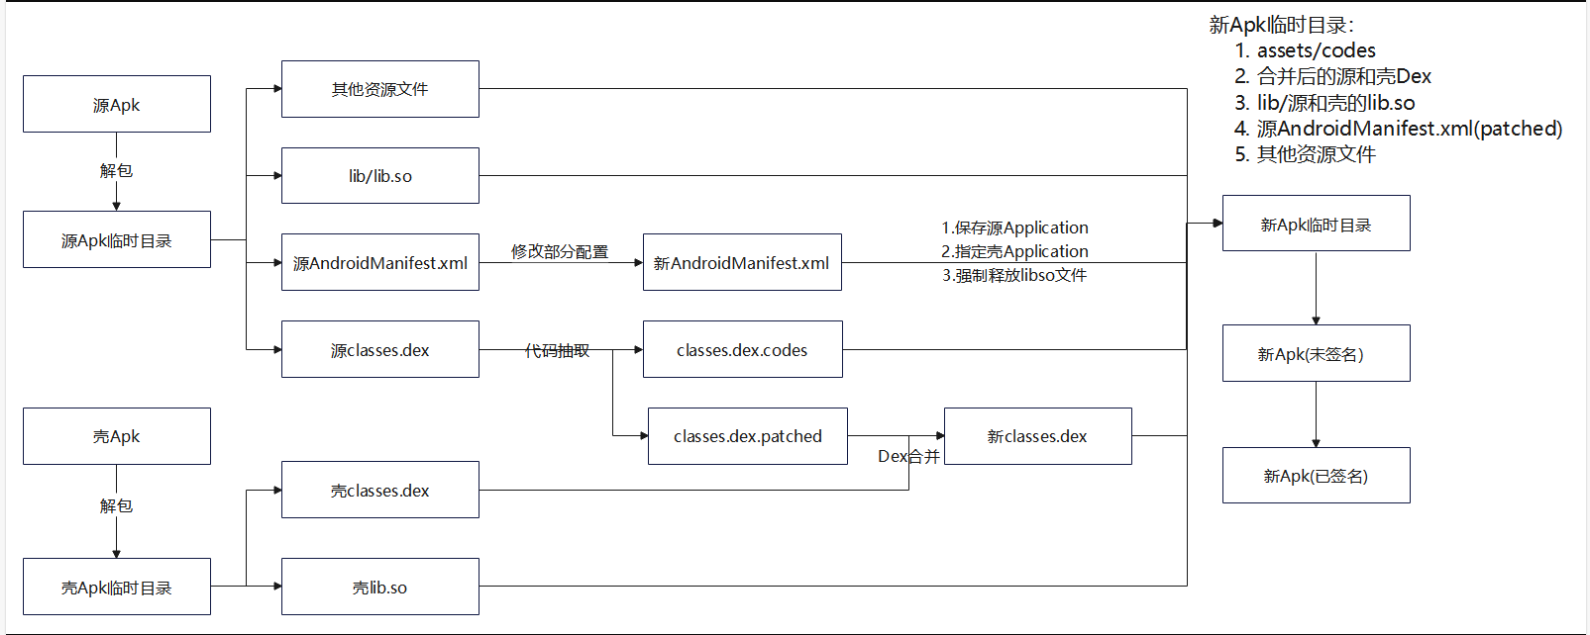
相对于 SecondShell.py 的改动如下:
- start
- 解包原 APK 后 调用 extractAllDexFiles 抽取出所有 dex 文件的代码;
- 另外复制了壳 APK 的 lib 库到新 APK 的临时目录(hook 和代码回填逻辑在 native 层);
- extractAllDexFiles
- 遍历指定目录的所有 dex 文件,调用 ReadDex 抽取代码,得到对应的 .patched 和 .codes 文件;
- 修复 patch 后的 dex 文件并覆写原 dex 文件,将 codes 移动到 assets 目录下。
from zlib import adler32
from hashlib import sha1
from binascii import unhexlify
from lxml import etree
import subprocess
import shutil
from pathlib import Path
import argparse


# Paths类,管理全局用到的路径
class Paths:
    def __init__(self, srcApk: Path, shellApk: Path, outputApk: Path):
        # 相关APK文件路径
        self.srcApkPath = srcApk.resolve()  # 解析为绝对路径
        self.shellApkPath = shellApk.resolve()
        self.newApkPath = outputApk.resolve()

        # 临时目录 以该脚本文件父目录为根目录
        self.tmpdir = Path(__file__).parent / 'temp'
        self.srcApkTempDir = self.tmpdir / 'srcApkTemp'
        self.shellApkTempDir = self.tmpdir / 'shellApkTemp'
        self.newApkTempDir = self.tmpdir / 'newApkTemp'


# Apktool类,通过subprocess调用其他工具 提供解包,打包,签名,抽取代码功能
class Apktool:
    def __init__(self):
        self.apktool_path = Path(__file__).parent.parent / 'tools/apktool/apktool.bat'
        self.signer_path = Path(__file__).parent / 'tools/uber-apk-signer-1.3.0.jar'
        self.readDex_path = Path(__file__).parent / 'tools/ReadDex.exe'

    # 为apk签名
    def signApk(self, unsignedApkPath: Path):
        self.runCommand(['java', '-jar', self.signer_path, '--apk', unsignedApkPath])

    # 使用apktool解包apk 只解包资源得到AndroidManifest.xml 不需要解包dex文件得到smali
    def unpackApk(self, apkPath: Path, outputDir: Path):
        self.runCommand([self.apktool_path, 'd', apkPath, '-s', '-o', outputDir])

    # 重打包apk
    def repackApk(self, inputDir: Path, outApk: Path):
        self.runCommand([self.apktool_path, 'b', inputDir, '-o', outApk])

    # 抽取指定dex文件的代码
    def extractDexCodes(self, dexPath: Path):
        # 调用ReadDex.exe抽取dex文件代码,输出到同级目录 例如classes.dex抽取后生成classes.dex.patched和classes.dex.codes
        self.runCommand([self.readDex_path, '-file', dexPath, '-extractCodes'])

    # 执行命令
    def runCommand(self, args):
        # subprocess.run(args)
        subprocess.run(args, stdout=subprocess.DEVNULL)  # 仅调用工具,不需要额外输出,重定向stdout到os.devnull
        # 参数列表 捕获输出 输出转为字符串
        # print(subprocess.run(args,  capture_output=True,text=True).stdout)


# AndroidManifest.xml的editor 用于获取和修改标签属性,以及添加标签
class ManifestEditor:
    def __init__(self, xml_content: bytes):
        self.ns = {'android': 'http://schemas.android.com/apk/res/android'}
        self.tree = etree.fromstring(xml_content)

    # 获取指定标签的android属性值 examples: get_attr('application', 'name') get_attr('activity', 'name')
    def getTagAttribute(self, tag_name: str, attr_name: str):
        if tag_name == 'manifest':  # 根标签特殊处理
            elem = self.tree
            if elem is not None:
                return elem.get(f'{attr_name}')  # 寻找标签的属性
        else:
            elem = self.tree.find(f'.//{tag_name}', namespaces=self.ns)
            if elem is not None:
                return elem.get(f'{{{self.ns["android"]}}}{attr_name}')  # 根标签之外的属性位于android命名空间下
        return None

    # 设置指定标签的属性值 example:s et_attr('application','name',"com.example.ProxyApplication")
    def setTagAttribute(self, tag_name: str, attr_name: str, new_value: str):
        if tag_name == 'manifest':  # 根标签特殊处理
            elem = self.tree
            if elem is not None:
                return elem.set(f'{attr_name}', new_value)  # 设置属性值
        else:
            elem = self.tree.find(f'.//{tag_name}', namespaces=self.ns)
            if elem is not None:
                elem.set(f'{{{self.ns["android"]}}}{attr_name}', new_value)
                return True
        return False

    # 在指定父标签下添加新子标签 example: add_tag('application',"meta-data",{'name': 'android.permission.CAMERA','value':'hello'})
    def addTagWithAttributes(self, parent_tag: str, new_tag: str, attrs: dict):
        if parent_tag == 'manifest':
            parent = self.tree
            if parent is not None:
                new_elem = etree.SubElement(parent, new_tag)
                for k, v in attrs.items():  # 支持一次给添加的标签设置多个属性
                    new_elem.set(f'{k}', v)
                return True
        else:
            parent = self.tree.find(f'.//{parent_tag}', namespaces=self.ns)
            if parent is not None:
                new_elem = etree.SubElement(parent, new_tag)
                for k, v in attrs.items():
                    new_elem.set(f'{{{self.ns["android"]}}}{k}', v)
                return True
        return False

    # 不以壳manifest为基准操作则用不到该函数,以源apk的manifest为基准自带,无需额外设置
    def getMainActivity(self):
        activities = self.tree.findall('.//activity', namespaces=self.ns)
        for activity in activities:
            intent_filters = activity.findall('.//intent-filter', namespaces=self.ns)
            for intent_filter in intent_filters:
                action = intent_filter.find('.//action[@android:name="android.intent.action.MAIN"]', namespaces=self.ns)
                category = intent_filter.find('.//category[@android:name="android.intent.category.LAUNCHER"]',
                                              namespaces=self.ns)
                if action is not None and category is not None:
                    return activity.get(f'{{{self.ns["android"]}}}name')
        return None

    # 获取application标签的name属性值
    def getApplicationName(self):
        return self.getTagAttribute('application', 'name')

    # 设置application标签的name属性值
    def setApplicationName(self, application: str):
        self.setTagAttribute('application', 'name', application)

    # 添加meta-data标签,并设置name和value属性值
    def addMetaData(self, name: str, value: str):
        self.addTagWithAttributes('application', 'meta-data', {'name': name, 'value': value})

    # 获取AndroidManifest.xml的字符串
    def getManifestData(self):
        """返回XML字符串"""
        return etree.tostring(self.tree, pretty_print=True, encoding='utf-8', xml_declaration=True).decode()

    # 获取application标签的extractNativeLibs属性值
    def getEtractNativeLibs(self):
        return self.getTagAttribute('application', 'extractNativeLibs')

    # 设置application标签的extractNativeLibs属性值为true
    def resetExtractNativeLibs(self):
        self.setTagAttribute('application', 'extractNativeLibs', 'true')


# 工具函数,注意修复时顺序为: fileSize->signature->checksum
# 修复dex文件的checksum
def fixCheckSum(dexBytes: bytearray):
    # dexfile[8:12] 小端序4字节
    value = adler32(bytes(dexBytes[12:]))
    valueArray = bytearray(value.to_bytes(4, 'little'))
    for i in range(len(valueArray)):
        dexBytes[8 + i] = valueArray[i]


# 修复dex文件的signature
def fixSignature(dexBytes: bytearray):
    # dexfile[12:32] 小端序20字节
    sha_1 = sha1()
    sha_1.update(bytes(dexBytes[32:]))
    value = sha_1.hexdigest()
    valueArray = bytearray(unhexlify(value))
    for i in range(len(valueArray)):
        dexBytes[12 + i] = valueArray[i]


# 修复dex文件的filesize
def fixFileSize(dexBytes: bytearray, fileSize):
    # dexfile[32:36] 小端存储
    fileSizeArray = bytearray(fileSize.to_bytes(4, "little"))
    for i in range(len(fileSizeArray)):
        dexBytes[32 + i] = fileSizeArray[i]


# 加密函数,使用异或
def encrypt(data: bytearray):
    # todo:使用aes/sm4等加密算法替代
    for i in range(len(data)):
        data[i] ^= 0xff
    return data


# 抽取指定目录下的所有dex文件的代码 patch所有dex文件并修复,将codes文件移动到assets目录下
def extractAllDexFiles(directory: Path):
    apktool = Apktool()
    # 1.遍历目录下的所有dex文件,并抽取对应代码
    for dex in directory.glob('classes*.dex'):
        apktool.extractDexCodes(dex)  # 抽取dex文件代码 得到classes*.dex.patched和classes*.dex.codes

    # 2.修复抽取后的文件并覆写原dex文件
    for patchedDex in directory.glob('classes*.dex.patched'):
        newDexName = str(patchedDex).replace('.patched', '')  # 重命名
        # 读取文件内容
        with open(patchedDex, 'rb') as f:
            data = bytearray(f.read())
            # 修复signature和checksum,注意先后顺序
            fixSignature(data)
            fixCheckSum(data)
            # 修复后的文件覆写原dex文件
            with open(newDexName, 'wb') as newf:
                newf.write(data)

    # 3.删除patched文件
    for patchedDex in directory.glob('classes*.dex.patched'):
        patchedDex.unlink()

    # 4.移动.codes文件到assets目录下
    # 如果没有assets目录则创建
    if not (directory / 'assets').exists():
        (directory / 'assets').mkdir(parents=True)

    for codes in directory.glob('classes*.dex.codes'):
        shutil.move(codes, directory / 'assets' / codes.name)  # 移动到assets目录下


# 合并壳dex和源apk的dex,支持多dex文件,合并为一个dex
def combineShellAndSourceDexs(shellApkTempDir: Path, srcApkTempDir: Path, newApkTempDir: Path):
    # 读取解包后的apk的所有dex文件,并合并为一个dex文件
    def readAndCombineDexs(unpackedApkDir: Path):
        combinedDex = bytearray()
        # glob方法返回包含所有匹配文件的生成器
        for dex in unpackedApkDir.glob('classes*.dex'):
            print('Source Apk Dex file:', dex)
            with open(dex, 'rb') as f:
                data = bytearray(f.read())
                combinedDex += bytearray(len(data).to_bytes(4, 'little'))  # dex文件的长度,小端序
                combinedDex += data  # dex文件内容
        return combinedDex

    # 获取shelldex
    with open(shellApkTempDir / 'classes.dex', 'rb') as f:
        shellDexArray = bytearray(f.read())

    # 获取源apk的dex文件
    srcDexArray = readAndCombineDexs(srcApkTempDir)
    # 新的dex文件长度
    newDexLen = len(srcDexArray) + len(shellDexArray) + 4
    # 加密源文件
    encSrcDexArray = encrypt(srcDexArray)
    # 新的dex文件内容 = 壳dex + 加密的源dex + 四字节标识加密后源dex大小长度
    newDexArray = shellDexArray + encSrcDexArray + bytearray(len(encSrcDexArray).to_bytes(4, 'little'))

    # 修改filesize
    fixFileSize(newDexArray, newDexLen)
    # 修改signature
    fixSignature(newDexArray)
    # 修改checksum
    fixCheckSum(newDexArray)  # 注意先后顺序,先修改signature,再修改checksum

    # 导出文件
    with open(newApkTempDir / 'classes.dex', 'wb') as f:
        f.write(newDexArray)


# 提取源apk的Manifest文件,修改application为壳application(可能添加meta-data标签),输出新的Manifest文件
def handleManifest(srcApkTempDir: Path, shellApkTempDir: Path, newApkTempDir: Path):
    # 从源apk提取AndroidManifest.xml
    with open(srcApkTempDir / 'AndroidManifest.xml', 'r') as f:
        srcManifestEditor = ManifestEditor(f.read().encode())
    srcApplication = srcManifestEditor.getApplicationName()  # 获取application:name,确定是否存在自定义Application类
    srcExtractNativeLibs = srcManifestEditor.getEtractNativeLibs()  # 获取application:extractNativeLibs,判断是否释放lib文件
    print('SourceApplication:', srcApplication)
    print('SourceExtractNativeLibs:', srcExtractNativeLibs)

    # 从壳apk提取AndroidManifest.xml
    with open(shellApkTempDir / 'AndroidManifest.xml', 'r') as f:
        shellManifestEditor = ManifestEditor(f.read().encode())
    print('ShellApplication:', shellManifestEditor.getApplicationName())

    # 修改源AndroidManifest.xml的application为壳的代理application
    srcManifestEditor.setApplicationName(shellManifestEditor.getApplicationName())

    # 写入meta-data标签 保存源apk的原始application
    if srcApplication != None:
        print('Source application:', srcApplication)
        srcManifestEditor.addMetaData('APPLICATION_CLASS_NAME', srcApplication)

    # 如果源apk的manifest中默认设置etractNativeLibs=false,则重置为true,确保释放lib文件
    if srcExtractNativeLibs == 'false':
        srcManifestEditor.resetExtractNativeLibs()

    # 输出新的AndroidManifest.xml
    with open(newApkTempDir / 'AndroidManifest.xml', 'w') as f:
        f.write(srcManifestEditor.getManifestData())


# 执行加固流程
def start(paths: Paths):
    apktool = Apktool()
    # 1.分别解包源文件和壳文件到临时目录
    print('Extracting source and shell apk...')
    apktool.unpackApk(paths.srcApkPath, paths.srcApkTempDir)
    print('Extract source apk success!')

    print('Extracting shell apk...')
    apktool.unpackApk(paths.shellApkPath, paths.shellApkTempDir)
    print('Extract shell apk success!')

    # 2.抽取源dex文件代码
    print('Exrtracting dex files codes...')
    extractAllDexFiles(paths.srcApkTempDir)
    print('Extract dex files codes success!')

    # 3.复制源apk所有文件到新apk临时目录中 忽略源dex和manifest文件
    print('Copying source apk files to new apk temp dir...')
    shutil.copytree(paths.srcApkTempDir, paths.newApkTempDir,
                    ignore=shutil.ignore_patterns('AndroidManifest.xml', 'classes*.dex'))
    print('Copy source apk files success!')

    # 4.复制壳apk的lib库文件到新apk临时目录中 (壳的代码回填逻辑在lib中实现)
    print('Copying shell apk lib files to new apk temp dir...')
    shutil.copytree(paths.shellApkTempDir / 'lib', paths.newApkTempDir / 'lib',
                    dirs_exist_ok=True)  # dirs_exist_ok=True 如果目标目录已存在,则覆盖
    print('Copy shell apk lib files success!')

    # 5.处理AndroidManifest.xml
    print('Handling AndroidManifest.xml...')
    handleManifest(paths.srcApkTempDir, paths.shellApkTempDir, paths.newApkTempDir)
    print('Handle AndroidManifest.xml success!')

    # 6.合并壳dex和源apk的dex并导出文件
    print('Combining shell dex and source dexs...')
    combineShellAndSourceDexs(paths.shellApkTempDir, paths.srcApkTempDir, paths.newApkTempDir)
    print('Combine shell dex and source dexs success!')

    # 7.重打包apk
    print('Repacking apk...')
    apktool.repackApk(paths.newApkTempDir, paths.newApkPath)
    print('Repack apk success!')

    # 8.签名apk
    print('Signing apk...')
    apktool.signApk(paths.newApkPath)
    print('Resign apk success!')

    # 9.删除临时目录
    print('Deleting temp directories...')
    shutil.rmtree(paths.tmpdir)
    print('Delete temp directories success!')


def main():
    parser = argparse.ArgumentParser(description="Android APK Packer")
    parser.add_argument('-src', '--src-apk', required=True, type=Path, help='Path to source APK file')
    parser.add_argument('-shell', '--shell-apk', required=True, type=Path, help='Path to shell APK file')
    parser.add_argument('-o', '-out', '--output-apk', type=Path,
                        help='Output path for packed APK (Default: ./out/<src-apk>_protected.apk)')
    args = parser.parse_args()
    if args.output_apk == None:
        args.output_apk = Path('./out') / (args.src_apk.stem + '_protected.apk')  # 默认新apk名称及输出路径
    paths = Paths(args.src_apk, args.shell_apk, args.output_apk)

    print('Source APK:', paths.srcApkPath)
    print('Shell APK:', paths.shellApkPath)
    print('Output APK:', paths.newApkPath)
    start(paths)


if __name__ == "__main__":
    main()
脱壳程序
脱壳程序主要分为 2 个模块:
- Java 层:提供环境初始化、替换 ClassLoader、替换 Application 的功能;
- Native 层:提供禁用 Dex2Oat、设置 Dex 文件可写、代码回填、代码文件解析的功能。
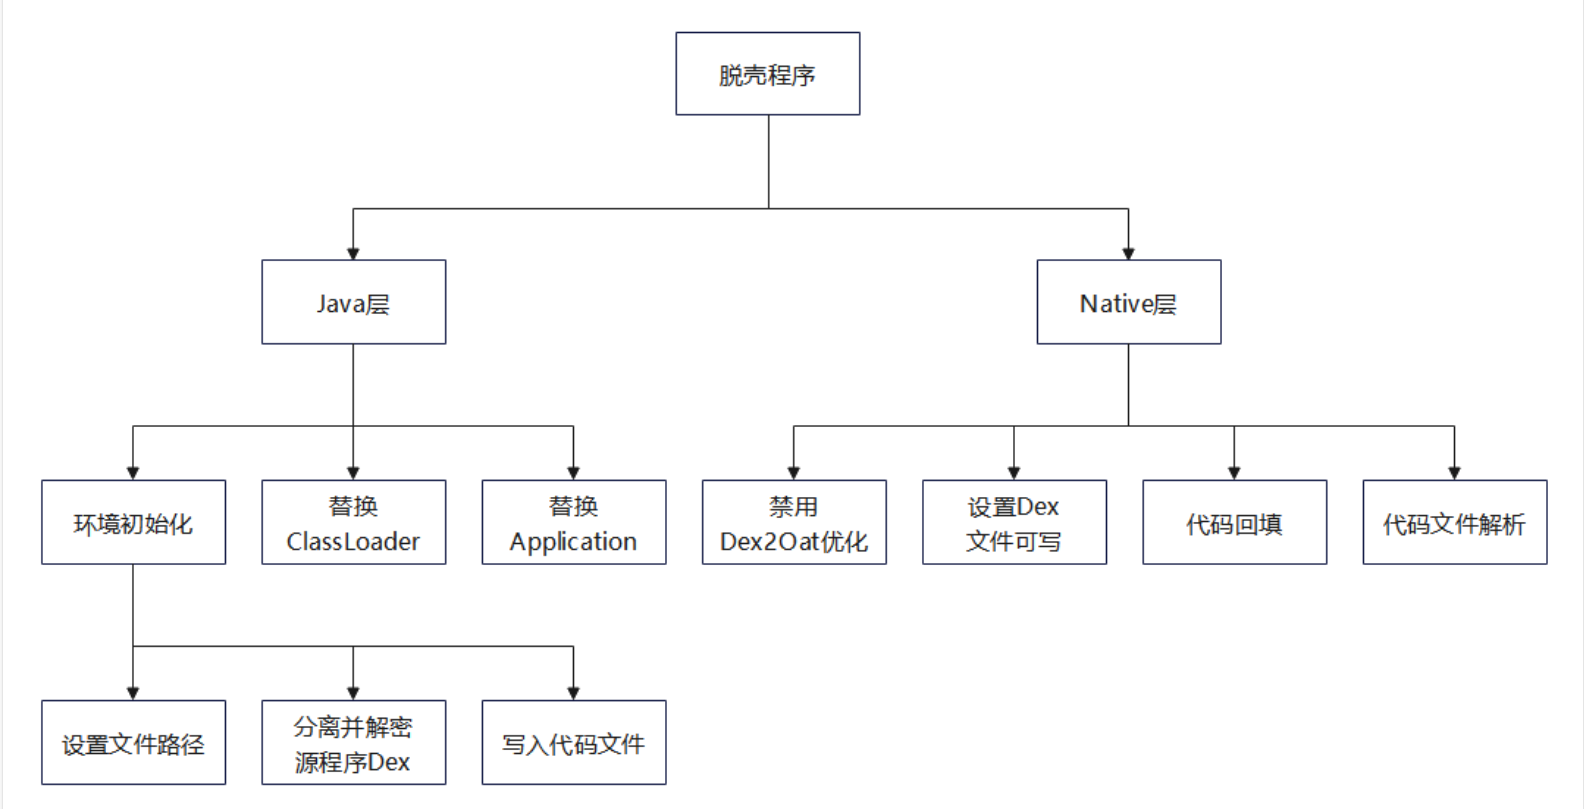
经过前文加壳程序的处理后,源程序 AndroidManifest.xml 文件的 application 标签的 name 属性指定壳的 application,由于 application 是 Android 应用程序真正的入口类,所以启动加壳后的程序时控制权在壳的代理 application 中。
在壳的代理 application 中主要执行以下操作:
- 初始化操作
- 设置相关文件路径,解析相关文件用于后续处理
- 替换 ClassLoader
- 替换壳程序的 ClassLoader 为被保护程序的 ClassLoader
- 替换 application
- 若被保护程序存在自定义 application,则创建实例并替换
- 加载壳 so
- 调用 System.loadLiabray() 主动加载即可,后续在 Native 层执行代码回填
示意图如下: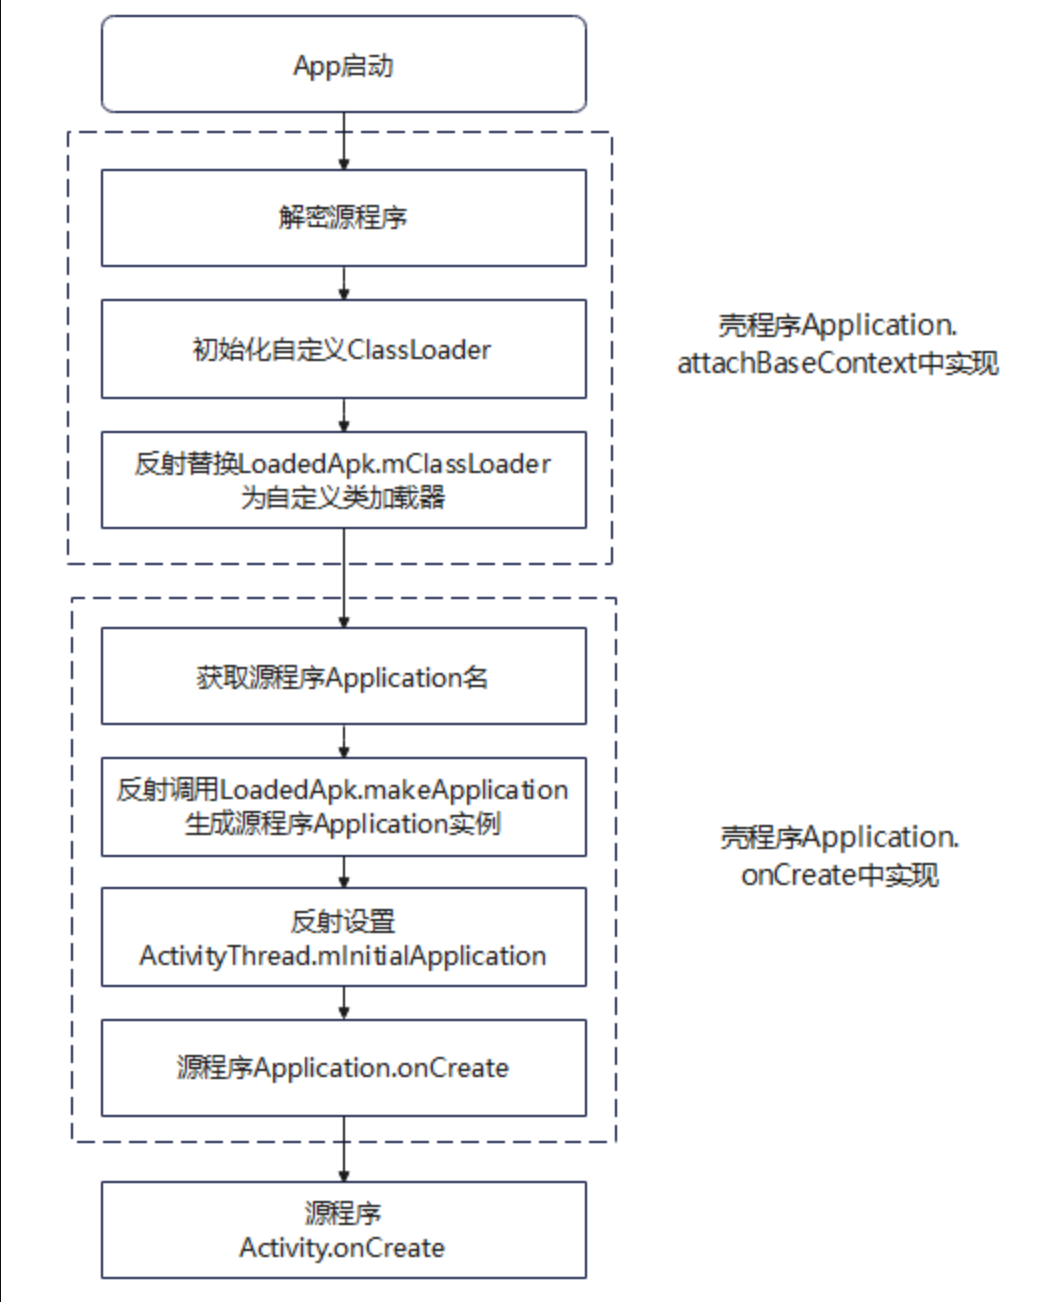
环境初始化
主要执行以下操作:
- 设置相关私有目录,供后续释放文件以及设置 DexClassLoader;
- 从壳 APK 文件提取并解析被保护的 dex 文件,写入私有目录
- 调用 readDexFromApk 从当前 APK 文件中提取 classs.dex,再调用 extractDexFilesFromShellDex 从中提取并分离源程序 Dex 文件,最后调用 writeByteBuffersToDirectory 将多个 Dex 文件依次写入私有目录;
- 从 assets 目录提取 codes 文件写入私有目录
- 调用 copyClassesCodesFiles 执行该操作;
- 拼接源程序所有的 dex 文件的路径
- 用 “:” 分隔,拼接源程序所有 dex 文件路径,供后续 DexClassLoader 加载使用。
示意图如下:
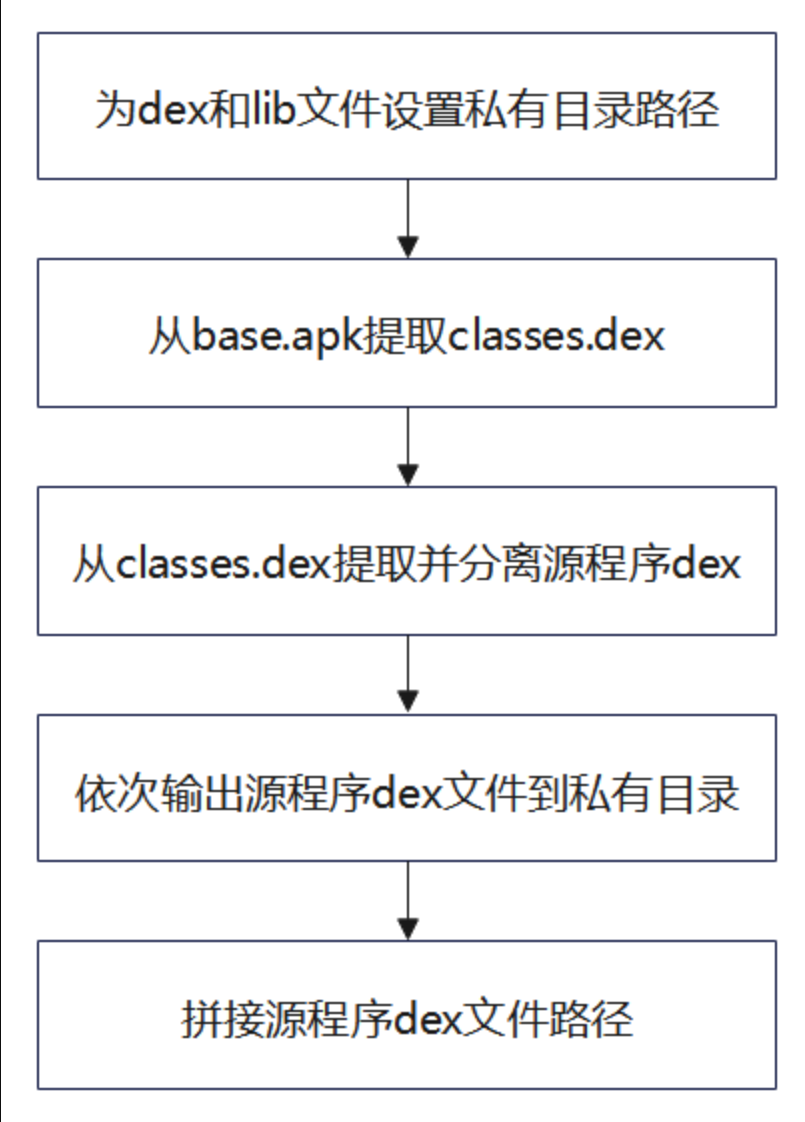
替换 ClassLoader
主要执行以下操作:
- 获取当前 ClassLoader
- 调用 this.getClassLoader() 获取;
- 反射获取 ActivityThread 实例
- 通过反射直接获取 ActivityThread.sCurrentActivityThread 字段,即当前程序对应的 ActivityThread 实例;
- 反射获取 LoadedApk 实例
- 首先反射获取ActivityThread.mPackages 字段
- 再根据当前程序的包名,从中查找获取对应的 LoadedApk 实例;
- 创建并替换 ClassLoader
- 将环境初始化工作中创建的 lib 和 dex 文件的私有目录路径以及当前 ClassLoader 作为参数,新建 DexClassLoader,该 ClassLoader 可用于加载之前释放的源程序 Dex 文件和 libso 文件。
- 最后通过反射修改 LoadedApk.mClassLoader 实例完整修改。
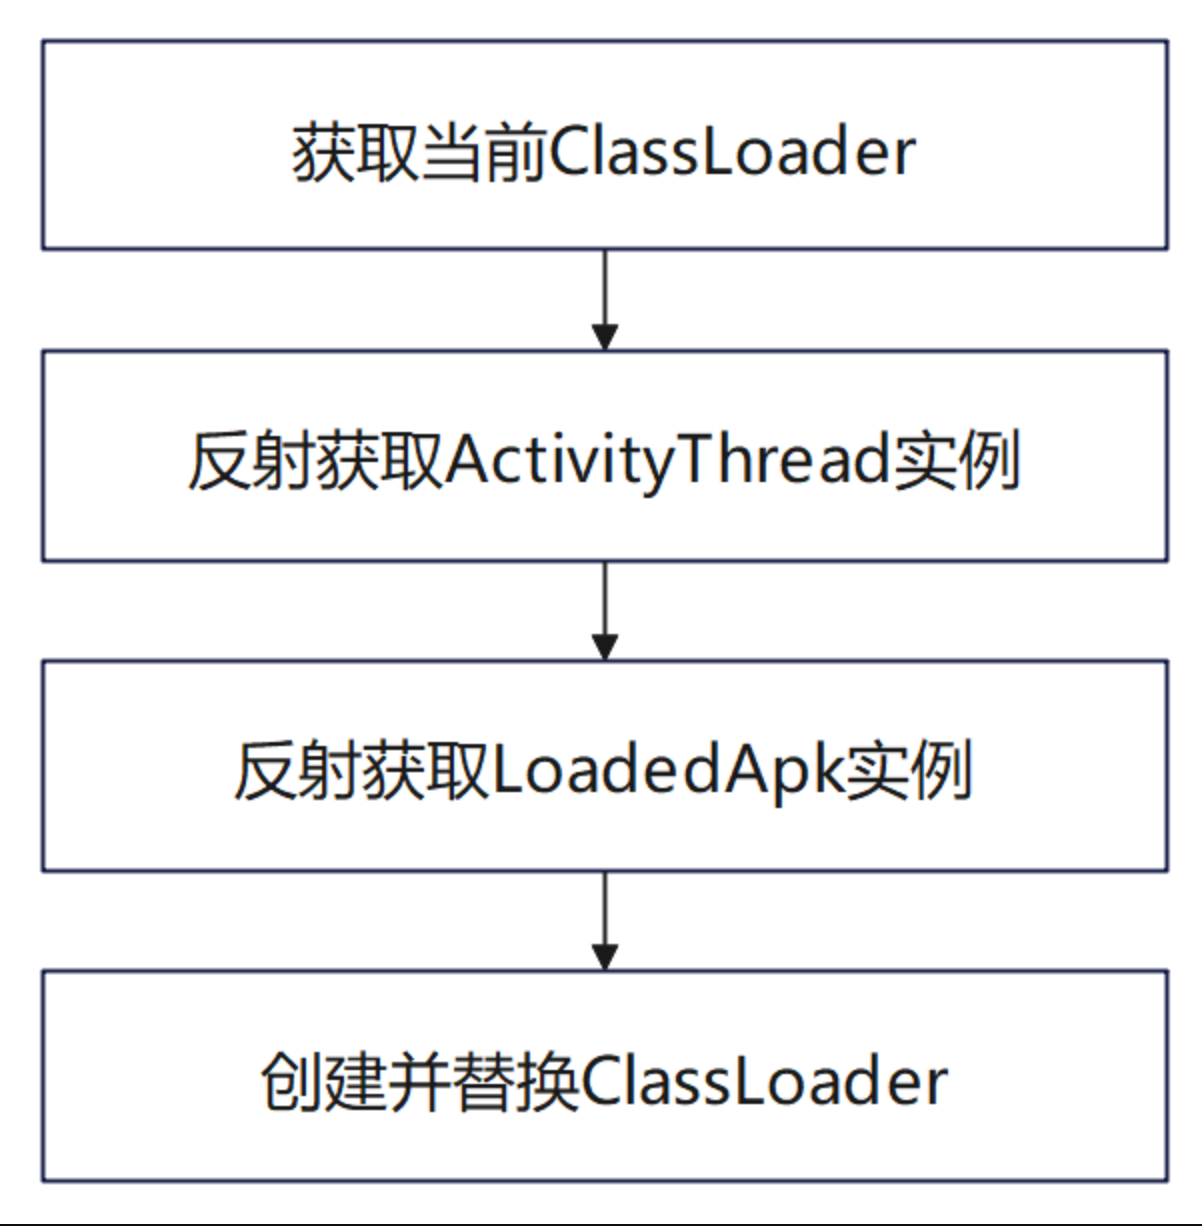
替换 application
主要执行以下操作:
- 获取自定义 application 完整类名
- 同上文,加壳程序为 AndroidManifest.xml 添加 meta-data 标签,其中保存了源程序自定义的 Application类名;
- 反射获取 ActivityThread 实例,同上;
- 反射获取 LoadedApk 实例,并设置 mApplication 为空;
- 获取 LoadedApk 实例也同上,设置 mApplication 为空的原因是调用 LoadedApk.makeApplication 时,如果 mApplication 不为空,则直接返回当前的 Application实例,所以想要替换 Application必须先置空再创建;
- 获取 ActivityThread.mInitialApplication 并删除壳 Application;
- 反射调用 LoadedApk.makeApplication 创建源 Application;
- 重置 ActivityThread.mInitialApplication 为源 Application;
- 处理 ContentProvider 持有的代理 Application;
- 调用 Application.onCreate(),源程序,启动!
流程图如下:
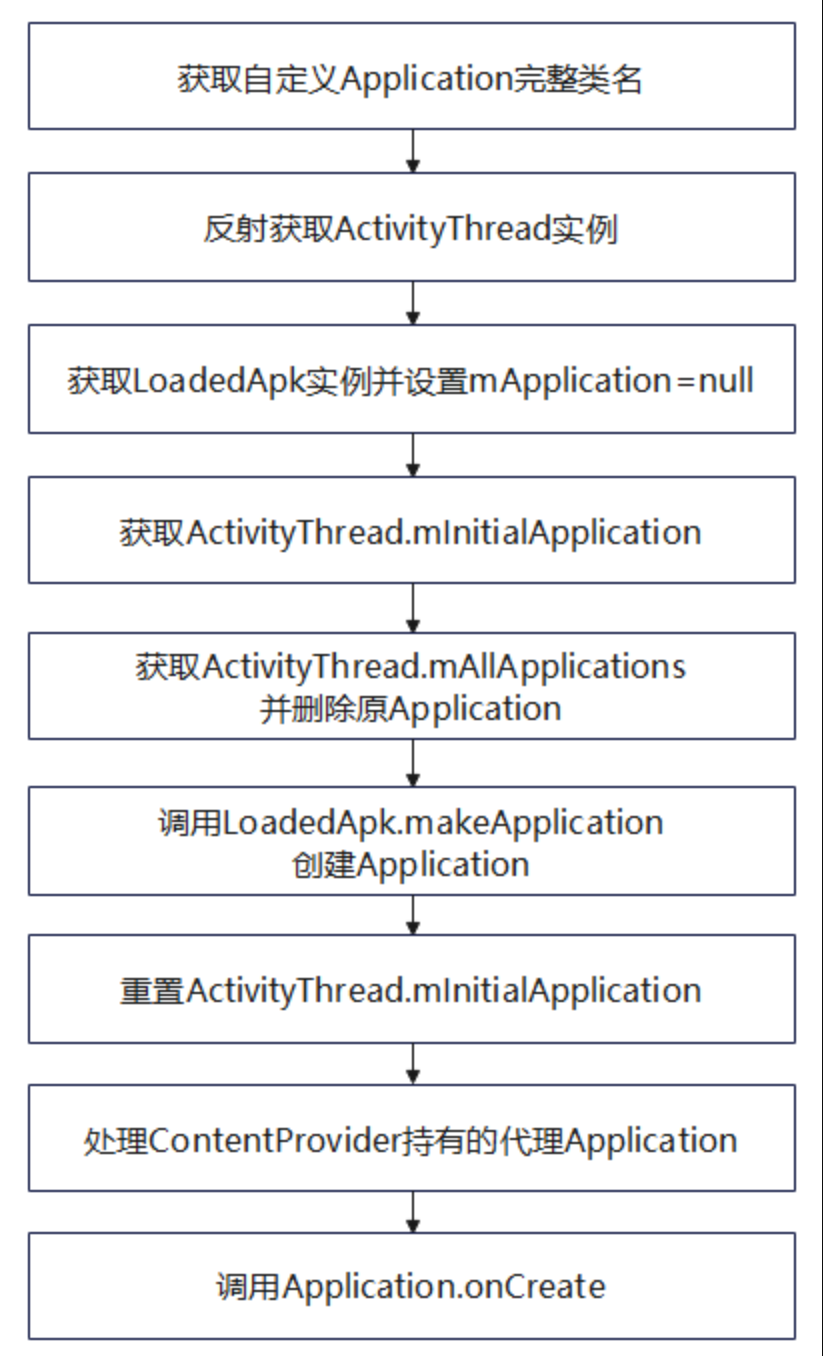
Native 层
调用 System.loadLibrary 主动加载了壳的 so 文件,首先调用 init 函数,其中依次执行以下 Hook 操作(劫持对应函数):
- Hook execve
- 在 Hook 后添加判断逻辑,匹配到调用 dex2oat 系统调用时直接返回(dex2oat 是 ART 将所有 Dex 文件优化为一个 OAT 文件(本质为 ELF 文件)操作,目的是加快指令执行速度,但这会影响加固工具执行指令回填);
- Hook mmap
- 在 mmap 映射内存时添加写权限,保证可以修改 DexFile 进行指令回填;
- Hook LoadMethod
- LoadMethod 有两个关键参数:
DexFile* dexFile和Method* method1; - 通过 dexFile 获取方法所在的 Dex 文件路径,从而判断是否为源程序被抽取了代码的 Dex 文件,如果是则判断是否进行过文件解析;
- 若没有解析过则调用 parseExtractedCodeFiles 函数解析 Dex 文件对应的 codes 文件,这样便成功创建了一组 CodeMap(保存 codeOff 和 CodeItem 映射);
- 之后调用目标方法时,根据 Method.codeOff 从 CodeMap 中提取对应的 CodeItem 并执行指令回填,dexFile.begin + Method.codeOff 即为 insns[] 指令字节数组的位置。
- LoadMethod 有两个关键参数:
其中 Hook 主要使用 BHook 和 Dobby
Dobby
参考 https://github.com/luoyesiqiu/dpt-shell/blob/main/shell/src/main/cpp/CMakeLists.txt 和 https://www.52pojie.cn/thread-1779984-1-1.html
源码编译似乎有点麻烦,静态导入 Dobby
下面是完整的 CMakeLists.txtcmake_minimum_required(VERSION 3.22.1) project("androidshell3") find_package(bytehook REQUIRED CONFIG) include_directories(dobby) add_library(local_dobby STATIC IMPORTED) set_target_properties(local_dobby PROPERTIES IMPORTED_LOCATION ${CMAKE_CURRENT_SOURCE_DIR}/../../../libs/${ANDROID_ABI}/libdobby.a) add_library(${CMAKE_PROJECT_NAME} SHARED # List C/C++ source files with relative paths to this CMakeLists.txt. dex/DexFile.cpp dex/DexFile.h dex/CodeItem.h dex/class_accessor.h shell.cpp) target_link_libraries(${CMAKE_PROJECT_NAME} # List libraries link to the target library android log local_dobby bytehook::bytehook)但是当我去 GitHub 上找已编译好的 Dobby 时,发现Android 版本的 release 已经没了,不过好在之前因为公司的一个项目,组长发过一份给我,就直接用了。
Bhook
参考
https://github.com/bytedance/bhook/blob/main/README.zh-CN.md 添加 Bhook 依赖
android {
    buildFeatures {
        prefab true
    }
}

dependencies {
    implementation 'com.bytedance:bytehook:1.1.1'
}
Hook 后的 LoadMethod 主要工作如下:
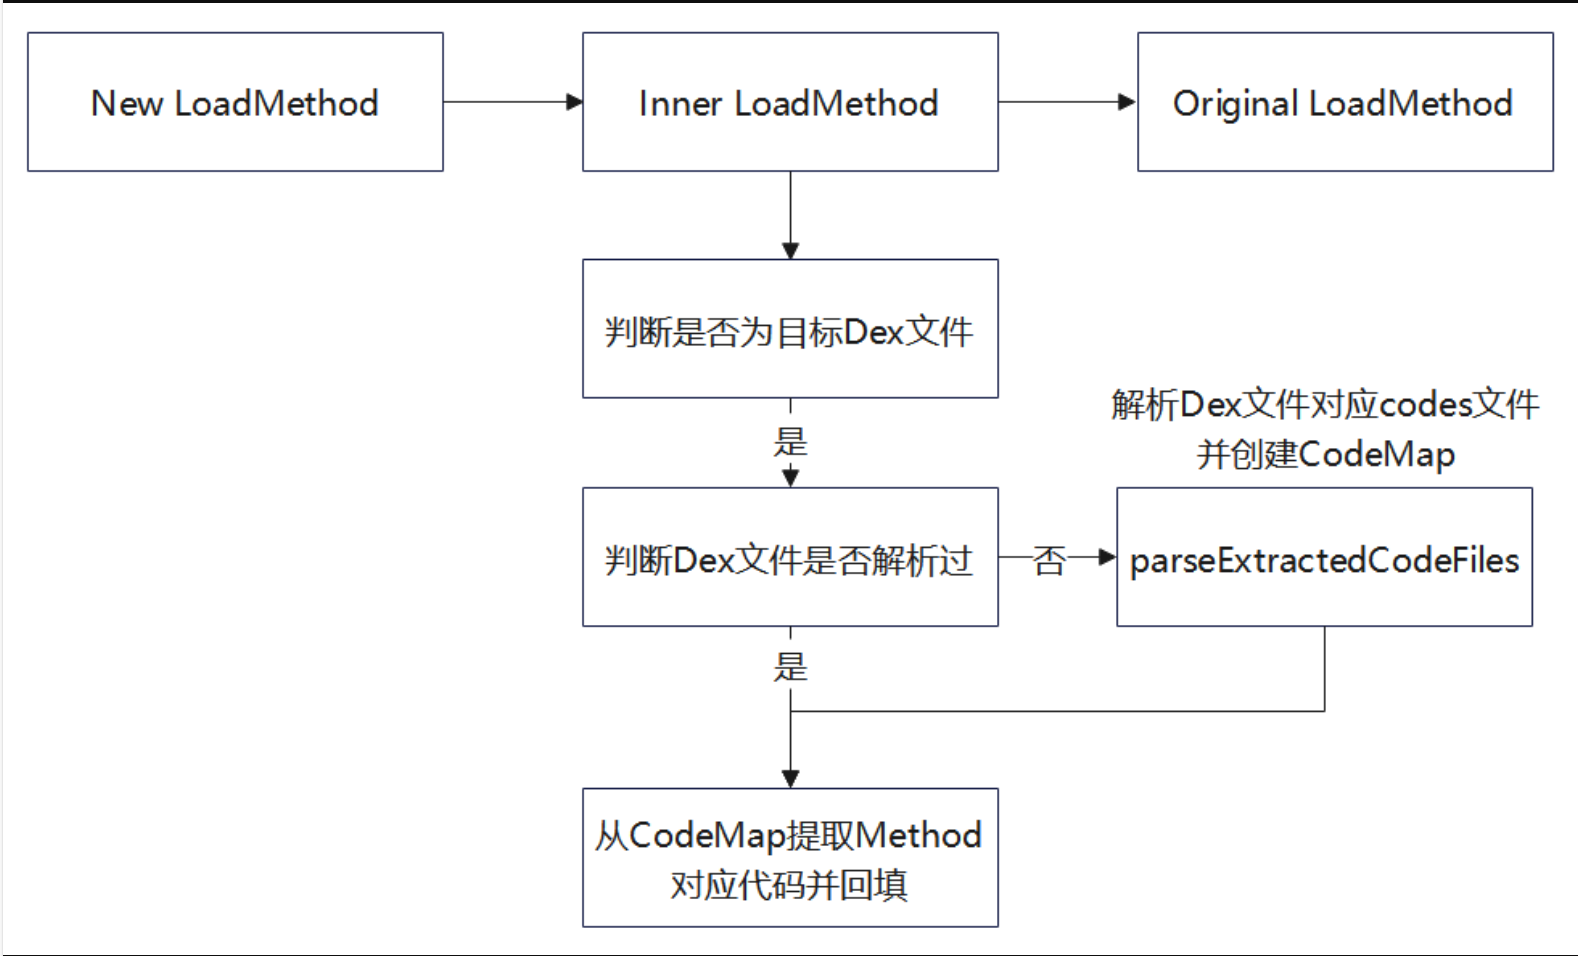
ThirdProxyApplication.java
相对 FirstProxyApplication.java 的改动如下:
- System.loadLibrary(“androidshell3”)
- 主动加载壳程序的 so,设置 hook;
- writeByteBuffersToDirectory
- 用于将壳 dex 中提取的源 dex 字节数组写为文件;
- copyClassesCodesFiles
- 用于将 dex 文件对应的 codes 文件复制到和 dex 相同的私有目录。
package com.example.androidshell3;

import android.app.Application;
import android.app.Instrumentation;
import android.content.Context;
import android.content.pm.ApplicationInfo;
import android.content.pm.PackageManager;
import android.content.res.AssetManager;
import android.os.Bundle;
import android.util.ArrayMap;
import android.util.Log;

import java.io.BufferedInputStream;
import java.io.BufferedOutputStream;
import java.io.ByteArrayOutputStream;
import java.io.File;
import java.io.FileInputStream;
import java.io.FileOutputStream;
import java.io.IOException;
import java.io.InputStream;
import java.lang.ref.WeakReference;
import java.nio.ByteBuffer;
import java.nio.ByteOrder;
import java.util.ArrayList;
import java.util.Iterator;
import java.util.zip.ZipEntry;
import java.util.zip.ZipInputStream;

import dalvik.system.DexClassLoader;

public class ThirdProxyApplication extends Application {
    private final String TAG="NshIdE";
    private String dexPath;
    private String odexPath;
    private String libPath;
    public void log(String message){Log.d(TAG,message);}

    @Override
    protected void attachBaseContext(Context base) {
        super.attachBaseContext(base);
        log("ThirdProxyApplication.attachBaseContext is running!");
        System.loadLibrary("androidshell");     //主动加载so,设置hook,进行指令回填
        log("Load libandroidshell.so succeed!");
        try {
            //初始化相关环境
            initEnvironments();
            //配置加载源程序的动态环境,即替换mClassLoader
            replaceClassLoader();
        } catch (Exception e) {
            log( Log.getStackTraceString(e));
        }
    }
    @Override
    public void onCreate() {
        super.onCreate();
        log("ThirdProxyApplication.onCreate is running!");
        if(replaceApplication())
            log("Replace Application succeed!");
    }

    private void initEnvironments() throws IOException {
        //1.设置相关目录和路径
        File dex = getDir("tmp_dex", MODE_PRIVATE);     // 私有目录,存放dex文件
        //File lib = getDir("tmp_lib", MODE_PRIVATE);       // lib可使用默认目录
        //libPath = lib.getAbsolutePath();
        odexPath = dex.getAbsolutePath();
        libPath=this.getApplicationInfo().nativeLibraryDir; //默认lib路径
        dexPath =this.getApplicationInfo().sourceDir;   //当前base.apk路径
        //2.从当前base.apk读取classes.dex并读取为字节数组
        byte[] shellDexData = readDexFromApk();
        log("Get classes.dex from base.apk succeed!");
        //3.从壳dex文件中分离出源dex文件
        ByteBuffer[] byteBuffers = extractDexFilesFromShellDex(shellDexData);
        //4.将源dex文件依次写入私有目录
        writeByteBuffersToDirectory(byteBuffers, odexPath);
        //5.将codes文件依次写入私有目录
        copyClassesCodesFiles(this, odexPath);
        //6.拼接dex目录字符串,设置dex文件路径 DexClassLoader支持传递多个dex文件路径以加载多个dex文件,通过':'分隔路径
        StringBuffer dexFiles=new StringBuffer();
        for(File file:dex.listFiles()){
            if(file.getName().contains(".codes"))
                continue;
            dexFiles.append(file.getAbsolutePath());
            dexFiles.append(":");
        }
        dexPath=dexFiles.toString();
    }
    private void writeByteBuffersToDirectory(ByteBuffer[] byteBuffers, String directoryPath) throws IOException {
        // 创建目录对象
        File directory = new File(directoryPath);
        // 检查目录是否存在,不存在则创建
        if (!directory.exists()) {
            if (!directory.mkdirs()) {
                throw new IOException("无法创建目录: " + directoryPath);
            }
        }

        // 遍历 ByteBuffer 数组
        for (int i = 0; i < byteBuffers.length; i++) {
            // 生成文件名
            String fileName;
            if (i == 0) {
                fileName = "classes.dex";
            } else {
                fileName = "classes" + (i + 1) + ".dex";
            }
            // 构建文件对象
            File file = new File(directory, fileName);
            // 创建文件输出流
            try (FileOutputStream fos = new FileOutputStream(file)) {
                // 获取 ByteBuffer 中的字节数组
                ByteBuffer buffer = byteBuffers[i];
                byte[] bytes = new byte[buffer.remaining()];
                buffer.get(bytes);
                // 将字节数组写入文件
                fos.write(bytes);
            }
        }
    }
    private void copyClassesCodesFiles(Context context, String targetDirectoryPath) {
        AssetManager assetManager = context.getAssets();
        try {
            // 获取 assets 目录下的所有文件和文件夹
            String[] files = assetManager.list("");
            if (files != null) {
                // 创建目标目录
                File targetDirectory = new File(targetDirectoryPath);
                if (!targetDirectory.exists()) {
                    if (!targetDirectory.mkdirs()) {
                        throw new IOException("无法创建目标目录: " + targetDirectoryPath);
                    }
                }
                for (String fileName : files) {
                    // 筛选以 classes 开头且以 .codes 结尾的文件
                    if (fileName.startsWith("classes") && fileName.endsWith(".codes")) {
                        try (InputStream inputStream = assetManager.open(fileName);
                             BufferedInputStream bis = new BufferedInputStream(inputStream);
                             FileOutputStream fos = new FileOutputStream(new File(targetDirectory, fileName));
                             BufferedOutputStream bos = new BufferedOutputStream(fos)) {

                            byte[] buffer = new byte[1024];
                            int bytesRead;
                            while ((bytesRead = bis.read(buffer)) != -1) {
                                bos.write(buffer, 0, bytesRead);
                            }
                        } catch (IOException e) {
                            e.printStackTrace();
                        }
                    }
                }
            }
        } catch (IOException e) {
            e.printStackTrace();
        }
    }

    // 从壳dex文件中提取源apk的dex并封装为ByteBuffer
    private ByteBuffer[] extractDexFilesFromShellDex(byte[] shellDexData) {
        int shellDexlength = shellDexData.length;
        //开始解析dex文件
        byte[] sourceDexsSizeByte = new byte[4];
        //读取源dexs的大小
        System.arraycopy(shellDexData,shellDexlength - 4, sourceDexsSizeByte,0,4);
        //转成bytebuffer,方便4byte转int
        ByteBuffer wrap = ByteBuffer.wrap(sourceDexsSizeByte);
        //将byte转成int, 加壳时,长度按小端存储
        int sourceDexsSizeInt = wrap.order(ByteOrder.LITTLE_ENDIAN).getInt();
        Log.d(TAG, "源dex集合的大小: " + sourceDexsSizeInt);
        //读取源dexs
        byte[] sourceDexsData = new byte[sourceDexsSizeInt];
        System.arraycopy(shellDexData,shellDexlength - sourceDexsSizeInt - 4, sourceDexsData, 0, sourceDexsSizeInt);
        //解密源dexs
        sourceDexsData = decrypt(sourceDexsData);

        //更新部分
        //从源dexs中分离dex
        ArrayList<byte[]> sourceDexList = new ArrayList<>();
        int pos = 0;
        while(pos < sourceDexsSizeInt){
            //先提取四个字节,描述当前dex的大小
            //开始解析dex文件
            byte[] singleDexSizeByte = new byte[4];
            //读取源dexs的大小
            System.arraycopy(sourceDexsData, pos, singleDexSizeByte,0,4);
            //转成bytebuffer,方便4byte转int
            ByteBuffer singleDexwrap = ByteBuffer.wrap(singleDexSizeByte);
            int singleDexSizeInt = singleDexwrap.order(ByteOrder.LITTLE_ENDIAN).getInt();
            Log.d(TAG, "当前Dex的大小: " + singleDexSizeInt);
            //读取单独dex
            byte[] singleDexData = new byte[singleDexSizeInt];
            System.arraycopy(sourceDexsData,pos + 4, singleDexData, 0, singleDexSizeInt);
            //加入到dexlist中
            sourceDexList.add(singleDexData);
            //更新pos
            pos += 4 + singleDexSizeInt;
        }

        //将dexlist包装成ByteBuffer
        int dexNum = sourceDexList.size();
        Log.d(TAG, "源dex的数量: " + dexNum);
        ByteBuffer[] dexBuffers = new ByteBuffer[dexNum];
        for (int i = 0; i < dexNum; i++){
            dexBuffers[i] = ByteBuffer.wrap(sourceDexList.get(i));
        }

        return dexBuffers;

    }
    // 从当前程序的apk读取dex文件并存储为字节数组
    private byte[] readDexFromApk() throws IOException {
        //1.获取当前应用程序的源码路径(apk),一般是data/app目录下,该目录用于存放用户安装的软件
        String sourceDir = this.getApplicationInfo().sourceDir;
        log("this.getApplicationInfo().sourceDir: " +sourceDir);

        //2.创建相关输入流
        FileInputStream fileInputStream = new FileInputStream(sourceDir);
        BufferedInputStream bufferedInputStream = new BufferedInputStream(fileInputStream);
        ZipInputStream zipInputStream = new ZipInputStream(bufferedInputStream); //用于解析apk文件

        ByteArrayOutputStream byteArrayOutputStream = new ByteArrayOutputStream(); //用于存放dex文件

        //3.遍历apk的所有文件并提取dex文件
        ZipEntry zipEntry;
        while((zipEntry = zipInputStream.getNextEntry()) != null){ //存在下一个文件
            // 将classes.dex文件存储到bytearray中 壳dex和源apk合并后只保留一个dex便于处理
            if (zipEntry.getName().equals("classes.dex")){
                byte[] bytes = new byte[1024];
                int num;
                while((num = zipInputStream.read(bytes))!=-1){      //每次读取1024byte,返回读取到的byte数
                    byteArrayOutputStream.write(bytes,0, num); //存放到开辟的byteArrayOutputStream中
                }
            }
            zipInputStream.closeEntry(); //关闭当前文件
        }
        zipInputStream.close();

        log("Read dex from apk succeed!");
        return byteArrayOutputStream.toByteArray(); //将读取到的dex文件以字节数组形式返回
    }
    // 解密
    private byte[] decrypt(byte[] data) {
        for (int i = 0; i < data.length; i++){
            data[i] ^= (byte) 0xff;
        }
        return data;

    }
    //替换壳程序LoadedApk的Application为源程序Application,并调用其onCreate方法
    private boolean replaceApplication(){
        // Application实例存在于: LoadedApk.mApplication
        // 以及ActivityThread的mInitialApplication和mAllApplications和mBoundApplication

        //判断源程序是否使用自定义Application 若使用则需要进行替换,若未使用则直接返回,使用壳的默认Application即可

        String appClassName = null; //源程序的Application类名
        try {
            //获取AndroidManifest.xml 文件中的 <meta-data> 元素
            ApplicationInfo applicationInfo = getPackageManager().getApplicationInfo(this.getPackageName(), PackageManager.GET_META_DATA);
            Bundle metaData = applicationInfo.metaData;
            //获取xml文件声明的Application类
            if (metaData != null && metaData.containsKey("APPLICATION_CLASS_NAME")){
                appClassName = metaData.getString("APPLICATION_CLASS_NAME");
            } else {
                log("源程序中没有自定义Application");
                return false; //如果不存在直接返回,使用壳的application即可
            }
        } catch (PackageManager.NameNotFoundException e) {
            log(Log.getStackTraceString(e));
        }

        //源程序存在自定义application类,开始替换
        log("Try to replace Application");

        //1.反射获取ActivityThread实例
        Object sCurrentActivityThreadObj = Reflection.getStaticField("android.app.ActivityThread","sCurrentActivityThread");
        log("ActivityThread: " + sCurrentActivityThreadObj.toString());

        //2.获取并设置LoadedApk
        //获取mBoundApplication (AppBindData对象)
        Object mBoundApplicationObj = Reflection.getField("android.app.ActivityThread",sCurrentActivityThreadObj,"mBoundApplication") ;
        log("mBoundApplication: "+mBoundApplicationObj.toString());
        //获取mBoundApplication.info (即LoadedApk)
        Object infoObj = Reflection.getField("android.app.ActivityThread$AppBindData",mBoundApplicationObj,"info");
        log( "LoadedApk: " + infoObj.toString());
        //把LoadedApk的mApplication设置为null,这样后续才能调用makeApplication() 否则由于已存在Application,无法进行替换
        Reflection.setField("android.app.LoadedApk","mApplication",infoObj,null);

        //3.获取ActivityThread.mInitialApplication 即拿到旧的Application(对于要加载的Application来讲)
        Object mInitialApplicationObj = Reflection.getField("android.app.ActivityThread",sCurrentActivityThreadObj,"mInitialApplication");
        log("mInitialApplicationObj: " + mInitialApplicationObj.toString());

        //4.获取ActivityThread.mAllApplications并删除旧的application
        ArrayList<Application> mAllApplicationsObj = (ArrayList<Application>) Reflection.getField("android.app.ActivityThread",sCurrentActivityThreadObj,"mAllApplications");
        mAllApplicationsObj.remove(mInitialApplicationObj);
        log("mInitialApplication 从 mAllApplications 中移除成功");

        //5.重置相关类的Application类名 便于后续创建Application
        //获取LoadedApk.mApplicationInfo
        ApplicationInfo applicationInfo = (ApplicationInfo) Reflection.getField("android.app.LoadedApk",infoObj,"mApplicationInfo");
        log( "LoadedApk.mApplicationInfo: " + applicationInfo.toString());
        //获取mBoundApplication.appInfo
        ApplicationInfo appinfoInAppBindData = (ApplicationInfo) Reflection.getField("android.app.ActivityThread$AppBindData",mBoundApplicationObj,"appInfo");
        log("ActivityThread.mBoundApplication.appInfo: " + appinfoInAppBindData.toString());
        //此处通过引用修改值,虽然后续没有使用,但是实际上是修改其指向的LoadedApk相关字段的值
        //设置两个appinfo的classname为源程序的application类名,以便后续调用makeApplication()创建源程序的application
        applicationInfo.className = appClassName;
        appinfoInAppBindData.className = appClassName;
        log("Source Application name: " + appClassName);

        //6.反射调用makeApplication方法创建源程序的application
        Application application = (Application) Reflection.invokeMethod("android.app.LoadedApk","makeApplication",infoObj,new Class[]{boolean.class, Instrumentation.class},new Object[]{false,null}); //使用源程序中的application
        //Application app = (Application)ReflectionMethods.invokeMethod("android.app.LoadedApk","makeApplication",infoObj,new Class[]{boolean.class, Instrumentation.class},new Object[]{true,null}); //使用自定义的application 强制为系统默认
        log("Create source Application succeed: "+application);

        //7.重置ActivityThread.mInitialApplication为新的Application
        Reflection.setField("android.app.ActivityThread","mInitialApplication",sCurrentActivityThreadObj,application);
        log("Reset ActivityThread.mInitialApplication by new Application succeed!");

        //8.ContentProvider会持有代理的Application,需要特殊处理一下
        ArrayMap mProviderMap = (ArrayMap) Reflection.getField("android.app.ActivityThread",sCurrentActivityThreadObj,"mProviderMap");
        log("ActivityThread.mProviderMap: " + mProviderMap);

        //获取所有provider,装进迭代器中遍历
        Iterator iterator = mProviderMap.values().iterator();
        while(iterator.hasNext()){
            Object providerClientRecord = iterator.next();
            //获取ProviderClientRecord.mLocalProvider,可能为空
            Object mLocalProvider = Reflection.getField("android.app.ActivityThread$ProviderClientRecord",providerClientRecord,"mLocalProvider") ;
            if(mLocalProvider != null){
                log("ProviderClientRecord.mLocalProvider: " + mLocalProvider);
                //获取ContentProvider中的mContext字段,设置为新的Application
                Reflection.setField("android.content.ContentProvider","mContext",mLocalProvider,application);
            }
        }

        log( "Run Application.onCreate" );
        application.onCreate(); //源程序,启动!
        return true;
    }
    // 替换壳App的ClassLoader为源App的ClassLoader
    private void replaceClassLoader() {
        //1.获取当前的classloader
        ClassLoader classLoader = this.getClassLoader();
        log("Current ClassLoader: " + classLoader.toString());
        log("Parent ClassLoader: " + classLoader.getParent().toString());

        //2.反射获取ActivityThread
        Object sCurrentActivityThreadObj = Reflection.getStaticField("android.app.ActivityThread","sCurrentActivityThread");
        log("ActivityThread.sCurrentActivityThread: " + sCurrentActivityThreadObj.toString());

        //3.反射获取LoadedApk
        //获取当前ActivityThread实例的mPackages字段 类型为ArrayMap<String, WeakReference<LoadedApk>>, 里面存放了当前应用的LoadedApk对象
        ArrayMap mPackagesObj = (ArrayMap) Reflection.getField("android.app.ActivityThread",sCurrentActivityThreadObj,"mPackages");
        log( "mPackagesObj: " + mPackagesObj.toString());

        //获取mPackages中的当前应用包名
        String currentPackageName = this.getPackageName();
        log("currentPackageName: " + currentPackageName);

        // 获取loadedApk实例也有好几种,mInitialApplication mAllApplications mPackages
        // 通过包名获取当前应用的loadedApk实例
        WeakReference weakReference = (WeakReference) mPackagesObj.get(currentPackageName);
        Object loadedApkObj = weakReference.get();
        log( "LoadedApk: " + loadedApkObj.toString());

        //4.替换ClassLoader
        DexClassLoader dexClassLoader = new DexClassLoader(dexPath, odexPath,libPath, classLoader.getParent()); //动态加载源程序的dex文件,以当前classloader的父加载器作为parent
        Reflection.setField("android.app.LoadedApk","mClassLoader",loadedApkObj,dexClassLoader); //替换当前loadedApk实例中的mClassLoader字段
        log("New DexClassLoader: " + dexClassLoader);
    }
}
shell.cpp
主要提供以下功能:
hook execve
- 主要目的是禁止 dex2oat,防止 dex 文件被优化;
hook mmap
- 使 dex 文件可写,用于后续指令回填;
hook LoadMethod
- loadmethod 用于加载 dex 文件的方法,可获取 dex 文件引用和 codeoff;
- hook劫持后执行codes文件解析和指令回填。
#include <jni.h>
#include <string>
#include <unistd.h>
#include <map>
#include <fstream>
#include <stdlib.h>
#include <elf.h>
#include <dlfcn.h>
#include "android/log.h"
#include "sys/mman.h"
#include "bytehook.h"
#include "dobby/dobby.h"
#include "dex/DexFile.h"
#include "dex/CodeItem.h"
#include "dex/class_accessor.h"
#define TAG "NshIdE"
#define logd(...) __android_log_print(ANDROID_LOG_DEBUG, TAG, __VA_ARGS__);
#define logi(...) __android_log_print(ANDROID_LOG_INFO , TAG, __VA_ARGS__);
#define loge(...) __android_log_print(ANDROID_LOG_ERROR, TAG, __VA_ARGS__);

// sdk版本,用于兼容适配
int APILevel;
// 函数声明
void hook();
void hookExecve();
void hookMmap();
void hook_LoadMethod();

// 抽取代码文件,与源.dex在同一私有目录
std::string codeFilePostfix = ".codes";

//dex文件名->codeOff->CodeItem 每个dex文件对应一个map,每个map内的codeoff对应一个CodeItem
std::map<std::string,std::map<uint32_t, CodeItem>> codeMapList;

//art/runtime/class_linker.h
// 函数声明
static void (*g_originLoadMethod)(void* thiz,
                                  const DexFile* dex_file,
                                  ClassAccessor::Method* method,
                                  void* klass,
                                  void* dst);
/*//Android 10-14 原型如下
void LoadMethod(const DexFile& dex_file,
                const ClassAccessor::Method& method,
                Handle<mirror::Class> klass,
                ArtMethod* dst);
*/


// Tool functions

// 以二进制形式读取整个文件,返回字节数组并返回文件长度
uint8_t* readFileToBytes(const std::string fileName,size_t* readSize) {
    FILE *file = fopen(fileName.c_str(), "rb");
    if (file == NULL) {
        logd("Error opening file");
        fclose(file);
        return NULL;
    }
    fseek(file, 0,SEEK_END);
    size_t fileSize = ftell(file);
    fseek(file, 0,SEEK_SET);
    uint8_t *buffer = (uint8_t *) malloc(fileSize);
    if (buffer == NULL) {
        logd("Error allocating memory\n");
        fclose(file);
        return NULL;
    }
    size_t bytesRead = fread(buffer, 1, fileSize, file);
    if(bytesRead!=fileSize) {
        logd("Read bytes not equal file size!\n");
        free(buffer);
        fclose(file);
        return NULL;
    }
    fclose(file);
    if(readSize)
        *readSize=bytesRead;
    return buffer;
}

// 4字节数组转uint32_t
uint32_t bytes2uint32(unsigned char * bytes){
    uint32_t retnum = 0;
    for(int i = 3;i >=0;i--){
        retnum <<= 8;
        retnum |= bytes[i];
    }
    return retnum;
}

const char * getArtLibPath() {
    if(APILevel < 29) {
        return "/system/lib64/libart.so";
    } else if(APILevel == 29) {
        return "/apex/com.android.runtime/lib64/libart.so";
    } else {
        return "/apex/com.android.art/lib64/libart.so";
    }
}

const char * getArtBaseLibPath() {
    if(APILevel == 29) {
        return "/apex/com.android.runtime/lib64/libartbase.so";
    } else {
        return "/apex/com.android.art/lib64/libartbase.so";
    }
}

const char* find_symbol_in_elf_file(const char *elf_file,int keyword_count,...) {
    FILE *elf_fp = fopen(elf_file, "r");
    if (elf_fp) {
        // 获取elf文件大小
        fseek(elf_fp, 0L, SEEK_END);
        size_t lib_size = ftell(elf_fp);
        fseek(elf_fp, 0L, SEEK_SET);
        // 读取elf文件数据
        char *data = (char *) calloc(lib_size, 1);
        fread(data, 1, lib_size, elf_fp);
        char *elf_bytes_data = data;
        // elf头
        Elf64_Ehdr *ehdr = (Elf64_Ehdr *) elf_bytes_data;
        // 节头
        Elf64_Shdr *shdr = (Elf64_Shdr *) (((uint8_t *) elf_bytes_data) + ehdr->e_shoff);
        va_list kw_list;
        // 遍历节
        for (int i = 0; i < ehdr->e_shnum; i++) {
            // 字符串表
            if (shdr->sh_type == SHT_STRTAB) {
                const char *str_base = (char *) ((uint8_t *) elf_bytes_data + shdr->sh_offset);
                char *ptr = (char *) str_base;
                // 遍历字符串表
                for (int k = 0; ptr < (str_base + shdr->sh_size); k++) {
                    const char *item_value = ptr;
                    size_t item_len = strnlen(item_value, 128);
                    ptr += (item_len + 1);
                    if (item_len == 0) {
                        continue;
                    }
                    int match_count = 0;
                    va_start(kw_list, keyword_count);
                    for (int n = 0; n < keyword_count; n++) {
                        const char *keyword = va_arg(kw_list, const char*);
                        if (strstr(item_value, keyword)) {
                            match_count++;
                        }
                    }
                    va_end(kw_list);
                    if (match_count == keyword_count) {
                        return item_value;
                    }
                }
                break;
            }
            shdr++;
        }
        fclose(elf_fp);
        free(data);
    }
    return nullptr;
}

const char * getClassLinkerDefineClassLibPath(){
    return getArtLibPath();
}


const char * getClassLinkerDefineClassSymbol() {
    const char * sym = find_symbol_in_elf_file(getClassLinkerDefineClassLibPath(),2,"ClassLinker","DefineClass");
    return sym;
}


const char * getClassLinkerLoadMethodLibPath(){
    return getArtLibPath();
}

//获取ClassLinker::LoadMethod真实符号名
const char * getClassLinkerLoadMethodSymbol() {
    const char * sym = find_symbol_in_elf_file(getClassLinkerLoadMethodLibPath(),2,"ClassLinker","LoadMethod");
    return sym;
}

//获取libart真实名称
const char * getArtLibName() {
    //Android 10及以后变为libartbase.so
    return APILevel >= 29 ? "libartbase.so" : "libart.so";
}

// 禁用dex2oat
int fakeExecve(const char *pathname, char *const argv[], char *const envp[]) {
    BYTEHOOK_STACK_SCOPE();
    // 禁用dex2oat
    if (strstr(pathname, "dex2oat") != nullptr) {
        errno = EACCES;
        return -1;
    }
    return BYTEHOOK_CALL_PREV(fakeExecve, pathname, argv, envp);
}

void hookExecve(){
    bytehook_stub_t stub = bytehook_hook_single(
            getArtLibName(),
            "libc.so",
            "execve",
            (void *) fakeExecve,
            nullptr,
            nullptr);
    if (stub != nullptr) {
        logd("hook execve done");
    }
}

//为dex文件添加可写权限
void* fakeMmap(void * __addr, size_t __size, int __prot, int __flags, int __fd, off_t __offset){
    BYTEHOOK_STACK_SCOPE();
    int prot = __prot;
    int hasRead = (__prot & PROT_READ) == PROT_READ;
    int hasWrite = (__prot & PROT_WRITE) == PROT_WRITE;
    // 添加写权限
    if(hasRead && !hasWrite) {
        prot |= PROT_WRITE;
    }
    void * addr = BYTEHOOK_CALL_PREV(fakeMmap, __addr, __size, prot, __flags, __fd, __offset);
    return addr;
}

void hookMmap(){
    bytehook_stub_t stub = bytehook_hook_single(
            getArtLibName(),
            "libc.so",
            "mmap",
            (void *) fakeMmap,
            nullptr,
            nullptr);
    if(stub != nullptr){
        logd("hook mmap done");
    }
}

// 解析抽取代码文件,每个dex.codes只解析一次
void parseExtractedCodeFiles(const std::string& dexPath){
    //1.读取代码文件为字节数组
    std::string codeFilePath=dexPath+codeFilePostfix;
    logd("Code File Path: %s",codeFilePath.c_str());
    size_t codeBytesLen = 0;
    uint8_t* codeBytes = readFileToBytes(codeFilePath, &codeBytesLen);
    if(codeBytes == nullptr || codeBytesLen == 0) {
        logd("Code file not found!")
        return;
    }
    logd("CodeFile: %s Len:%#llx", codeFilePath.c_str(),codeBytesLen);

    // 2.解析代码字节数组
    size_t offset=0;
    while(offset<codeBytesLen){
        uint8_t* pointer = codeBytes + offset;  //每个结构的起点指针
        uint32_t codeOff = bytes2uint32(pointer); // 4字节CodeOff和4字节InsnSize
        uint32_t insnSize = bytes2uint32(pointer+4);
        if(codeOff == 0 || insnSize == 0){
            logd("CodeOff or InsnSize equals 0!")
            break;
        }
        logd("CodeOff: %#x InsnSize: %#x", codeOff, insnSize);
        // 创建抽取代码对象
        CodeItem codeItem = CodeItem(insnSize, pointer+8);
        // 添加一组CodeOff:CodeItem映射
        codeMapList[dexPath].insert(std::pair<uint32_t, CodeItem>(codeOff, codeItem));
        logd("CodeItem codeOff: %#x insnSize: %#x has created!", codeOff, insnSize);
        offset += 8 + insnSize*2; //跳过CodeOff,InsnSize和Insn[]
    }
}

// 回填dex的方法代码,每次只回填一个Method
void innerLoadMethod(void* thiz, const DexFile* dexFile, ClassAccessor::Method* method, void* klass, void* dest){
    // dex文件路径
    std::string location = dexFile->location_;
    //logd("Load Dex File Location: %s",location.c_str())
    // 判断是否为解密释放的dex文件,位于私有目录内
    if(location.find("app_tmp_dex") == std::string::npos){
        return;
    }
    // 如果未解析过dexCodes文件则进行解析,每个dex文件只解析一次,创建对应的map<CodeOff,CodeItem>映射
    if(codeMapList.find(location)==codeMapList.end()){
        logd("Parse dex file %s codes",location.c_str());
        codeMapList[location]=std::map<uint32_t,CodeItem>(); //创建新的codeMap
        parseExtractedCodeFiles(location);
    }
    // 不存在DexCode 直接跳过
    if(method->code_off_==0){
        return;
    }
    // 指令地址
    uint8_t* codeAddr = (uint8_t*)(dexFile->begin_ + method->code_off_ + 16); //insn结构前面有16字节

    //logd("MethodCodeOff: %d",method->code_off_);
    // 回填指令
    std::map<uint32_t,CodeItem> codeMap=codeMapList[location];
    // 似乎没有走到回填指令处 (注意c++浅拷贝问题,不能随意delete)
    if(codeMap.find(method->code_off_) != codeMap.end()){
        CodeItem codeItem = codeMap[method->code_off_];
        memcpy(codeAddr,codeItem.getInsns(),codeItem.getInsnsSize()*2); //注意指令为u2类型,长度需要*2
    }
}

void newLoadMethod(void* thiz, const DexFile* dex_file, ClassAccessor::Method* method, void* klass, void* dest){
    if(g_originLoadMethod!= nullptr){
        // 先回填指令,再调用
        innerLoadMethod(thiz,dex_file,method,klass,dest);
        g_originLoadMethod(thiz,dex_file,method, klass, dest);
    }
    return;
}

void hook_LoadMethod(){
    void * loadMethodAddress =  DobbySymbolResolver(getClassLinkerLoadMethodLibPath(),getClassLinkerLoadMethodSymbol());
    DobbyHook(loadMethodAddress, (void *) newLoadMethod, (void **) &g_originLoadMethod);
    logd("hook LoadMethod done");
}

// 初始函数,实现hook
extern "C"
void _init(){
    APILevel = android_get_device_api_level();
    logd("Android API Level: %d", APILevel)
    logd("Setting hook...")
    hook();
}
// hook
void hook(){
    bytehook_init(BYTEHOOK_MODE_AUTOMATIC, false);
    hookExecve();   // 禁用dex2oat
    hookMmap();     // 使dex文件可写
    //hook_DefineClass(); //需手动解析ClassDef
    hook_LoadMethod();  // 加载方法时回填指令
}
四、加固测试
只需要执行以下指令
python ThirdAndroidShell.py -src <源程序Apk路径> -shell <壳程序Apk路径> -out <加壳后的Apk路径>
然后就可以得到加固之后的 APK
五、参考
[原创]Android从整体加固到抽取加固的实现及原理-Android安全-看雪-安全社区|安全招聘|kanxue.com
安卓壳学习记录-加壳脱壳-看雪-安全社区|安全招聘|kanxue.com
转载请注明来源,欢迎对文章中的引用来源进行考证,欢迎指出任何有错误或不够清晰的表达。可以在下面评论区评论,也可以邮件至 1621925986@qq.com


