Android 开发——NDK 开发
一、NDK 介绍
1.1 App 中为什么部分代码需要放到 so 中
- 虽然 Java 是平台无关性语言,但是运行 Java 语言的虚拟机是运行在具体平台上的,也就是说 Java 虚拟机是平台相关的。因此,在调用平台 API 的功能时,虽然在 Java 语言层是平台无关的,但背后只能通过 JNI 技术在 Native 层分别调用不同平台 API(例如打开文件功能,在 Window 平台是 openFile 函数,而在 Linux 平台是 open 函数)。类似的,对于有操作硬件需求的程序,也只能通过 C/C++ 实现对硬件的操作,再通过 JNI 调用。而 NDK 提供了 JNI 的工具和环境;
- C/C++ 代码的执行效率比 Java 高;
- Native 层代码安全性更高,反编译 so 文件的难度比反编译 Class 文件高,一些跟密码相关的功能会选择用 C/C++ 实现;
- 复用现有代码,当 C/C++ 存在程序需要的功能时,则可以直接复用。
1.2 什么是 JNI
JNI 是 Java Native Interface 的缩写。从 Java1.1 开始,JNI 标准成为 Java 平台的一部分,允许 Java 代码和其他语言写的代码进行交互。也就是说 JNI 是 Java 平台层面制定的“标准”,任何语言只要遵守这个规则都能跟 Java 交互。
1.3 什么是 NDK
NDK 是Google 提供的工具,让我们可以在 Android 上用 C/C++ 写代码,方便实现 JNI 交互和性能优化。
官方的介绍:NDK 使用入门 | Android NDK | Android Developers
1.4 ABI 与指令集
不同的 Android 设备使用不同的 CPU,而不同的 CPU 支持不同的指令集。CPU 与指令集的每种组合都有专属的应用二进制接口 (ABI)。详见:Android ABI | Android NDK | Android Developers
二、NDK 和 普通 Java 工程的区别
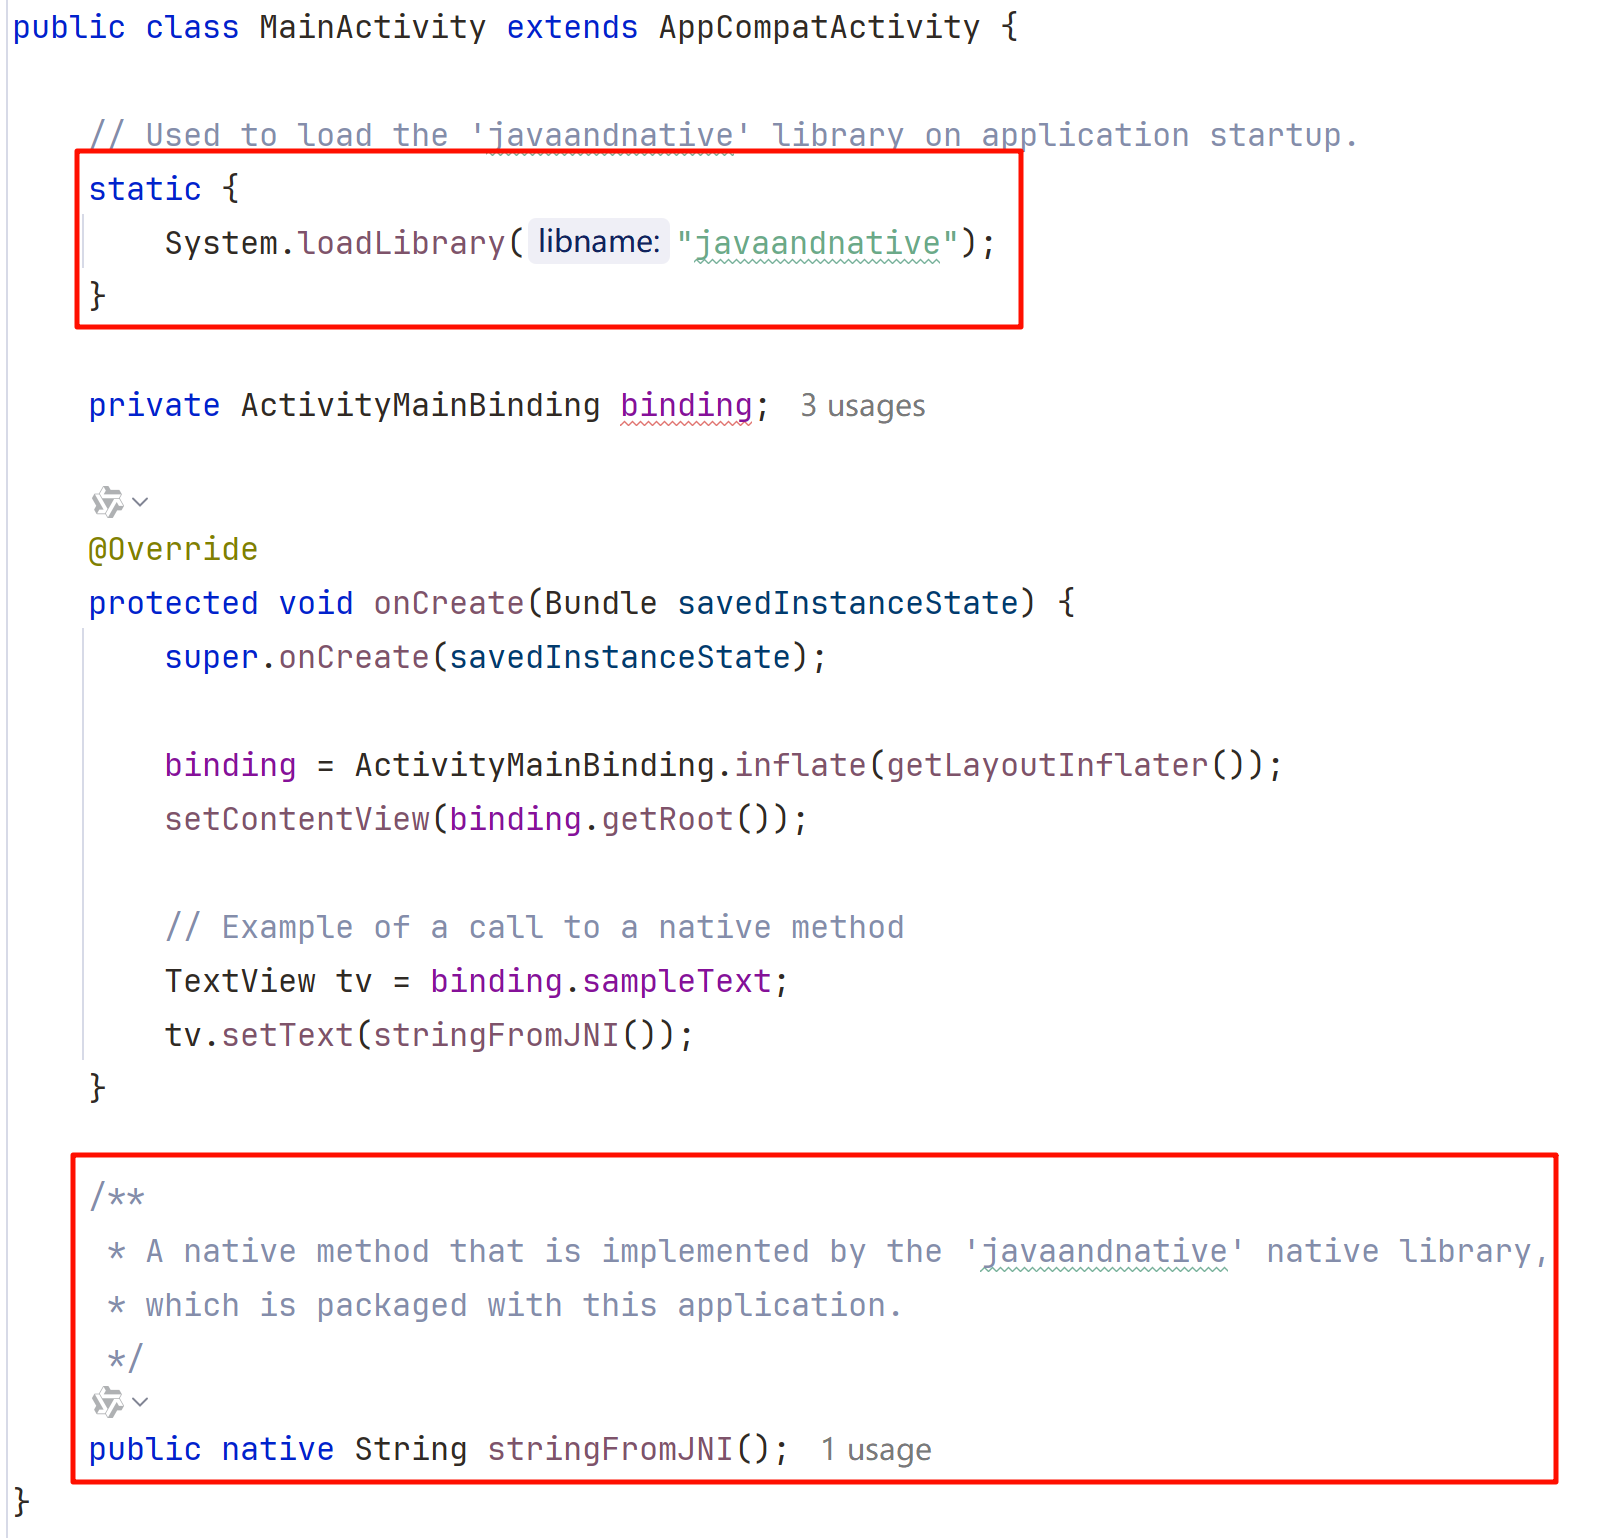
Java 代码中多了加载 so 和 声明所需要加载的 so 中函数的代码
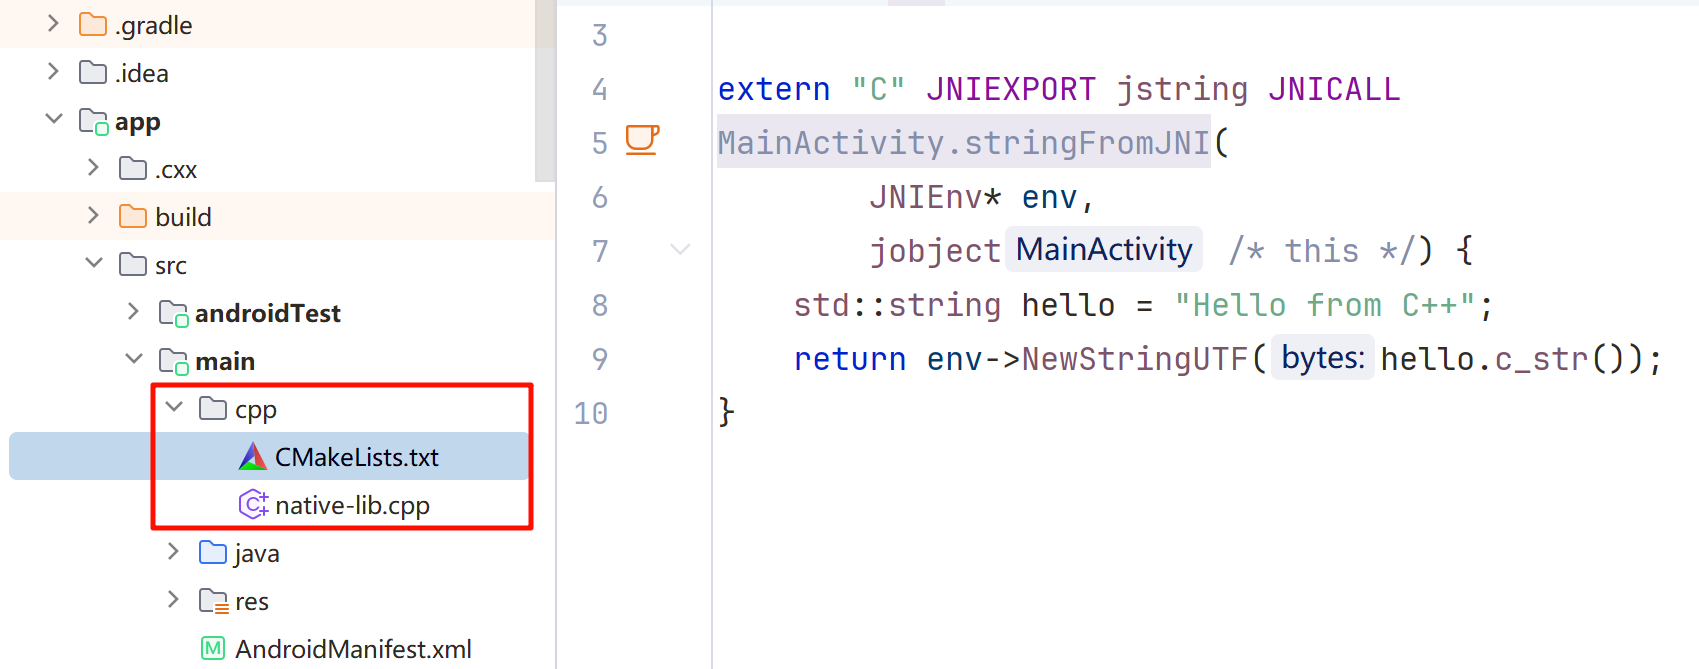
main 目录中多了一个 cpp 目录,其中包含有 CMakeLists.txt 和 cpp 文件
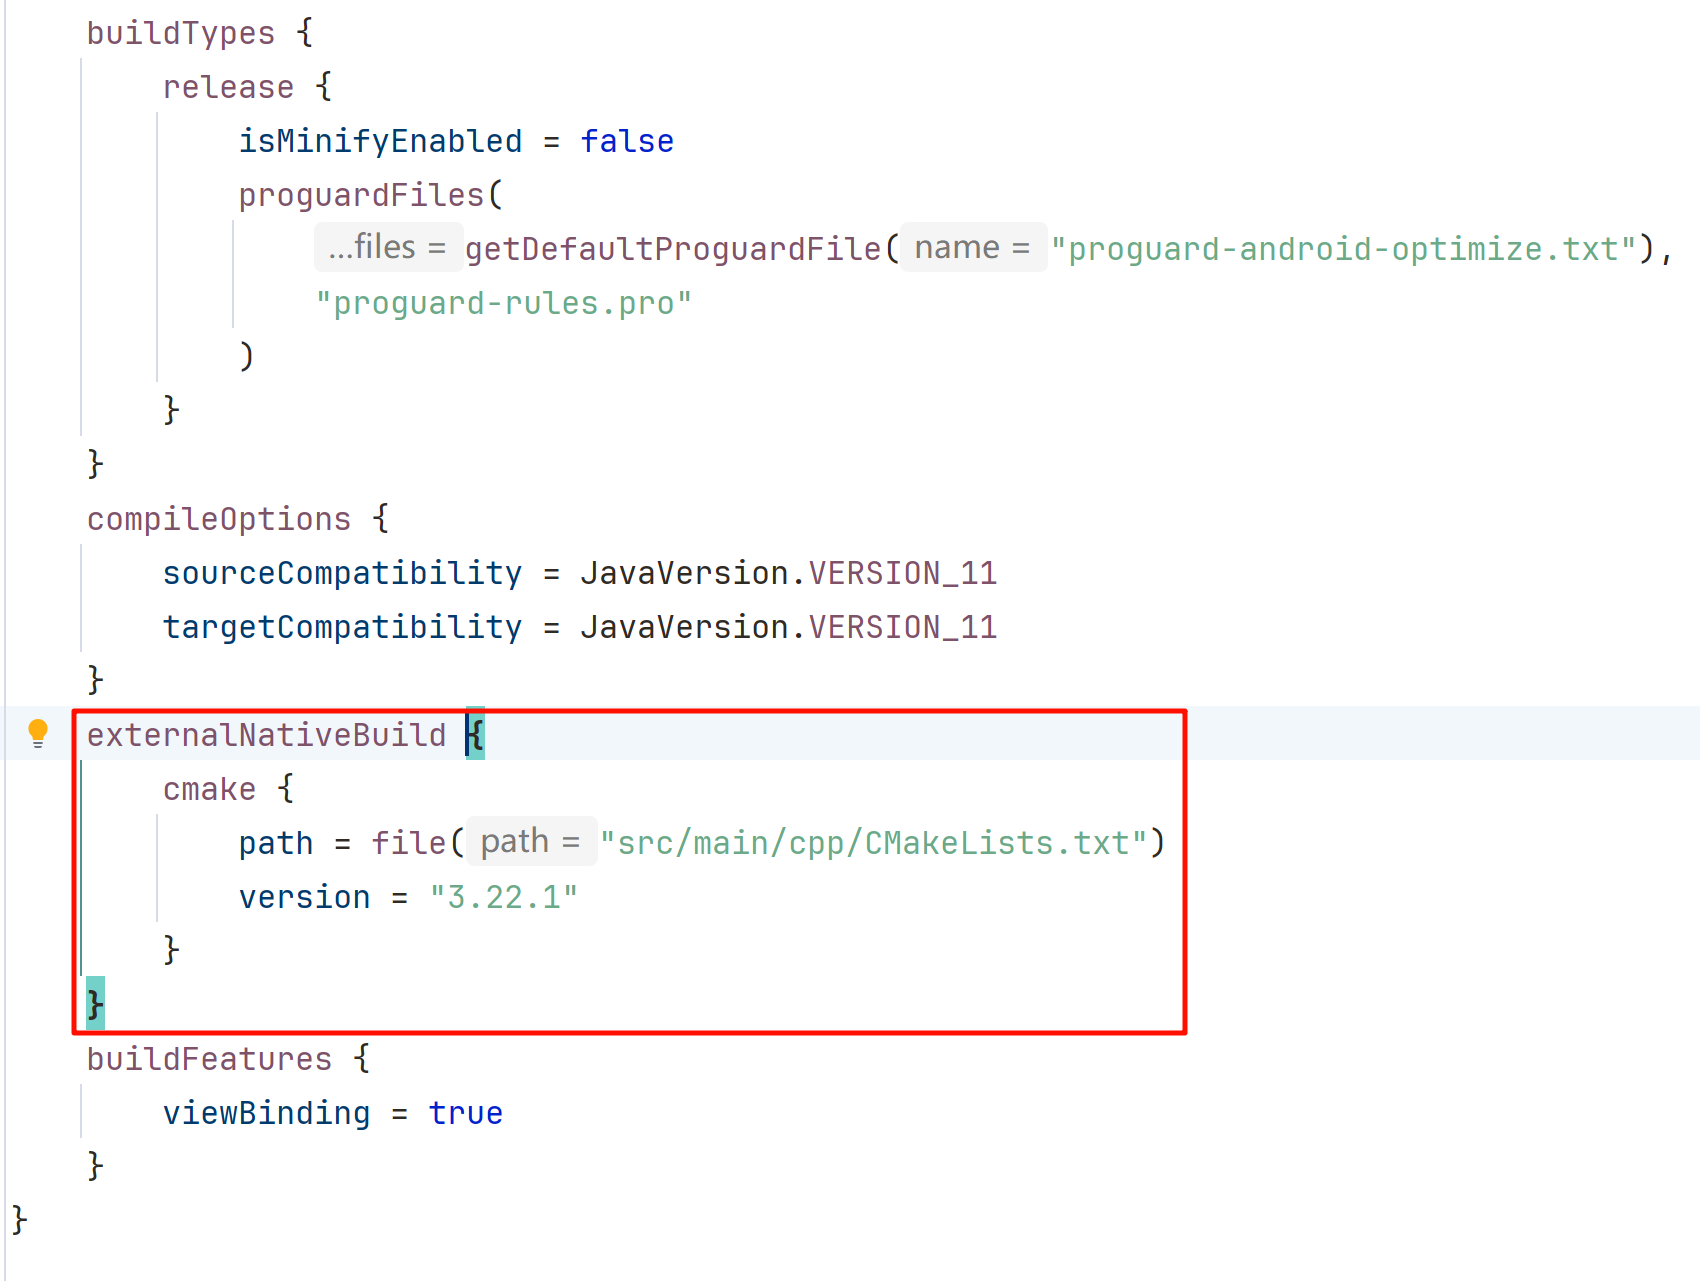
- build.gradle 中也多了一些代码
默认是支持四种 ABI,如果需要限制安装包大小可以选择只支持一部分 ABI
defaultConfig {
    // ...
    ndk {
        abiFilters += listOf("armeabi-v7a", "arm64-v8a", "x86", "x86_64")
    }
}
三、第一个 NDK 工程
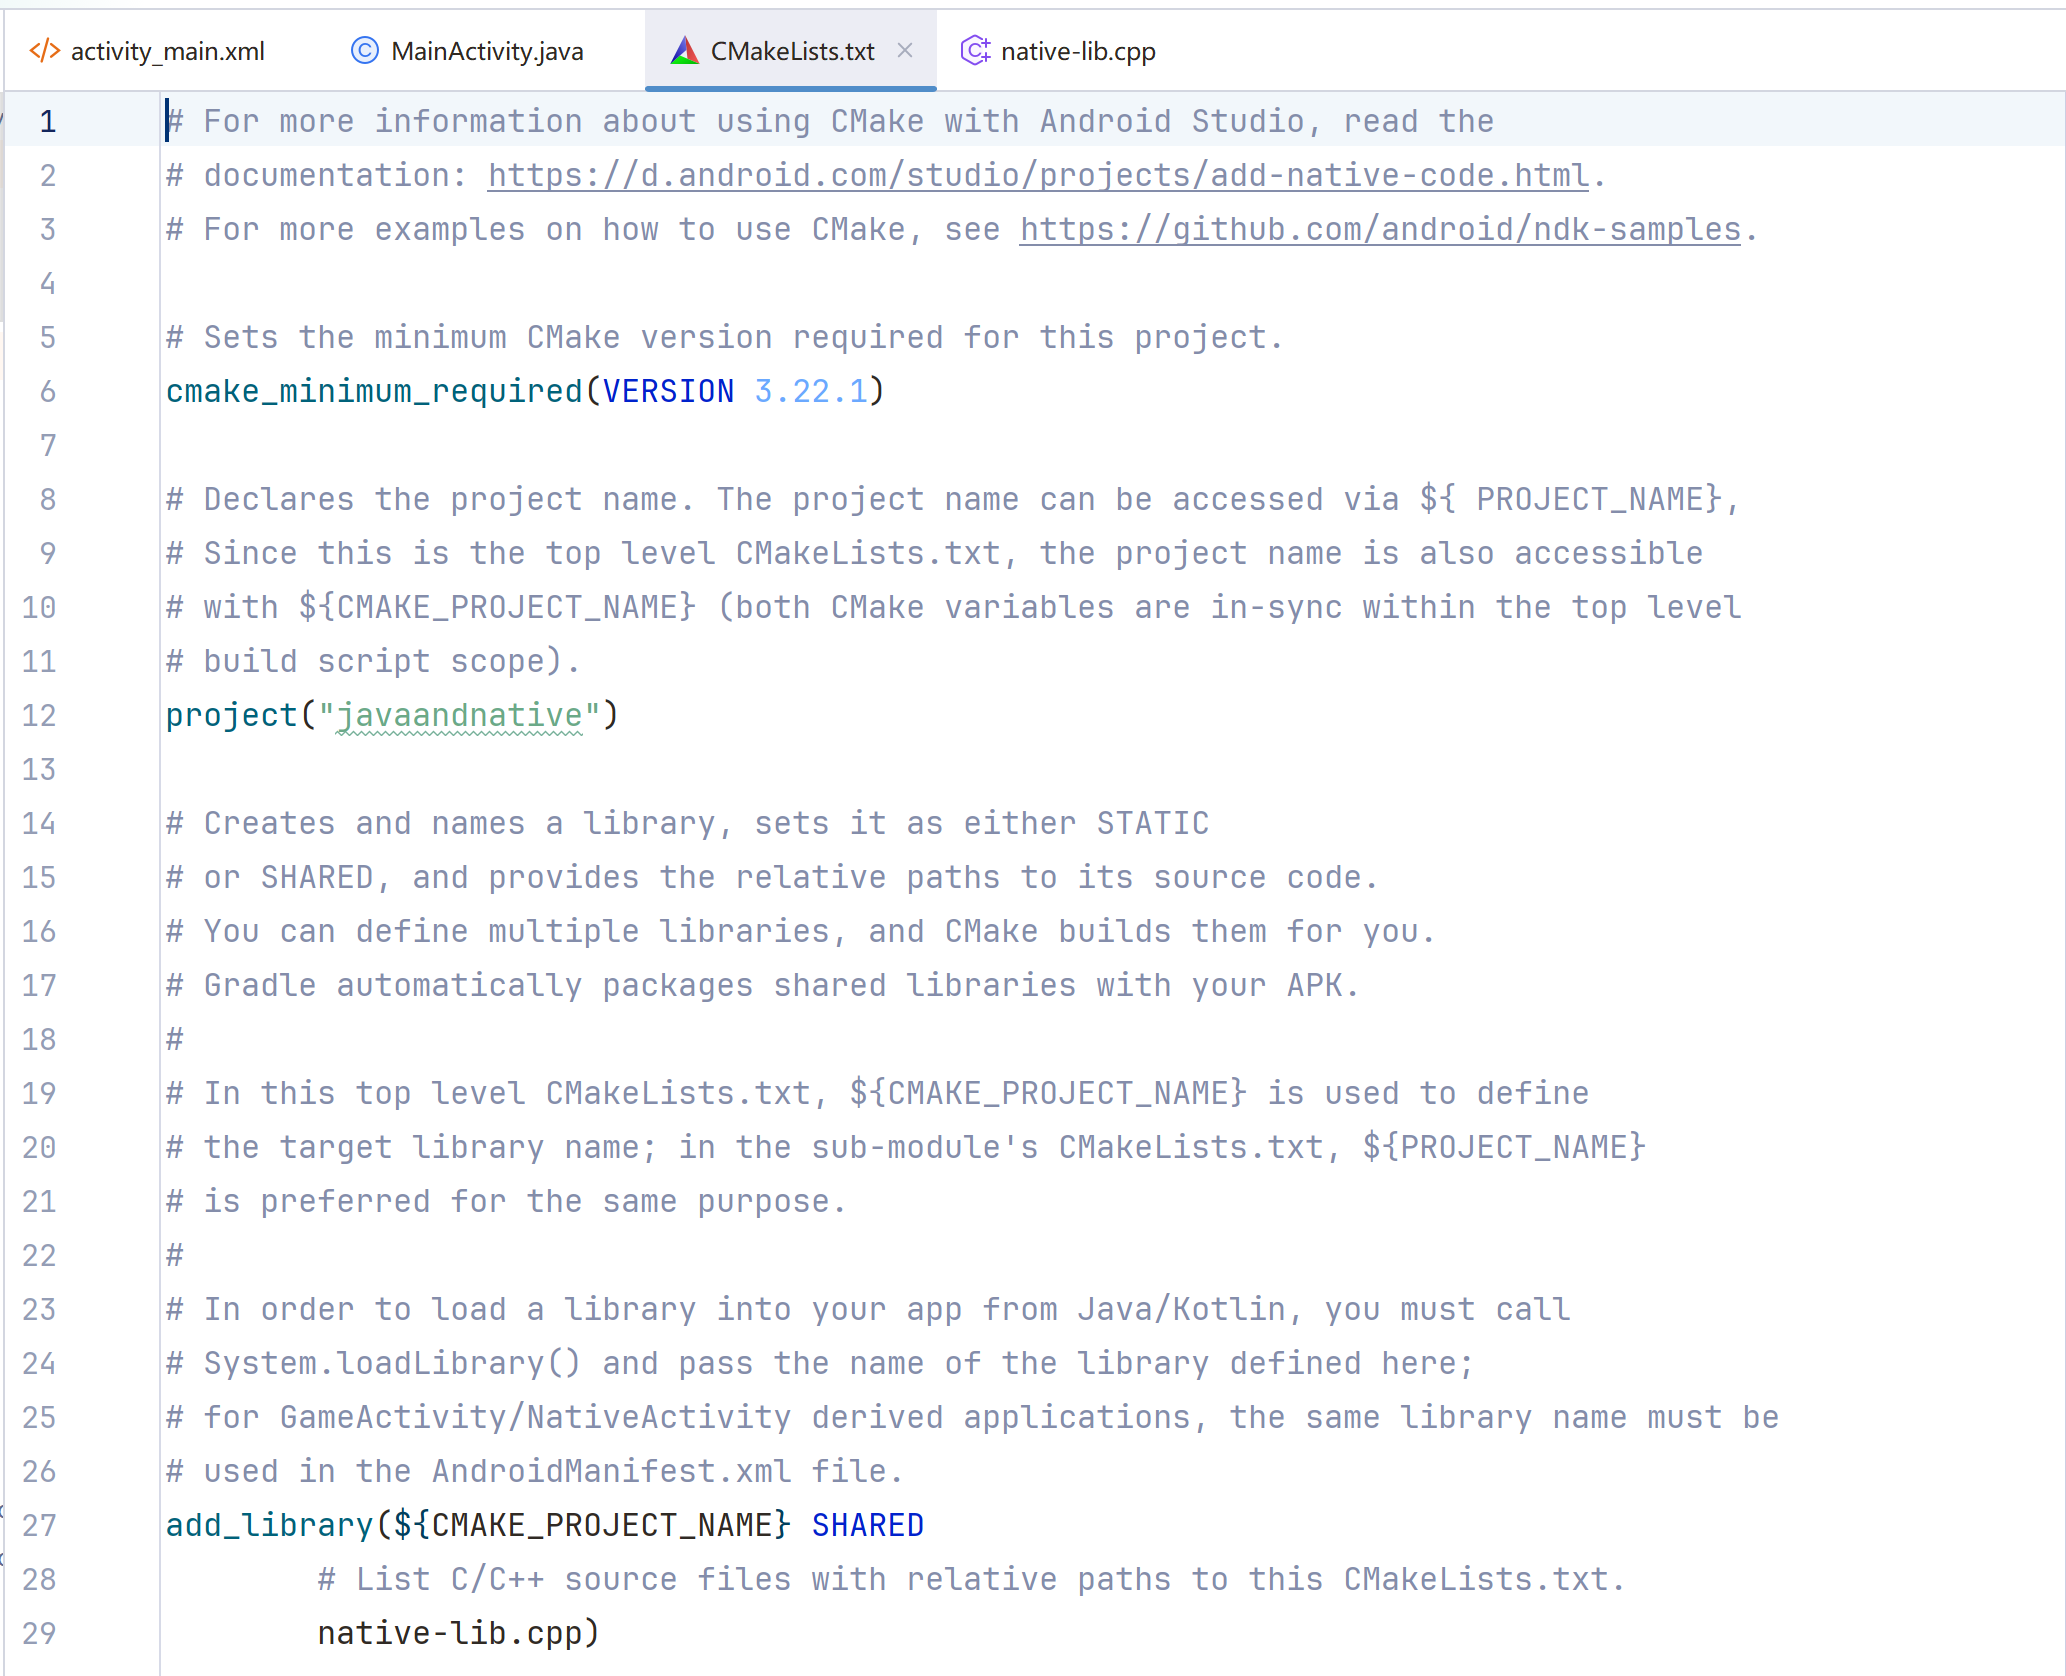
- CMakeLists.txt 介绍
# For more information about using CMake with Android Studio, read the
# documentation: https://d.android.com/studio/projects/add-native-code.html.
# For more examples on how to use CMake, see https://github.com/android/ndk-samples.
# 说明:这几行是官方提供的参考链接,方便你学习 CMake 和 NDK 的使用。

# Sets the minimum CMake version required for this project.
cmake_minimum_required(VERSION 3.22.1)
# 设置本项目要求的 CMake 最低版本,这里是 3.22.1。
# 如果你的系统 CMake 版本低于这个,会直接报错。

# Declares the project name. The project name can be accessed via ${ PROJECT_NAME},
# Since this is the top level CMakeLists.txt, the project name is also accessible
# with ${CMAKE_PROJECT_NAME} (both CMake variables are in-sync within the top level
# build script scope).
project("javaandnative")
# 定义项目名称为 "javaandnative"。
# 在这个顶层 CMakeLists.txt 中,${PROJECT_NAME} 和 ${CMAKE_PROJECT_NAME} 都可以访问这个名字。

# Creates and names a library, sets it as either STATIC
# or SHARED, and provides the relative paths to its source code.
# You can define multiple libraries, and CMake builds them for you.
# Gradle automatically packages shared libraries with your APK.
#
# In this top level CMakeLists.txt, ${CMAKE_PROJECT_NAME} is used to define
# the target library name; in the sub-module's CMakeLists.txt, ${PROJECT_NAME}
# is preferred for the same purpose.
#
# In order to load a library into your app from Java/Kotlin, you must call
# System.loadLibrary() and pass the name of the library defined here;
# for GameActivity/NativeActivity derived applications, the same library name must be
# used in the AndroidManifest.xml file.
add_library(${CMAKE_PROJECT_NAME} SHARED
        # List C/C++ source files with relative paths to this CMakeLists.txt.
        native-lib.cpp)
# 创建一个库(library)。
# ${CMAKE_PROJECT_NAME} → 这里会替换成 "javaandnative",也就是库的名字。
# SHARED 表示生成的是动态库(.so 文件),不是静态库(.a)。
# 后面是库包含的源文件列表,这里只有 native-lib.cpp。
# 注意:如果要在 Java/Kotlin 中加载这个库,需要调用 System.loadLibrary("javaandnative")。

# Specifies libraries CMake should link to your target library. You
# can link libraries from various origins, such as libraries defined in this
# build script, prebuilt third-party libraries, or Android system libraries.
target_link_libraries(${CMAKE_PROJECT_NAME}
        # List libraries link to the target library
        android
        log)
# 指定要和你的库一起链接的其他库。
# ${CMAKE_PROJECT_NAME} 是你的库名字(javaandnative)。
# 这里链接了两个 Android NDK 自带的库:
#   android → 提供 Android NDK 相关 API(如 NativeActivity)。
#   log → 提供 __android_log_print 等日志函数,用于在 logcat 输出调试信息。
so 的加载
    // Used to load the 'javaandnative' library on application startup.
    static {
        System.loadLibrary("javaandnative");
    }
native 层函数的声明
    /**
     * A native method that is implemented by the 'javaandnative' native library,
     * which is packaged with this application.
     */
    public native String stringFromJNI();
JNI 函数的静态注册规则
#include <jni.h>
#include <string>

extern "C" JNIEXPORT jstring JNICALL
Java_com_example_javaandnative_MainActivity_stringFromJNI(
        JNIEnv* env,
        jobject /* this */) {
    std::string hello = "Hello from C++";
    return env->NewStringUTF(hello.c_str());
}
Java_包名_类_方法名
JNIEnv、jobject/jclass
jobject 在 native 函数的声明改为 static 时,使用 jclass,因为静态方法可以通过类直接调用。NewstringUTF
Java 的数据和 so 的数据不互通,如果 so 的数据最后要转到 java 层处理就需要 NewstringUTF,因此 NewstringUTF 可以成为一个 hook 点。在 NDK 开发中,一定要注意哪些是 Java 的数据类型,哪些是 C/C++ 的数据类型,在适当的时候需要转换,hello.c_str() 获取 C/C++ 字符串的类型,jstring 是 Java 字符串类型。
extern “C” JNIEXPORT jstring JNICALL

JNICALL 是空的,JNIEXPORT 代表把函数导出,给函数添加了默认的可见属性
- 自定义 ABI 或者 自定义命名 so
在 CMakeLists.txt 中修改 project 中的文件名即可自定义命名 so;自定义 ABI 也在上文中提到即在 gradle.build 中添加条件即可。
三、so 中常用的 Log 输出
#include <jni.h>
#include <string>
#include <android/log.h>
#define TAG "NshIdE"
#define LOGD(...) __android_log_print(ANDROID_LOG_DEBUG, TAG, __VA_ARGS__);
#define LOGI(...) __android_log_print(ANDROID_LOG_INFO , TAG, __VA_ARGS__);
#define LOGE(...) __android_log_print(ANDROID_LOG_ERROR, TAG, __VA_ARGS__);

extern "C" JNIEXPORT jstring JNICALL
Java_com_example_javaandnative_MainActivity_stringFromJNI(
        JNIEnv* env,
        jobject /* this */) {
    std::string hello = "Hello from C++";
    LOGD("LOGD test%d", 1);
    LOGI("LOGI test%d,%d", 1, 2);
    LOGE("LOGE test%d,%d,%d", 1, 2, 3);
    return env->NewStringUTF(hello.c_str());
}
这是自定义的,当然也可以使用官方的,即不用 LOGD、LOGI 等进行包装,直接使用 __android_log_print。
四、NDK 多线程
int pthread_create(pthread_t* __pthread_ptr, pthread_attr_t const* __attr, void* (*__start_routine)(void*), void*);
第一个是指向 phread 的指针,也是线程 id,第二个是线程属性,第三个是线程执行的函数,第四个是函数参数。
#include <jni.h>
#include <string>
#include <android/log.h>
#define TAG "NshIdE"
#define LOGD(...) __android_log_print(ANDROID_LOG_DEBUG, TAG, __VA_ARGS__);
#define LOGI(...) __android_log_print(ANDROID_LOG_INFO , TAG, __VA_ARGS__);
#define LOGE(...) __android_log_print(ANDROID_LOG_ERROR, TAG, __VA_ARGS__);

void* myThread(void* arg) {
    std::string test = "this is a thread function";
    LOGD("%s", test.c_str());
    return nullptr;
}

extern "C" JNIEXPORT jstring JNICALL
Java_com_example_javaandnative_MainActivity_stringFromJNI(
        JNIEnv* env,
        jobject /* this */) {
    std::string hello = "Hello from C++";

    pthread_t pthread;
    pthread_create(&pthread, nullptr, myThread, nullptr);

    return env->NewStringUTF(hello.c_str());
}
日志
2025-08-14 17:14:44.334 3993-4264 NshIdE com.example.javaandnative D this is a thread function
默认的线程属性是 joinable 随着主线程结束而结束的。
#include <jni.h>
#include <string>
#include <android/log.h>
#define TAG "NshIdE"
#define LOGD(...) __android_log_print(ANDROID_LOG_DEBUG, TAG, __VA_ARGS__);
#define LOGI(...) __android_log_print(ANDROID_LOG_INFO , TAG, __VA_ARGS__);
#define LOGE(...) __android_log_print(ANDROID_LOG_ERROR, TAG, __VA_ARGS__);

void* myThread(void* arg) {
    std::string test = "this is a thread function";
    LOGD("%s", test.c_str());
    pthread_exit(nullptr);
    return nullptr;
}

extern "C" JNIEXPORT jstring JNICALL
Java_com_example_javaandnative_MainActivity_stringFromJNI(
        JNIEnv* env,
        jobject /* this */) {
    std::string hello = "Hello from C++";

    pthread_t pthread;
    pthread_create(&pthread, nullptr, myThread, nullptr);

    pthread_join(pthread, nullptr);

    return env->NewStringUTF(hello.c_str());
}
上面代码中加了一个 pthread_join,这么做可以 确保线程执行完成、日志输出、资源回收,然后再返回到 Java 层。但这么做会导致主线程阻塞,可能会造成界面卡顿。如果使用 detach 分离线程,让它异步执行,就不会阻塞主线程。
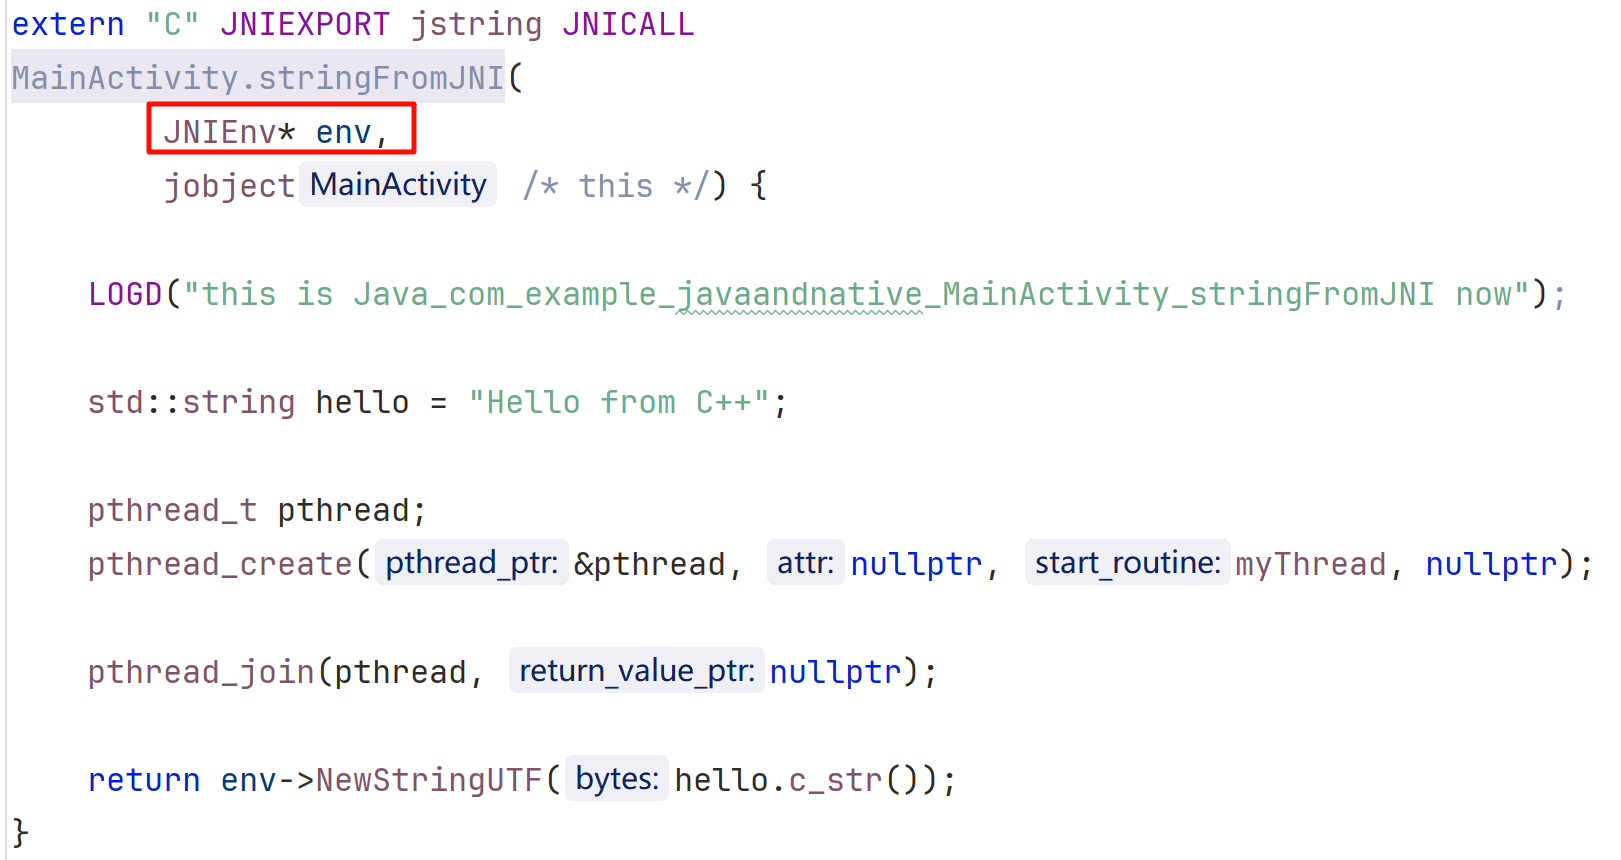
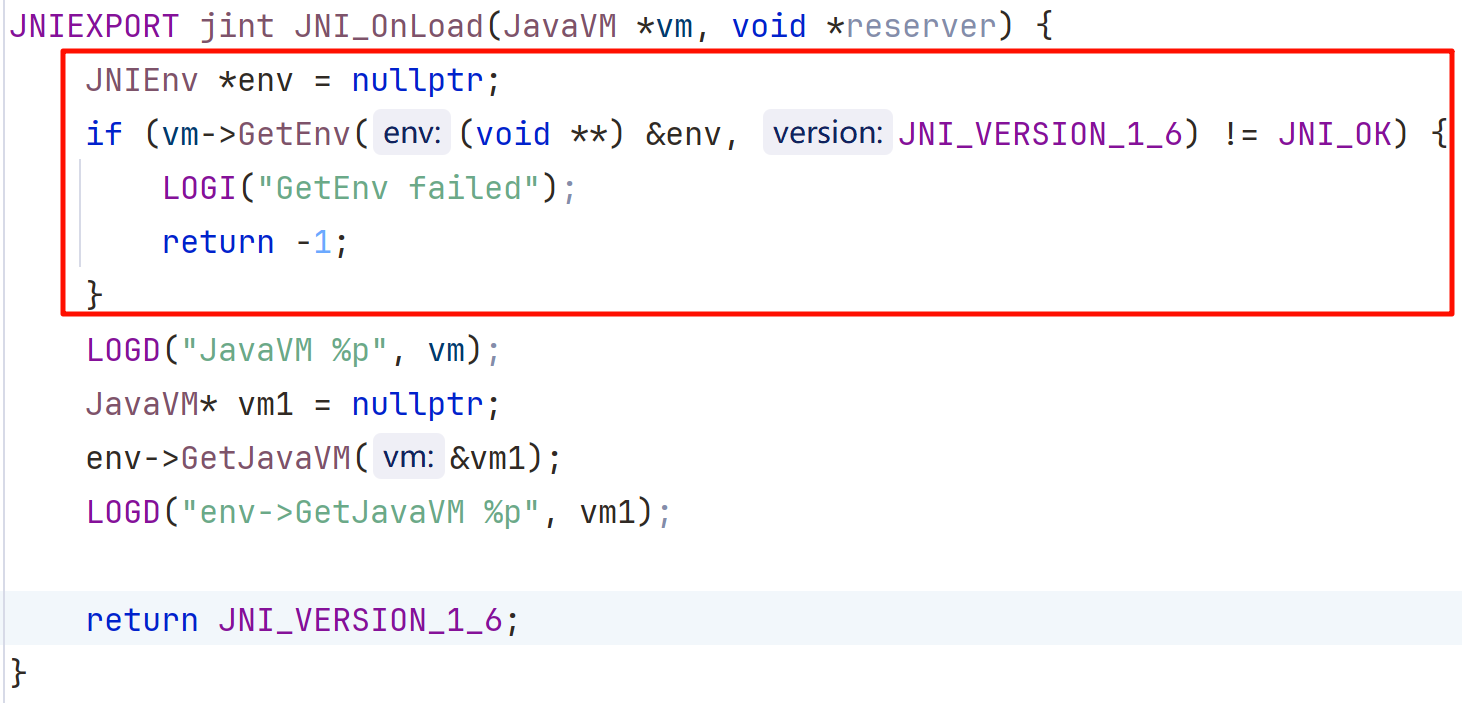
五、JNI_Onload
在使用 native 层方法之前都会先加载 native 层的so文件,通常在一个类的静态代码块中进行加载,当然也可以在构造函数,或者调用前加载。jvm 在加载 so 时都会先调用 so 中的 JNI_Onload 函数,如果你没有重写该方法,那么系统会给你自动生成一个。我们先来测试一下 JNI_Onload 的调用时机。
#include <jni.h>
#include <string>
#include <android/log.h>
#define TAG "NshIdE"
#define LOGD(...) __android_log_print(ANDROID_LOG_DEBUG, TAG, __VA_ARGS__);
#define LOGI(...) __android_log_print(ANDROID_LOG_INFO , TAG, __VA_ARGS__);
#define LOGE(...) __android_log_print(ANDROID_LOG_ERROR, TAG, __VA_ARGS__);

void* myThread(void* arg) {
    std::string test = "this is a mythread now";
    LOGD("%s", test.c_str());
    pthread_exit(nullptr);
    return nullptr;
}

extern "C" JNIEXPORT jstring JNICALL
Java_com_example_javaandnative_MainActivity_stringFromJNI(
        JNIEnv* env,
        jobject /* this */) {

    LOGD("this is Java_com_example_javaandnative_MainActivity_stringFromJNI now");

    std::string hello = "Hello from C++";

    pthread_t pthread;
    pthread_create(&pthread, nullptr, myThread, nullptr);

    pthread_join(pthread, nullptr);

    return env->NewStringUTF(hello.c_str());
}

JNIEXPORT jint JNI_OnLoad(JavaVM *vm, void *reserver) {
    LOGI("this is JNI_OnLoad now");
    JNIEnv *env = nullptr;
    if (vm->GetEnv((void **) &env, JNI_VERSION_1_6) != JNI_OK) {
        LOGI("GetEnv failed");
        return -1;
    }
    return JNI_VERSION_1_6;
}
日志
2025-08-14 17:56:11.092 19068-19068 NshIdE                  com.example.javaandnative            I  this is JNI_OnLoad now
2025-08-14 17:56:11.311 19068-19068 NshIdE                  com.example.javaandnative            D  this is Java_com_example_javaandnative_MainActivity_stringFromJNI now
2025-08-14 17:56:11.312 19068-19094 NshIdE                  com.example.javaandnative            D  this is a mythread now
注意事项:
一个 so 中可以不人为的主动定义 JNI_OnLoad,但是一旦定义了 JNI_OnLoad,在 so 被加载的时候会立刻自动执行,并且必须返回一个 JNI 版本表示加载成功,JVM 会按这个版本返回 JNIEnv 和相关功能。目前一般都是返回 JNI_VERSION_1_6。1_2、1_4 版本太老,几乎没人用,最新版本的在目前很多 Android 机型上没适配。
在 so 被成功卸载时,会回调另一个 JNI 方法:JNI_UnOnLoad。这两个方法声明如下:
JNIEXPORT jint JNICALL JNI_OnLoad(JavaVM* vm, void* reserved);
JNIEXPORT void JNICALL JNI_OnUnload(JavaVM* vm, void* reserved);
其中第一个参数 vm 表示 DVM 虚拟机,该 vm 在应用进程中有且仅有一个,可以保存在 native 的静态变量中,供其他函数活线程使用。其返回值表示当前 native library 所需要的版本。
六、JavaVM
6.1 JavaVM 是什么
JavaVM 是虚拟机在 JNI 中的表示,一个 JVM 中只有一个 JavaVM 实例,这个实例是线程共享的,通过 JNIEnv* 可以获取一个 Java 虚拟机实例,其函数如下:
jint GetJavaVM(JNIEnv *env, JavaVM **vm);
vm 用来存放获得的虚拟机指针的指针,成功时返回0,失败时返回其他值。
这里解释一下为什么可以通过 JNIEnv* 获取一个 Java 虚拟机实例。首先需要明白在 JNI 里,JNIEnv* 是 线程局部 的,每个线程都有一个自己的 JNIEnv*,不能跨线程使用,而 JavaVM 是全局唯一的 JVM 实例指针,可以在任意线程使用它去附加/分离线程(AttachCurrentThread / DetachCurrentThread)来获取新的 JNIEnv所以如果在 JNI_OnLoad 里没保存 JavaVM,后面又想在新的线程中使用 JNI,就需要从已有的 JNIEnv 反查它。
如果是 C++,则用 _JavaVM 定义,如果是 C,就用 JNIInvokeInterface 定义。详见如下:
#if defined(__cplusplus)
typedef _JNIEnv JNIEnv;
typedef _JavaVM JavaVM;
#else
typedef const struct JNINativeInterface* JNIEnv;
typedef const struct JNIInvokeInterface* JavaVM;
#endif
_JavaVM 和 JNIInvokeInterface 分别如下:
/*
 * JNI invocation interface.
 */
struct JNIInvokeInterface {
    void*       reserved0;
    void*       reserved1;
    void*       reserved2;

    jint        (*DestroyJavaVM)(JavaVM*);
    jint        (*AttachCurrentThread)(JavaVM*, JNIEnv**, void*);
    jint        (*DetachCurrentThread)(JavaVM*);
    jint        (*GetEnv)(JavaVM*, void**, jint);
    jint        (*AttachCurrentThreadAsDaemon)(JavaVM*, JNIEnv**, void*);
};

/*
 * C++ version.
 */
struct _JavaVM {
    const struct JNIInvokeInterface* functions;

#if defined(__cplusplus)
    jint DestroyJavaVM()
    { return functions->DestroyJavaVM(this); }
    jint AttachCurrentThread(JNIEnv** p_env, void* thr_args)
    { return functions->AttachCurrentThread(this, p_env, thr_args); }
    jint DetachCurrentThread()
    { return functions->DetachCurrentThread(this); }
    jint GetEnv(void** env, jint version)
    { return functions->GetEnv(this, env, version); }
    jint AttachCurrentThreadAsDaemon(JNIEnv** p_env, void* thr_args)
    { return functions->AttachCurrentThreadAsDaemon(this, p_env, thr_args); }
#endif /*__cplusplus*/
};
这个底层逻辑很清晰了。_JavaVM 就是对 JNIInvokeInterface 的封装,底层逻辑还是调用 JNIInvokeInterface 的函数。这么带来的效果如下:
// C++ 版本
vm->AttachCurrentThread(&env, NULL);
//C 版本 (*vm)->AttachCurrentThread(vm, &env, NULL);JavaVM 中的常用方法:GetEnv 和 AttachCurrentThread(在子线程中获取JNIEnv)
6.2 JavaVM 的获取方式
- JNI_OnLoad 的第一个参数
- JNI_UnOnLoad 的第一个参数
- env->GetJavaVM
#include <jni.h>
#include <string>
#include <android/log.h>
#define TAG "NshIdE"
#define LOGD(...) __android_log_print(ANDROID_LOG_DEBUG, TAG, __VA_ARGS__);
#define LOGI(...) __android_log_print(ANDROID_LOG_INFO , TAG, __VA_ARGS__);
#define LOGE(...) __android_log_print(ANDROID_LOG_ERROR, TAG, __VA_ARGS__);

void* myThread(void* arg) {
    std::string test = "this is a mythread now";
    LOGD("%s", test.c_str());
    pthread_exit(nullptr);
    return nullptr;
}

extern "C" JNIEXPORT jstring JNICALL
Java_com_example_javaandnative_MainActivity_stringFromJNI(
        JNIEnv* env,
        jobject /* this */) {

    LOGD("this is Java_com_example_javaandnative_MainActivity_stringFromJNI now");

    std::string hello = "Hello from C++";

    pthread_t pthread;
    pthread_create(&pthread, nullptr, myThread, nullptr);

    pthread_join(pthread, nullptr);

    return env->NewStringUTF(hello.c_str());
}

JNIEXPORT jint JNI_OnLoad(JavaVM *vm, void *reserver) {
    JNIEnv *env = nullptr;
    if (vm->GetEnv((void **) &env, JNI_VERSION_1_6) != JNI_OK) {
        LOGI("GetEnv failed");
        return -1;
    }
    LOGD("JavaVM %p", vm);
    JavaVM* vm1 = nullptr;
    env->GetJavaVM(&vm1);
    LOGD("env->GetJavaVM %p", vm1);

    return JNI_VERSION_1_6;
}
查看日志
2025-08-15 10:35:54.068 27209-27209 NshIdE                  com.example.javaandnative            D  JavaVM 0xb400006fd5b8f540
2025-08-15 10:35:54.068 27209-27209 NshIdE                  com.example.javaandnative            D  env->GetJavaVM 0xb400006fd5b8f540
2025-08-15 10:35:54.219 27209-27209 NshIdE                  com.example.javaandnative            D  this is Java_com_example_javaandnative_MainActivity_stringFromJNI now
2025-08-15 10:35:54.219 27209-27384 NshIdE                  com.example.javaandnative            D  this is a mythread now
七、JNIEnv
7.1 JNIEnv 是什么
JNIEnv 一般是由虚拟机传入的,而且是与线程相关的变量,即线程 A 不能使用线程 B 的 JNIEnv。而作为一个结构体,它里面定义了 JNI 系统的操作函数。JNI 定义如下
#if defined(__cplusplus)
typedef _JNIEnv JNIEnv;
#else
typedef const struct JNINativeInterface* JNIEnv;
#endif
JNIEnv 在 C 语言环境和 C++ 语言环境中的实现是不一样的。在 C 中定义为 JNINativeInterface,在 C++ 中定义为 _JNIEnv。
_JNIEnv 结构体的定义如下
struct _JNIEnv {
/* do not rename this; it does not seem to be entirely opaque */
const struct JNINativeInterface* functions;

#if defined(__cplusplus)

jint GetVersion()
{ return functions->GetVersion(this); }

jclass DefineClass(const char *name, jobject loader, const jbyte* buf,
jsize bufLen)
{ return functions->DefineClass(this, name, loader, buf, bufLen); }

jclass FindClass(const char* name)
{ return functions->FindClass(this, name); }


...
...

#endif
}
在 _JNIEnv 中定义了一个 functions 变量,这个变量是指向 JNINativeInterface 的指针。所以如果我们在写 native 函数时,当接收到类型为 JNIEnv* 的变量 env 时,可以使用如下方式调用 JNIEnv 中的函数(准确说时通过函数指针来调用函数,因为 JNIEnv 的数据结果聚合了所有 JNI 函数的函数指针),我们可以在 C++ 中通过如下方式调用:
env->FindClass("java/lang/String")
而在 C 中可以通过如下方式调用:
(*env)->FindClass(env, "java/lang/String")
由于变量 functions 是定义在结构体 _JNIEnv 的第一个变量,所以我们通过 *env 就能获取到 functions 变量的值,然后通过 JNINativeInterface 中的函数指针来调用对应的函数。
JNINativeInterface 结构体的定义如下:
struct JNINativeInterface {
void* reserved0;
void* reserved1;
void* reserved2;
void* reserved3;

jint (*GetVersion)(JNIEnv *);

jclass (*DefineClass)(JNIEnv*, const char*, jobject, const jbyte*,
jsize);
jclass (*FindClass)(JNIEnv*, const char*);


...
}
8.2 JNIEnv 的获取方式
函数静态 / 动态注册,传的第一个参数
vm->GetEnv
globalVM->AttachCurrentThread
用于子线程中获取 JNIEnv*#include <jni.h> #include <string> #include <android/log.h> #define TAG "NshIdE" #define LOGD(...) __android_log_print(ANDROID_LOG_DEBUG, TAG, __VA_ARGS__); #define LOGI(...) __android_log_print(ANDROID_LOG_INFO , TAG, __VA_ARGS__); #define LOGE(...) __android_log_print(ANDROID_LOG_ERROR, TAG, __VA_ARGS__); JavaVM* global_vm; void* myThread(void* arg) { JNIEnv* env = nullptr; if (global_vm->AttachCurrentThread(&env, nullptr) != JNI_OK) { LOGE("AttachCurrentThread failed"); return nullptr; } LOGD("myThread env: %p", env); std::string test = "this is a mythread now"; LOGD("%s", test.c_str()); // 用完一定要分离线程 global_vm->DetachCurrentThread(); pthread_exit(nullptr); return nullptr; } extern "C" JNIEXPORT jstring JNICALL Java_com_example_javaandnative_MainActivity_stringFromJNI( JNIEnv* env, jobject /* this */) { LOGD("this is Java_com_example_javaandnative_MainActivity_stringFromJNI now"); LOGD("Java_com_example_javaandnative_MainActivity_stringFromJNI env: %p", env); std::string hello = "Hello from C++"; pthread_t pthread; pthread_create(&pthread, nullptr, myThread, nullptr); pthread_join(pthread, nullptr); return env->NewStringUTF(hello.c_str()); } JNIEXPORT jint JNI_OnLoad(JavaVM *vm, void *reserver) { global_vm = vm; JNIEnv *env = nullptr; if (vm->GetEnv((void **) &env, JNI_VERSION_1_6) != JNI_OK) { LOGI("GetEnv failed"); return -1; } LOGD("JavaVM %p", env); return JNI_VERSION_1_6; }查看日志
2025-08-15 11:09:08.977 30300-30300 NshIdE                  com.example.javaandnative            D  JavaVM 0xb400006fd5bff3c0
2025-08-15 11:09:09.455 30300-30300 NshIdE                  com.example.javaandnative            D  this is Java_com_example_javaandnative_MainActivity_stringFromJNI now
2025-08-15 11:09:09.455 30300-30300 NshIdE                  com.example.javaandnative            D  Java_com_example_javaandnative_MainActivity_stringFromJNI env: 0xb400006fd5bff3c0
2025-08-15 11:09:09.455 30300-30347 NshIdE                  com.example.javaandnative            D  myThread env: 0xb400006f20762580
2025-08-15 11:09:09.455 30300-30347 NshIdE                  com.example.javaandnative            D  this is a mythread now
JNIEnv 是每个线程单独拥有的一个,对于 JNI_OnLoad 和 Java_com_example_javaandnative_MainActivity_stringFromJNI 都在主线程中,所以他们的值是相等的,而 myThread 是一个新开的线程,所以打印出来的 JNIEnv 值不一样。
八、JNI 函数的注册
8.1 静态注册
必须遵循一定的命名规则,一般都是 Java_ 包名_ 类名_ 方法名。
系统会通过 dlopen 加载对应的 so,通过 dlsym 来获取指定名字的函数地址,然后调用静态注册的 jni 函数,必然在 导出表 中。
8.2 动态注册
通过 env->RegisterNatives 注册函数,通常在 JNI_OnLoad 中注册
typedef struct {
    const char* name;
    const char* signature;
    void*       fnPtr;
} JNINativeMethod;
JNINativeMethod 是一个结构体,第一个成员是 Java 层的函数名;第二个是签名,通常格式为(参数类型)返回值类型【其实就是在 smali 代码中看到的那种格式的函数签名】;第三个参数是 Native 层的函数指针(可以直接根据这个指针找到动态注册的函数的函数体)。
#include <jni.h>
#include <string>
#include <android/log.h>
#define TAG "NshIdE"
#define LOGD(...) __android_log_print(ANDROID_LOG_DEBUG, TAG, __VA_ARGS__);
#define LOGI(...) __android_log_print(ANDROID_LOG_INFO , TAG, __VA_ARGS__);
#define LOGE(...) __android_log_print(ANDROID_LOG_ERROR, TAG, __VA_ARGS__);

JavaVM* global_vm;

extern "C" JNIEXPORT jstring JNICALL
Java_com_example_javaandnative_MainActivity_stringFromJNI(
        JNIEnv* env,
        jobject /* this */) {

    LOGD("this is Java_com_example_javaandnative_MainActivity_stringFromJNI now");
    LOGD("Java_com_example_javaandnative_MainActivity_stringFromJNI env: %p", env);

    std::string hello = "Hello from C++";

    return env->NewStringUTF(hello.c_str());
}


jstring FunctionTest(JNIEnv* env, jobject thiz, int a, jstring b, jbyteArray c) {
    return env->NewStringUTF("This is FunctionTest");
}


JNIEXPORT jint JNI_OnLoad(JavaVM *vm, void *reserver) {
    global_vm = vm;
    JNIEnv *env = nullptr;
    if (vm->GetEnv((void **) &env, JNI_VERSION_1_6) != JNI_OK) {
        LOGI("GetEnv failed");
        return -1;
    }
    jclass MainActivityClazz = env->FindClass("com/example/javaandnative/MainActivity");
    JNINativeMethod methods[] = {
            {"stringFromJNI1", "(ILjava/lang/String;[B)Ljava/lang/String;", (void *)FunctionTest}
    };
    env->RegisterNatives(MainActivityClazz, methods, sizeof(methods) / sizeof(JNINativeMethod));

    return JNI_VERSION_1_6;
}
然后在 Java 层记得调用注册的这个方法即可,运行就可以看到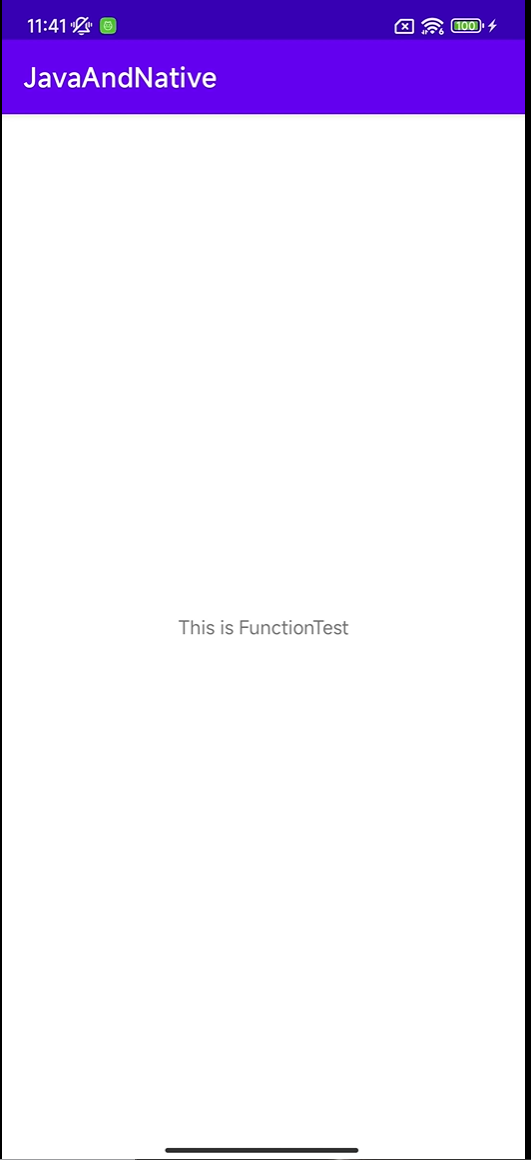
可以给同一个 Java 函数注册多个 native 函数,以最后一次为准
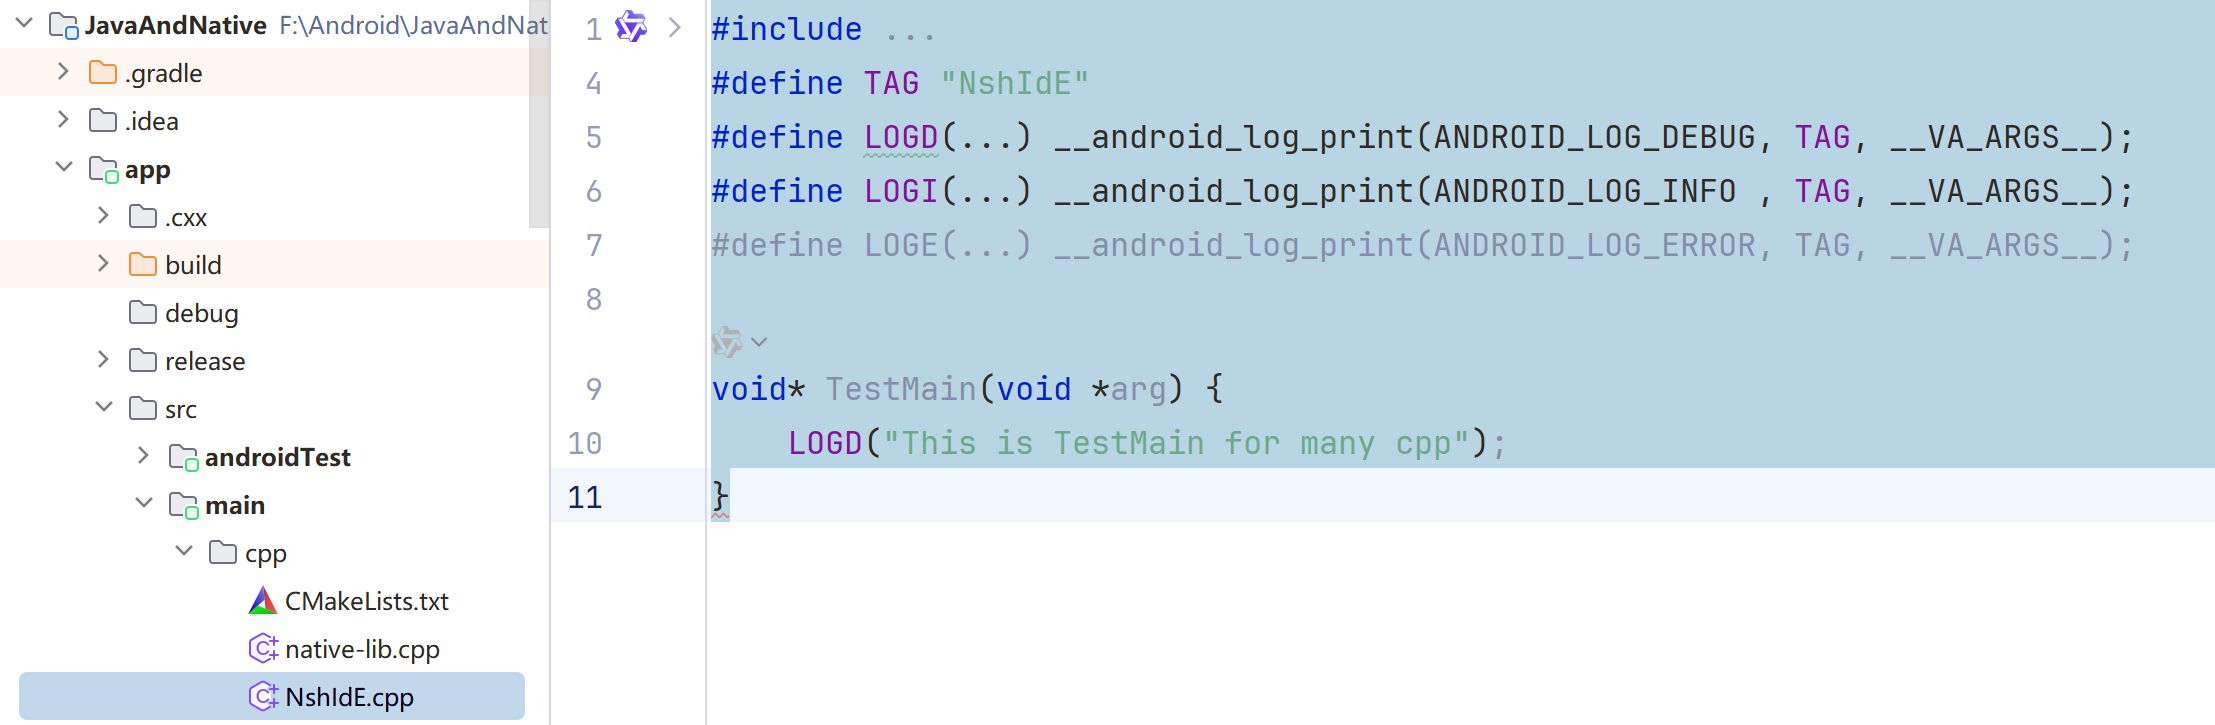
九、多个 cpp 文件编译成一个 so
新建一个 cpp 文件
然后修改 CMakeLists.txt 文件
然后在 JNI_OnLoad 中调用这个函数
#include <jni.h>
#include <string>
#include <android/log.h>
#define TAG "NshIdE"
#define LOGD(...) __android_log_print(ANDROID_LOG_DEBUG, TAG, __VA_ARGS__);
#define LOGI(...) __android_log_print(ANDROID_LOG_INFO , TAG, __VA_ARGS__);
#define LOGE(...) __android_log_print(ANDROID_LOG_ERROR, TAG, __VA_ARGS__);

JavaVM* global_vm;

// 声明另一个文件里的函数
extern "C" void TestMain(JNIEnv* env);

extern "C" JNIEXPORT jstring JNICALL
Java_com_example_javaandnative_MainActivity_stringFromJNI(
        JNIEnv* env,
        jobject /* this */) {
    std::string hello = "Hello from C++";

    return env->NewStringUTF(hello.c_str());
}


jstring FunctionTest(JNIEnv* env, jobject thiz, int a, jstring b, jbyteArray c) {
    return env->NewStringUTF("This is FunctionTest");
}


JNIEXPORT jint JNI_OnLoad(JavaVM *vm, void *reserver) {
    global_vm = vm;
    JNIEnv *env = nullptr;
    if (vm->GetEnv((void **) &env, JNI_VERSION_1_6) != JNI_OK) {
        LOGI("GetEnv failed");
        return -1;
    }
    jclass MainActivityClazz = env->FindClass("com/example/javaandnative/MainActivity");
    JNINativeMethod methods[] = {
            {"stringFromJNI", "(ILjava/lang/String;[B)Ljava/lang/String;", (void *)FunctionTest}
    };
    env->RegisterNatives(MainActivityClazz, methods, sizeof(methods) / sizeof(JNINativeMethod));

    // 直接调用
    TestMain(env);

    return JNI_VERSION_1_6;
}
查看日志,就可以看到我们成功调用了另一个 so 里的函数
2025-08-15 14:58:03.377 843-843 NshIdE com.example.javaandnative D This is TestMain for many cpp
十、编译多个 so
- 编写多个 cpp 文件
- 修改 CMakeLists.txt
- Java 静态代码块加载多个 so
首先先修改 CMakeLists.txt 文件
# For more information about using CMake with Android Studio, read the
# documentation: https://d.android.com/studio/projects/add-native-code.html.
# For more examples on how to use CMake, see https://github.com/android/ndk-samples.
# 说明:这几行是官方提供的参考链接,方便你学习 CMake 和 NDK 的使用。

# Sets the minimum CMake version required for this project.
cmake_minimum_required(VERSION 3.22.1)
# 设置本项目要求的 CMake 最低版本,这里是 3.22.1。
# 如果你的系统 CMake 版本低于这个,会直接报错。

# Declares the project name. The project name can be accessed via ${ PROJECT_NAME},
# Since this is the top level CMakeLists.txt, the project name is also accessible
# with ${CMAKE_PROJECT_NAME} (both CMake variables are in-sync within the top level
# build script scope).
project("javaandnative")
# 定义项目名称为 "javaandnative"。
# 在这个顶层 CMakeLists.txt 中,${PROJECT_NAME} 和 ${CMAKE_PROJECT_NAME} 都可以访问这个名字。

# Creates and names a library, sets it as either STATIC
# or SHARED, and provides the relative paths to its source code.
# You can define multiple libraries, and CMake builds them for you.
# Gradle automatically packages shared libraries with your APK.
#
# In this top level CMakeLists.txt, ${CMAKE_PROJECT_NAME} is used to define
# the target library name; in the sub-module's CMakeLists.txt, ${PROJECT_NAME}
# is preferred for the same purpose.
#
# In order to load a library into your app from Java/Kotlin, you must call
# System.loadLibrary() and pass the name of the library defined here;
# for GameActivity/NativeActivity derived applications, the same library name must be
# used in the AndroidManifest.xml file.
add_library(${CMAKE_PROJECT_NAME} SHARED
        # List C/C++ source files with relative paths to this CMakeLists.txt.
        native-lib.cpp)
# 创建一个库(library)。
# ${CMAKE_PROJECT_NAME} → 这里会替换成 "javaandnative",也就是库的名字。
# SHARED 表示生成的是动态库(.so 文件),不是静态库(.a)。
# 后面是库包含的源文件列表,这里只有 native-lib.cpp。
# 注意:如果要在 Java/Kotlin 中加载这个库,需要调用 System.loadLibrary("javaandnative")。

# Specifies libraries CMake should link to your target library. You
# can link libraries from various origins, such as libraries defined in this
# build script, prebuilt third-party libraries, or Android system libraries.
target_link_libraries(${CMAKE_PROJECT_NAME}
        # List libraries link to the target library
        android
        log)
# 指定要和你的库一起链接的其他库。
# ${CMAKE_PROJECT_NAME} 是你的库名字(javaandnative)。
# 这里链接了两个 Android NDK 自带的库:
#   android → 提供 Android NDK 相关 API(如 NativeActivity)。
#   log → 提供 __android_log_print 等日志函数,用于在 logcat 输出调试信息。

# 新增的库
add_library(nshide SHARED
        NshIdE.cpp)

target_link_libraries(nshide
        android
        log)
接下来修改 Java 代码。这里需要注意加载顺序,如果库之间有依赖关系,需要先加载被依赖的库。
    static {
        System.loadLibrary("javaandnative");
        System.loadLibrary("nshide");
    }
并且还需要再 CMake 中显式链接,例如
target_link_libraries(javaandnative
        mylib
        android
        log)
最后新建一个 cpp 文件,也不需要写什么,空着就可以,然后 build 一下,就可以看到生成了两个 so
十一、so 文件路径的动态获取
首先需要知道 apk 中的 so 文件将来要放在设备环境的哪一个目录下,/data/app/包名/lib。
然后在 Java 层添加如下代码
public String getSoPath(Context cxt) {
        // 获取包管理
        PackageManager pm = cxt.getPackageManager();
        // 获取已安装的 APP 的信息
        List<PackageInfo> pkgList = pm.getInstalledPackages(0);
        if (pkgList == null || pkgList.size() == 0) {
            return null;
        }
        for (PackageInfo pi : pkgList) {
            // 判断是否为 /data/app 开头
            if (pi.applicationInfo.nativeLibraryDir.startsWith("/data/app/")
                    && pi.packageName.startsWith("com.example.javaandnative")) {
                return pi.applicationInfo.nativeLibraryDir;
            }
        }
        return null;
    }
然后在 onCreate() 函数中调用一下即可。查看日志
2025-08-15 15:07:41.119 3830-3830 soPath com.example.javaandnative D /data/app/~~WmEKdieXJYNMsr4K93mc6A==/com.example.javaandnative-mXf7pi0TKTKavIqppE7IOw==/lib/arm64
十二、so 之间相互调用
这里就需要用到 dlopen 函数,需要导入 dlfcn.h。如果去看这个库的源码,会发现在后半段有一些常量,这些是传给 dlopen() 的标志位,控制加载策略
| 常量 | 值 | 含义 |
|---|---|---|
RTLD_LOCAL |
0 | 默认值:该库的符号不会导出给之后加载的库用。 |
RTLD_LAZY |
0x00001 | 延迟解析符号(Android 不支持,实际等同 RTLD_NOW)。 |
RTLD_NOW |
0x00002(LP64) / 0x00000(LP32) | 立即解析符号(Android 始终是这个行为)。 |
RTLD_NOLOAD |
0x00004 | 只检查库是否已加载,不真正加载(用于探测)。 |
RTLD_GLOBAL |
0x00100(LP64) / 0x00002(LP32) | 导出该库的符号,后续加载的库可以用。 |
RTLD_NODELETE |
0x01000 | 即使 dlclose() 也不卸载库。 |
在使用 dlopen() 函数时,需要传入两个参数,第一个就是 so 的路径,第二个就是刚刚提到的 常量,常用的就是 RTLD_NOW。在 JNI_OnLoad 中调用。
void* handle = dlopen("libnshide.so", RTLD_NOW);
    if (!handle) {
        LOGE("dlopen failed: %s", dlerror());
    } else {
        typedef void (*TestMainFunc)(JNIEnv*);
        TestMainFunc func = (TestMainFunc)dlsym(handle, "TestMain");
        if (func) {
            func(env);
        } else {
            LOGE("dlsym failed: %s", dlerror());
        }
        dlclose(handle);
    }
dlopen是 Linux/Android 提供的 运行时加载共享库 的函数;- 它会把指定的
.so加载到当前进程中,返回一个 库的句柄; - 如果加载失败,会返回
nullptr,这时候可以用dlerror()查看错误原因。
注:dlopen 只加载库,并不会自动让你能直接调用库里的函数。
dlsym是在 运行时 查找库里某个函数或变量的地址;handle是dlopen返回的句柄;"TestMain"是你要调用的函数名(必须是extern "C"的,否则 C++ 会有 name mangling);- 返回的是一个
void*,所以你必须把它 强制转换为函数指针,这里是TestMainFunc。
查看日志
2025-08-15 15:35:20.852 8466-8466 NshIdE com.example.javaandnative D This is TestMain for many cpp
另一种方法就是通过 link so 实现
首先修改 CMakeLists.txt
# 先编译 nshide
add_library(nshide SHARED
        NshIdE.cpp)

target_link_libraries(nshide
        android
        log)

# 再编译 javaandnative,链接 nshide
add_library(${CMAKE_PROJECT_NAME} SHARED
        # List C/C++ source files with relative paths to this CMakeLists.txt.
        native-lib.cpp)

target_link_libraries(${CMAKE_PROJECT_NAME}
        # List libraries link to the target library
        nshide
        android
        log)
因为javaandnative 要依赖 nshide,所以必须在 target_link_libraries 里先声明;函数名必须是 extern “C”,否则链接器找不到函数。
然后在另一个 so 中直接调用即可
#include <jni.h>
#include <string>
#include <android/log.h>
#include "dlfcn.h"
#define TAG "NshIdE"
#define LOGD(...) __android_log_print(ANDROID_LOG_DEBUG, TAG, __VA_ARGS__);
#define LOGI(...) __android_log_print(ANDROID_LOG_INFO , TAG, __VA_ARGS__);
#define LOGE(...) __android_log_print(ANDROID_LOG_ERROR, TAG, __VA_ARGS__);

JavaVM* global_vm;

// 声明另一个文件里的函数
extern "C" void TestMain(JNIEnv* env);

extern "C" JNIEXPORT jstring JNICALL
Java_com_example_javaandnative_MainActivity_stringFromJNI(
        JNIEnv* env,
        jobject /* this */) {
    std::string hello = "Hello from C++";

    return env->NewStringUTF(hello.c_str());
}


jstring FunctionTest(JNIEnv* env, jobject thiz, int a, jstring b, jbyteArray c) {
    return env->NewStringUTF("This is FunctionTest");
}


void callTestMain(JNIEnv* env) {
    TestMain(env);
}

JNIEXPORT jint JNI_OnLoad(JavaVM *vm, void *reserver) {
    global_vm = vm;
    JNIEnv *env = nullptr;
    if (vm->GetEnv((void **) &env, JNI_VERSION_1_6) != JNI_OK) {
        LOGI("GetEnv failed");
        return -1;
    }
    jclass MainActivityClazz = env->FindClass("com/example/javaandnative/MainActivity");
    JNINativeMethod methods[] = {
            {"stringFromJNI1", "(ILjava/lang/String;[B)Ljava/lang/String;", (void *)FunctionTest}
    };
    env->RegisterNatives(MainActivityClazz, methods, sizeof(methods) / sizeof(JNINativeMethod));

    callTestMain(env);

    return JNI_VERSION_1_6;
}
下面是另一个 cpp 文件的内容
#include <jni.h>
#include <string>
#include <android/log.h>
#define TAG "NshIdE"
#define LOGD(...) __android_log_print(ANDROID_LOG_DEBUG, TAG, __VA_ARGS__);
#define LOGI(...) __android_log_print(ANDROID_LOG_INFO , TAG, __VA_ARGS__);
#define LOGE(...) __android_log_print(ANDROID_LOG_ERROR, TAG, __VA_ARGS__);

extern "C" void TestMain(JNIEnv* env) {
    LOGD("This is TestMain for many cpp");
}
然后 build 该 demo,可以看到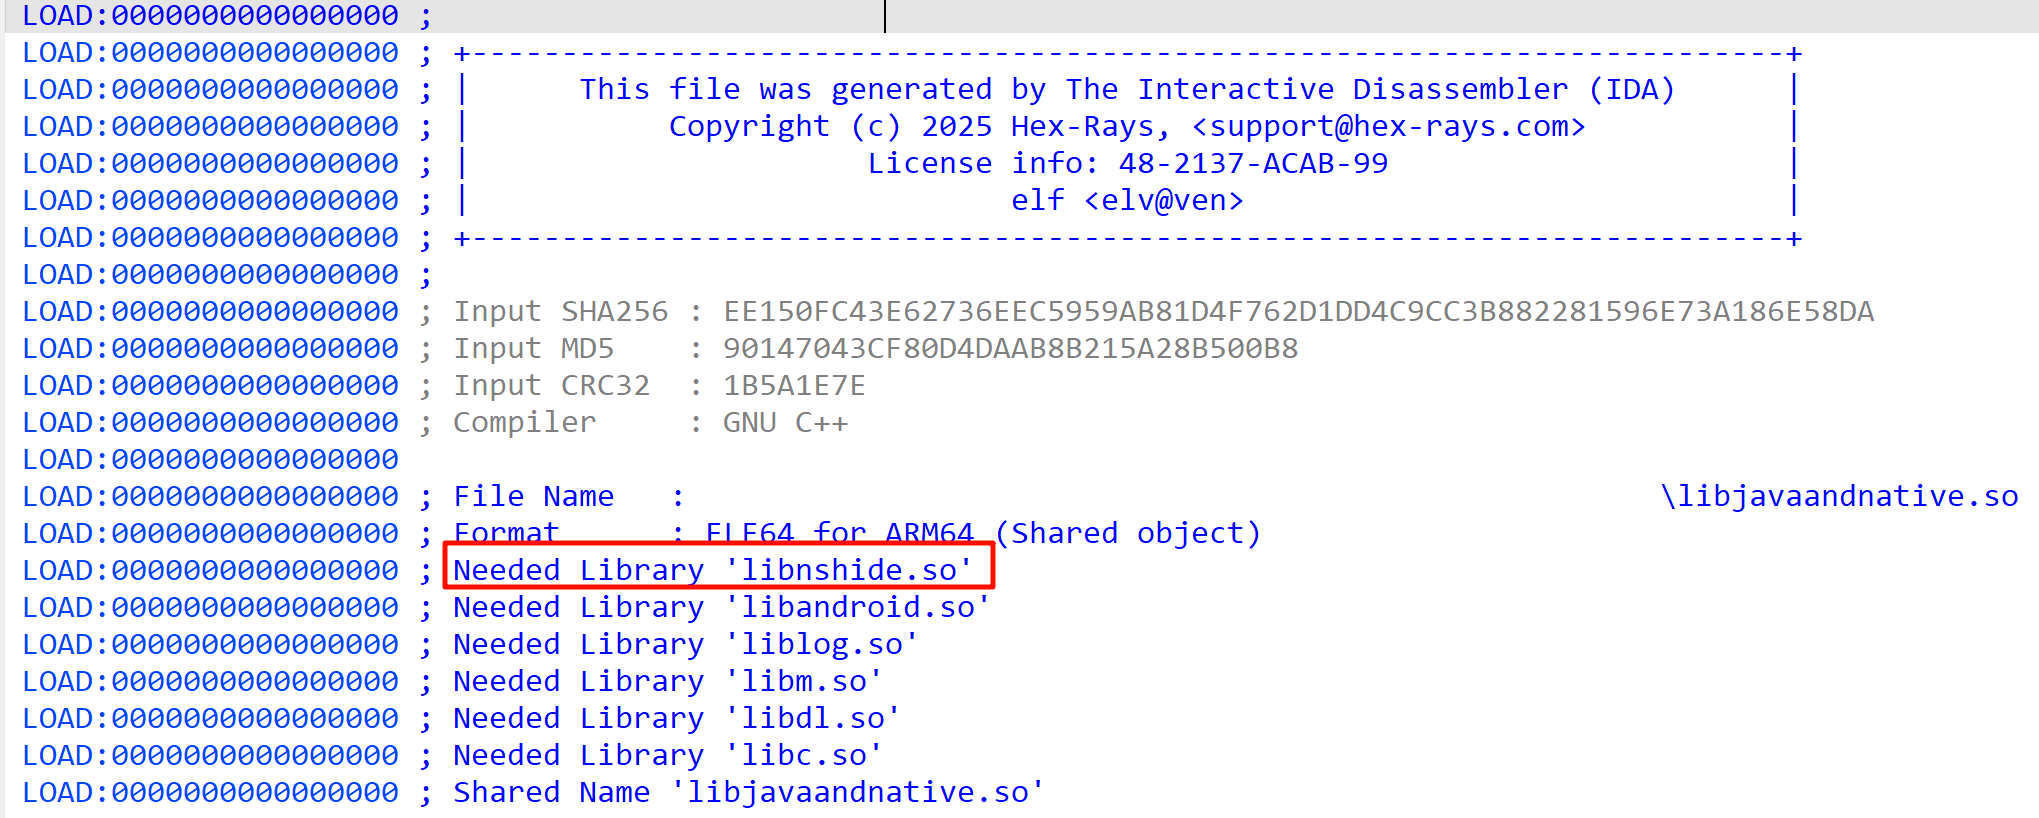
日志中也同样输出了
2025-08-15 15:56:13.246 16210-16210 NshIdE com.example.javaandnative D This is TestMain for many cpp
十三、通过 JNI 创建 Java 对象
有以下几种方法可以实现
- NewObject 创建对象
jclass clazz = env->FindClass("com/example/javaandnative/MyClass");
jmethodID ctor = env->GetMethodID(clazz, "<init>", "()V"); // 无参构造
jobject obj = env->NewObject(clazz, ctor);
//可选:调用对象方法
jmethodID method = env->GetMethodID(clazz, "someMethod", "(I)V");
env->CallVoidMethod(obj, method, 123);
这种方法最直接,推荐在知道构造函数的情况下使用。
jclass classClass = env->FindClass("java/lang/Class");
jmethodID forName = env->GetStaticMethodID(classClass, "forName", "(Ljava/lang/String;)Ljava/lang/Class;");
jstring className = env->NewStringUTF("com.example.javaandnative.MyClass");
jclass clazz = (jclass) env->CallStaticObjectMethod(classClass, forName, className);
jmethodID ctor = env->GetMethodID(clazz, "<init>", "()V");
jobject obj = env->NewObject(clazz, ctor);
这种方法适合 动态类名 或不确定类时使用,但比直接 FindClass 慢一些。
- AllocObject 创建对象
jclass clazz = env->FindClass("com.example.javaandnative.MyClass");
jmethodID methodID = env->GetMethodID(clazz, "<init>", "(Ljava/lang/String;I)V");
jobject ReflectDemoObj = env->AllocObject(clazz);
jstring jstr = env->NewStringUTF("from jni str");
env->CallNonvirtualVoidMethod(ReflectDemoObj, clazz, methodID, jstr, 100);
AllocObject:只分配对象,不调用构造函数;
CallNonvirtualVoidMethod:在空对象上调用 <init>,手动执行构造函数;
两步组合 = “手动版 NewObject”。
十四、通过 JNI 访问 Java 属性
14.1 获取静态字段
1、先调用获取静态字段 ID 的方法:GetStaticFieldID
jclass clazz = env->FindClass("com/example/javaandnative/MainActivity");
    jfieldID privateStaticStringField =
            env->GetStaticFieldID(clazz, "privateStaticStringField", "Ljava/lang/String;");
2、根据字段属性选择对应的 Get 方法
// env->GetStaticBooleanField();
// env->GetStaticIntField();
// env->GetStaticShortField();
// env->GetStaticByteField();
// env->GetStaticCharField();
// env->GetStaticFloatField();
// env->GetStaticDoubleField();
// env->GetStaticLongField();
// env->GetStaticObjectField();
上面代码中的 privateStaticStringField 是 String 类型,其实也就是 Object,所以选择 env->GetStaticObjectField()
3、获取 jstring 的静态字段 privateStaticString
jclass clazz = env->FindClass("com/example/NshIdE/NDKDemo");
jstring privateStaticString =
static_cast<jstring>(env->GetStaticObjectField(clazz, privateStaticStringField));
这里把 object 强制转换为 jstring 类型。
4、由于所处位置为 so 层,所以要转化成 C/C++ 语言类型
const char* privateStr =
            env->GetStringUTFChars(privateStaticString, nullptr);
5、以日志的形式打印
LOGD("privateStaticString(Old): %s", privateStr);
6、释放
env->ReleaseStringUTFChars(privateStaticString, privateStr);
日志输出
2025-08-15 17:34:03.544 28911-28911 NshIdE com.example.javaandnative D privateStaticString(Old): this is privateStaticStringField
14.2 获取对象字段
1、先获取 FieldId
jclass clazz = env->FindClass("com/example/javaandnative/MainActivity");
    jfieldID publicStringField =
            env->GetFieldID(clazz, "publicStringField", "Ljava/lang/String;");
2、获取 jstring
jmethodID methodID = env->GetMethodID(clazz, "<init>", "()V");
jobject ReflectDemoObj = env->NewObject(clazz, methodID);

jstring publicString =
static_cast<jstring>(env->GetObjectField(ReflectDemoObj, publicStringField));
由于我们获取的是对象字段,所以一定要有一个对象,因此 GetObjectField 的第一个参数是对象。
3、转化为 C/C++ 字符串
const char* publicStr =
            env->GetStringUTFChars(publicString, nullptr);
4、以日志的形式打印输出
LOGD("publicStringField: %s", publicStr);
5、对字符串进行释放
env->ReleaseStringUTFChars(publicString, publicStr);
日志输出
2025-08-15 17:43:37.710 31635-31635 NshIdE com.example.javaandnative D publicStringField: this is publicStringField
14.3 设置对象字段
通过 SetObjectField 就行了,第一个参数是对象,第二个参数是字段 ID,第三个参数是要修改的值
env->SetObjectField(ReflectDemoObj, privateStringFieldID, env->NewStringUTF("NshIdE"));
进行修改前后的对比
void setOobjectField(JNIEnv* env) {
    jclass clazz = env->FindClass("com/example/javaandnative/MainActivity");
    jmethodID methodId = env->GetMethodID(clazz, "<init>", "()V");
    jfieldID privateStringField =
            env->GetFieldID(clazz, "privateStringField", "Ljava/lang/String;");
    jobject obj = env->NewObject(clazz, methodId);
    jstring privateString = static_cast<jstring>(env->GetObjectField(obj, privateStringField));
    const char* privateStr =
            env->GetStringUTFChars(privateString, nullptr);
    LOGD("privateStringField(Old): %s", privateStr);
    env->ReleaseStringUTFChars(privateString, privateStr);

    env->SetObjectField(obj, privateStringField, env->NewStringUTF("NshIdE"));

    privateString = static_cast<jstring>(env->GetObjectField(obj, privateStringField));
    privateStr = env->GetStringUTFChars(privateString, nullptr);
    LOGD("privateStringField(New): %s", privateStr);
    env->ReleaseStringUTFChars(privateString, privateStr);
}
日志输出
2025-08-15 17:55:37.896  3564-3564  NshIdE                  com.example.javaandnative            D  privateStringField(Old): this is privateStaticStringField
2025-08-15 17:55:37.896  3564-3564  NshIdE                  com.example.javaandnative            D  privateStringField(New): NshIdE
同时我们也确定了不管是 public 还是 private 我们都能获取或修改。
十五、通过JNI访问和修改Java数组
具体操作详见下面代码,整体的思路和字符对象是一样的。
void visitByteArray(JNIEnv* env) {
    jclass clazz = env->FindClass("com/example/javaandnative/MainActivity");
    jmethodID methodId = env->GetMethodID(clazz, "<init>", "()V");
    jobject obj = env->NewObject(clazz, methodId);

    // 获取 byte 数组的字段 ID
    jfieldID byteArrayField =
            env->GetFieldID(clazz, "byteArrayField", "[B");
    jbyteArray byteArray = static_cast<jbyteArray>(env->GetObjectField(obj, byteArrayField));
    int length = env->GetArrayLength(byteArray);
    char *CByteArray = reinterpret_cast<char *>(env->GetByteArrayElements(byteArray, nullptr));
    for (int i = 0; i < length; i++) {
        LOGD("CByteArray(Old): %d", CByteArray[i]);
    }

    // 在 C++ 中新建一个 char 类型的数组 cByteArray,并且为其赋值
    char cByteArray[length];
    for (int i = 0; i < length; i++) {
        cByteArray[i] = static_cast<char>(100 - i);
    }
    // 将 cByteArray 中的元素转换成 jbyte 类型的数组
    const jbyte* java_array = reinterpret_cast<const jbyte*>(cByteArray);
    // 使用 SetByteArrayRegion 函数将 Java 数组元素设置为 cByteArray 中的元素
    env->SetByteArrayRegion(byteArray, 0, length, java_array);
    length = env->GetArrayLength(byteArray);
    CByteArray = reinterpret_cast<char *>(env->GetByteArrayElements(byteArray, nullptr));
    for (int i = 0; i < length; i++) {
        LOGD("CByteArray(New): %d", CByteArray[i]);
    }
    env->ReleaseByteArrayElements(byteArray, reinterpret_cast<jbyte *>(CByteArray), 0);

}
运行,查看日志输出
2025-08-18 10:27:30.356 27817-27817 NshIdE                  com.example.javaandnative            D  CByteArray(Old): 1
2025-08-18 10:27:30.356 27817-27817 NshIdE                  com.example.javaandnative            D  CByteArray(Old): 2
2025-08-18 10:27:30.356 27817-27817 NshIdE                  com.example.javaandnative            D  CByteArray(Old): 3
2025-08-18 10:27:30.356 27817-27817 NshIdE                  com.example.javaandnative            D  CByteArray(Old): 4
2025-08-18 10:27:30.356 27817-27817 NshIdE                  com.example.javaandnative            D  CByteArray(Old): 5
2025-08-18 10:27:30.356 27817-27817 NshIdE                  com.example.javaandnative            D  CByteArray(New): 100
2025-08-18 10:27:30.356 27817-27817 NshIdE                  com.example.javaandnative            D  CByteArray(New): 99
2025-08-18 10:27:30.356 27817-27817 NshIdE                  com.example.javaandnative            D  CByteArray(New): 98
2025-08-18 10:27:30.356 27817-27817 NshIdE                  com.example.javaandnative            D  CByteArray(New): 97
2025-08-18 10:27:30.356 27817-27817 NshIdE                  com.example.javaandnative            D  CByteArray(New): 96
十六、通过 JNI 访问 Java 方法
1、调用静态函数
// env->CallBooleanMethod();
// env->CallVoidMethod();
// env->CallByteMethod();
// env->CallShortMethod();
// env->CallIntMethod();
// env->CallCharMethod();
// env->CallDoubleMethod();
// env->CallLongMethod();
// env->CallFloatMethod();
// env->CallObjectMethod();
jmethodID publicStaticFuncID =
env->GetStaticMethodID(clazz, "publicStaticFunc", "()V");
env->CallStaticVoidMethod(clazz, publicStaticFuncID);
静态方法很简单,只要调用 CallStaticVoidMethod 就行了。
2、调用对象函数
jmethodID privateFuncID =
			env->GetMethodID(clazz,"privateFunc","(Ljava/lang/String;I)Ljava/lang/String;");
jstring str1 = env->NewStringUTF("this is from JNI");
jstring retval_jstring = static_cast<jstring>(env->CallObjectMethod(Obj, privateFuncID, str1, 1000));
const char* retval_cstr = env->GetStringUTFChars(retval_jstring, nullptr);
LOGD("privateStaticString: %s", retval_cstr);
env->ReleaseStringUTFChars(retval_jstring, retval_cstr);
既然是对象函数,那再调用前自然要先 new 一个对象,然后再调用,再将返回的字符串进行类型转换,即可在日志中输出。
十七、CallVoidMethod、A、V 版本的区别
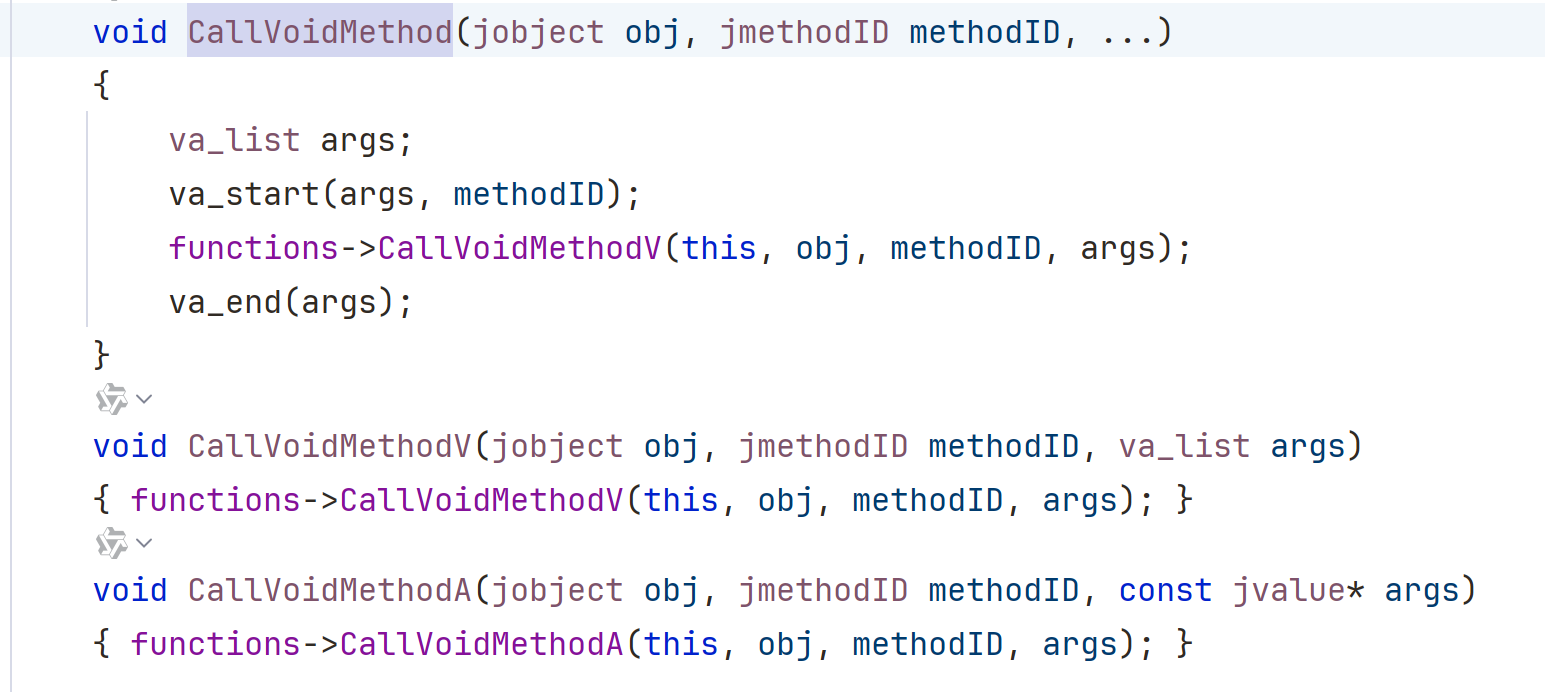
可以看到 CallVoidMethod 底层调用的是 CallVoidMethodV,他们两个的区别在于 CallVoidMethod 会帮我们封装参数,而 CallVoidMethodV 需要我们自己封装参数,可以看成它只能有一个参数。而对于 CallVoidMethodA,它的参数是 jvalue*。

jvalue* 是一个嵌合体
jmethodID privateFuncID =
env->GetMethodID(clazz,"privateFunc","(Ljava/lang/String;I)Ljava/lang/String;");
jstring str2 = env->NewStringUTF("this is from JNI2");
jvalue args[2];
args[0].l = str2;
args[1].i = 1000;
jstring retval = static_cast<jstring>(env->CallObjectMethodA(Obj, privateFuncID, args));
const char* cpp_retval = env->GetStringUTFChars(retval, nullptr);
LOGD("cpp_retval: %s", cpp_retval);
env->ReleaseStringUTFChars(retval, cpp_retval);
通过往 jvalue 里放参数,然后进行调用。
总结一下:
- CallVoidMethod(可变参数):虽然写法上是
...,但 编译期必须知道参数个数和类型,不能动态改变。 - CallVoidMethodA(jvalue 数组):可以在运行时决定数组长度和每个参数的类型,因此 参数个数和类型可以动态变化。
十八、内存管理
1、局部引用
- 大多数的 JNI 函数,调用以后返回的结果都是局部引用,因此,env->NewLocalRef 基本不用;
- 一个函数内的局部引用数量是有限的,在早期的安卓系统中,体现的更为明显;
- 当函数体内需要大量使用局部引用时,比如大循环中,最好及时删除不用的局部引用,可以使用 env->DeleteLocalRef 来删除局部引用;
- 局部引用和局部变量不同
| 方面 | 局部变量 | 局部引用(JNI) |
|---|---|---|
| 所在位置 | C/C++ 栈 | JVM 管理的引用(在栈上存放引用) |
| 生命周期 | 函数作用域 | 默认 native 方法结束自动释放,可手动删除 |
| 管理方式 | 自动释放 | 由 JVM 管理,可能需要手动释放 |
| 指向对象 | 本地值或对象 | JVM 中的 Java 对象 |
| 可能问题 | 内存安全由语言管理 | 如果超过作用域或循环不释放,可能导致局部引用表溢出 |
2、局部引用相关的其他函数
env->EnsureLocalCapacity(num) 用于判断是否有足够的局部引用可以使用,足够则返回 0,需要大量使用局部引用时,手动删除太过麻烦,可以使用以下两个函数来批量管理局部引用
env->PushLocalFrame(num)
env->PopLocalFrame(nullptr)
示例代码
env->PushLocalFrame(100);
if(env->EnsureLocalCapacity(100) == 0) {
	for(int i = 0; i < 3; i++){
		jstring tempString = env->NewStringUTF("NshIdE");
		env->SetObjectArrayElement(_jstringArray, i, tempString);
		//env->DeleteLocalRef(tempString);
		sleep(1);
		LOGD("env->EnsureLocalCapacity");
	}
}
env->PopLocalFrame(nullptr);
3、全局引用
在 JNI 开发中,需要跨函数使用变量时,直接定义全局变量时没有用的,需要使用以下两个方法,来创建和删除全局引用。
env->NewGlobalRef()
env->DeleteGlobalRef()
jobject g_obj;

void saveGlobalRef(JNIEnv* env, jobject obj) {
    g_obj = env->NewGlobalRef(obj);  // 创建全局引用
}

void releaseGlobalRef(JNIEnv* env) {
    env->DeleteGlobalRef(g_obj);
}
为什么不能直接定义全局变量,原因也还是和前面说的一个点有关:
- JNIEnv* 是 线程私有的指针,每个线程都有自己的 JNIEnv*;
- 不能在一个线程里拿到的 JNIEnv* 放到全局变量里,然后在另一个线程使用
4、弱全局引用
与全局引用基本相同,区别是弱全局引用有可能会被回收
env->NewWeakGlobalRef()
env->DeleteWeakGlobalRef()
| 特性 | 全局引用 (GlobalRef) | 弱全局引用 (WeakGlobalRef) |
|---|---|---|
| 跨函数/线程 | 可以 | 可以 |
| 阻止垃圾回收 | 会 | 不会 |
| 必须手动释放 | 是 | 是 |
| 使用前需检查是否有效 | 不需要 | 需要 NewLocalRef 检查 |
| 使用场景 | 跨线程回调、长期保存对象 | 缓存、观察者、弱引用容器 |
十九、子线程中获取 Java 类
1、在子线程中,findClass 可以直接获取 系统类。注意强调是 系统类。
jclass ClassLoaderClazz = env->FindClass("java/lang/ClassLoader");
LOGD("myThread ClassLoaderClazz: %p", ClassLoaderClazz);
jclass StringClasszz=env->FindClass("java/lang/String");
LOGD("myThread StringClasszz: %p", StringClasszz);
2、在主线程中获取类,使用全局引用来传递到子线程中
jclass MainActivityClazz = env->FindClass("com/example/javaandnative/MainActivity");
globalClass= static_cast<jclass>(env->NewGlobalRef(MainActivityClazz));

子线程中调用
LOGD("myThread globalClass: %p", globalClass);
3、在主线程中获取正确的 ClassLoader,在子线程中去加载类
在 Java 中,可以先获取类字节码,然后使用 getClassLoader() 来获取 ClassLoader
Demo.class.getClassLoader()

new Demo().getClass().getClassLoader()

Class.forName(...).getClassLoader()
在 native 层进行转换,获取 ClassLoader
//MainActivity.class.getClassLoader
jclass MainActivityClazz = env->FindClass("com/example/javaandnative/MainActivity");
jclass classClasszz=env->FindClass("java/lang/Class");
jmethodID getClassLoaderMethoid=env->GetMethodID(classClasszz,"getClassLoader", "()Ljava/lang/ClassLoader;");
jobject tempClassLoader = env->CallObjectMethod(MainActivityClazz,getClassLoaderMethoid);
globalClassLoader=env->NewGlobalRef(tempClassLoader);
在 JNI 的子线程中 loadClass
//jclass MainActivityClasszz=FindClass("com/example/javaandso/MainActivity")
jclass LoadClassClazz=env->FindClass("java/lang/ClassLoader");
jmethodID LoadClassmMethoid=env->GetMethodID(LoadClassClazz,"loadClass", "(Ljava/lang/String;)Ljava/lang/Class;");
jclass MainActivityClasszz= static_cast<jclass>(env->CallObjectMethod(globalClassLoader,
LoadClassmMethoid,
env->NewStringUTF(
"com.example.javaandso.MainActivity")));
我们要得到的MainActivityClasszz其实在主线程已经获取过一次了,所以第三种方法其实有点麻烦,不如第二种使用全局引用。
二十、init 与 initarray
1、SO 在执行 JNI_OnLoad 之前,还会执行两个构造函数 init、initarray

2、so 加固、so 中字符串加密等等,一般都会把相关代码放到这里,所以 JNI_OnLoad 的时候一般 so 是已经被解密了
3、init 的使用
extern "C" void _init(){ //函数名必须为_init
	LOGD("_init ");
}
4、initarray 的使用
__attribute__ ((constructor)) void initArrayTest3(){
	LOGD("initArrayTest3");
}
__attribute__ ((constructor)) void initArrayTest1(){
	LOGD("initArrayTest1 ");
}
__attribute__ ((constructor)) void initArrayTest2(){
	LOGD("initArrayTest2 ");
}
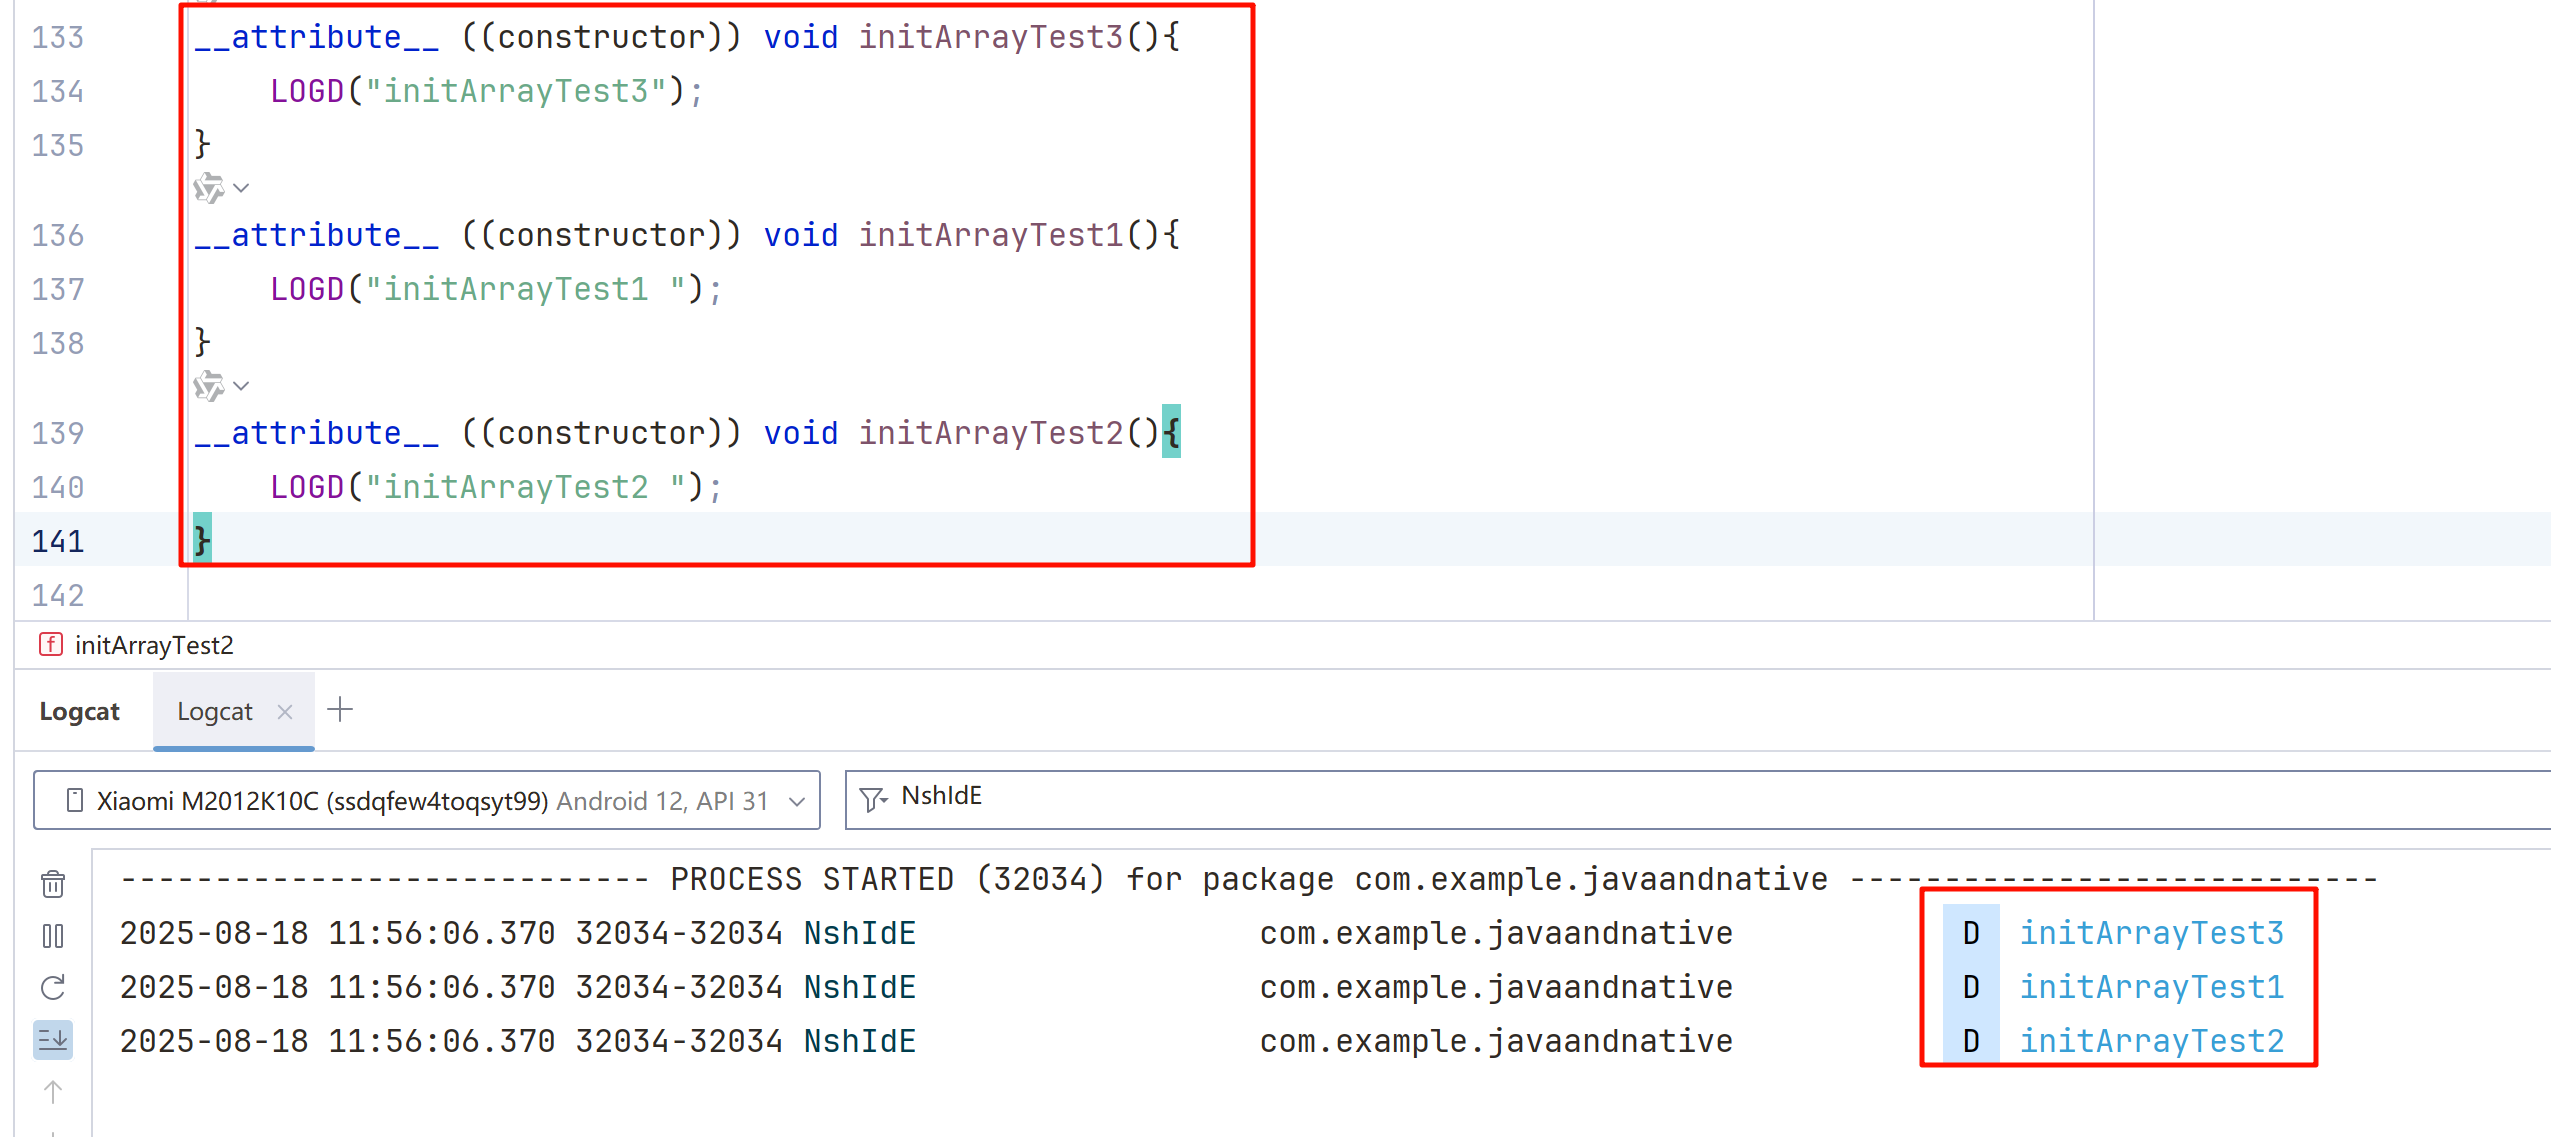
可以看到如果不加任何修饰,会按照我们代码写的顺序执行。
而如果加了,constructor 后面的值,较小的先执行,最好从100以后开始用。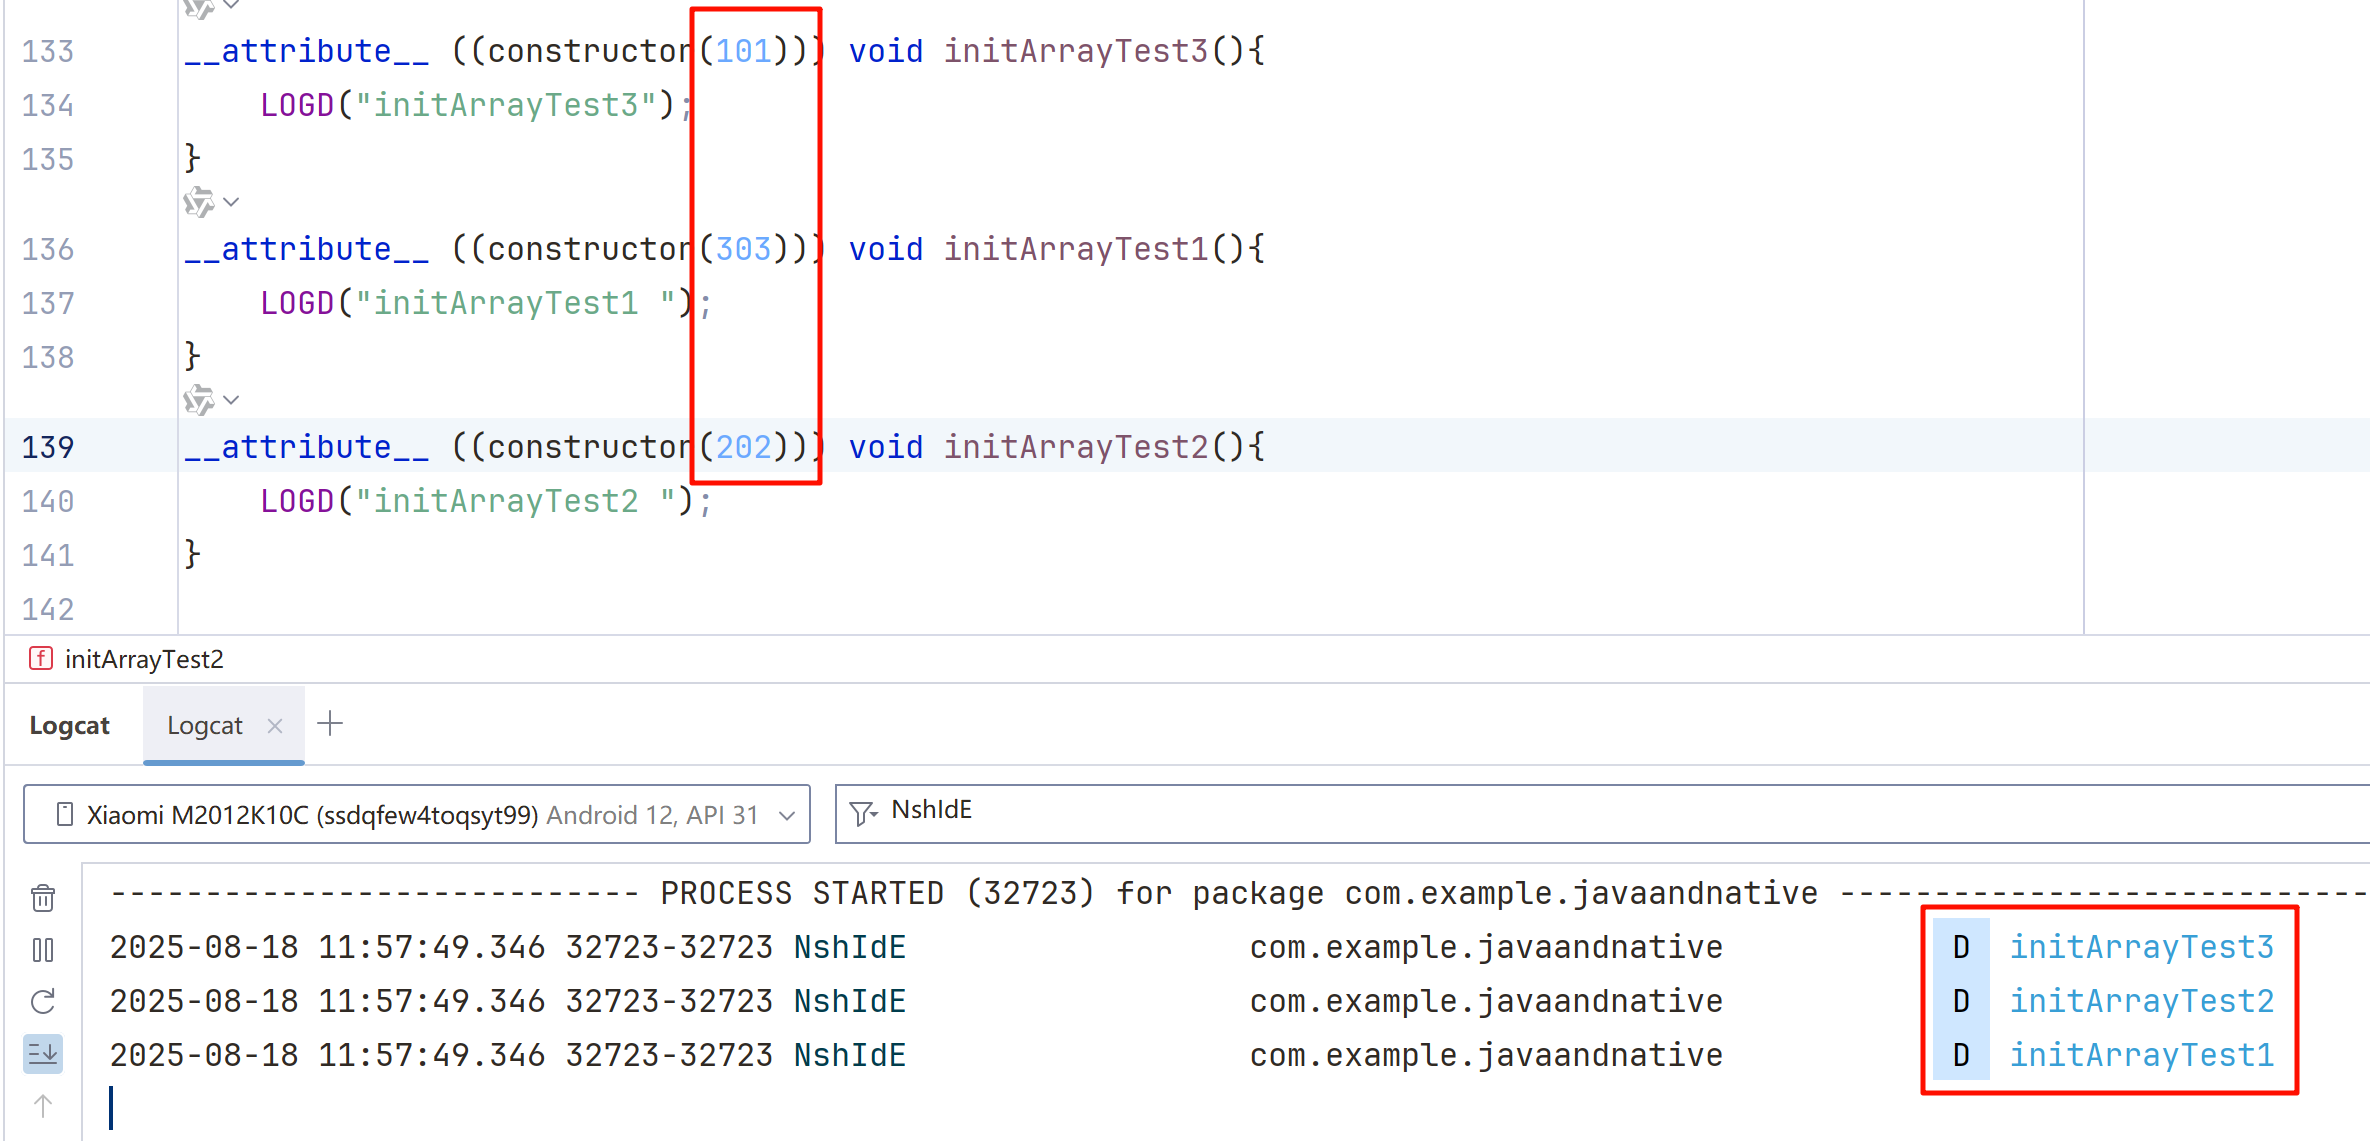
然而对于有的有值有的没值的情况,则先执行有值的顺序,再执行没值的顺序
__attribute__ ((constructor(101))) void initArrayTest3(){
	LOGD("initArrayTest3");
}
__attribute__ ((constructor)) void initArrayTest5(){
	LOGD("initArrayTest5");
}
__attribute__ ((constructor(303))) void initArrayTest1(){
	LOGD("initArrayTest1 ");
}
__attribute__ ((constructor)) void initArrayTest2(){
	LOGD("initArrayTest2 ");
}
__attribute__ ((constructor(202))) void initArrayTest4(){
	LOGD("initArrayTest4");
}
执行的日志结果
2025-08-18 12:00:41.019  1072-1072  NshIdE                  com.example.javaandnative            D  initArrayTest3
2025-08-18 12:00:41.019  1072-1072  NshIdE                  com.example.javaandnative            D  initArrayTest4
2025-08-18 12:00:41.019  1072-1072  NshIdE                  com.example.javaandnative            D  initArrayTest1
2025-08-18 12:00:41.019  1072-1072  NshIdE                  com.example.javaandnative            D  initArrayTest5
2025-08-18 12:00:41.019  1072-1072  NshIdE                  com.example.javaandnative            D  initArrayTest2
如果再加上 visibility(“hidden”),则会在反编译 so 时抹去 initArrayTest6 的符号
__attribute__ ((constructor, visibility("hidden"))) void initArrayTest6(){
	LOGD("initArrayTest6");
}
build一下,看反编译结果
反编译 so
_init 在 ida 反编译后为 .init_proc

然后通过段表,可以看到 init_array 段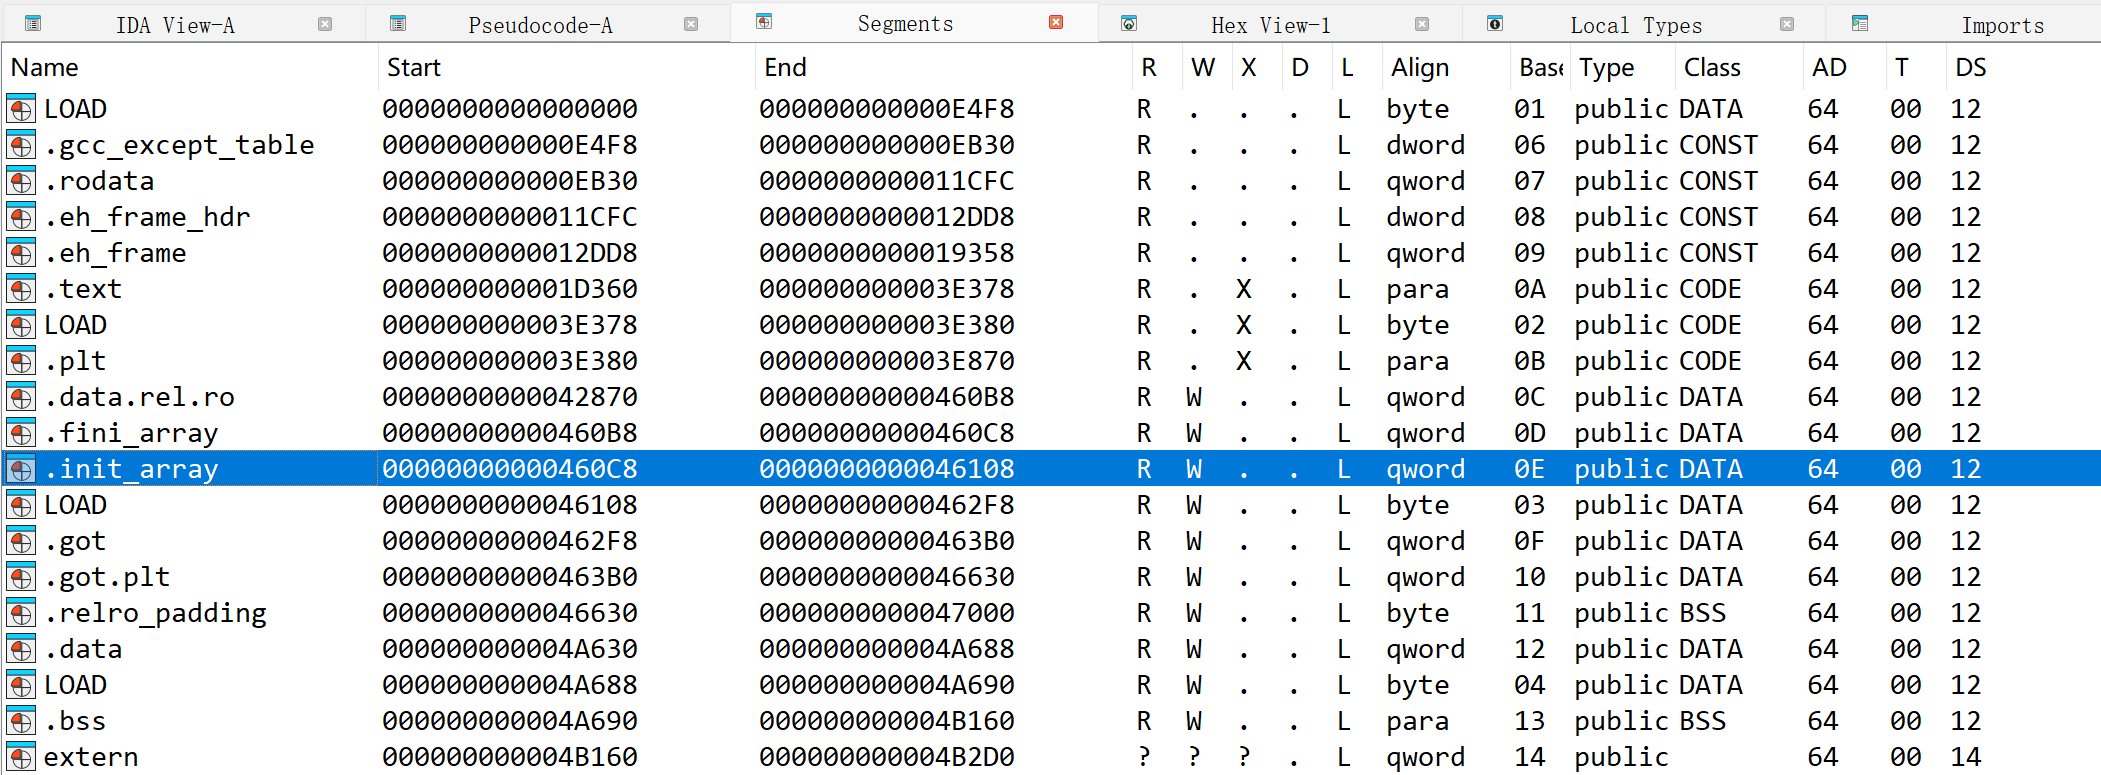
跟进看看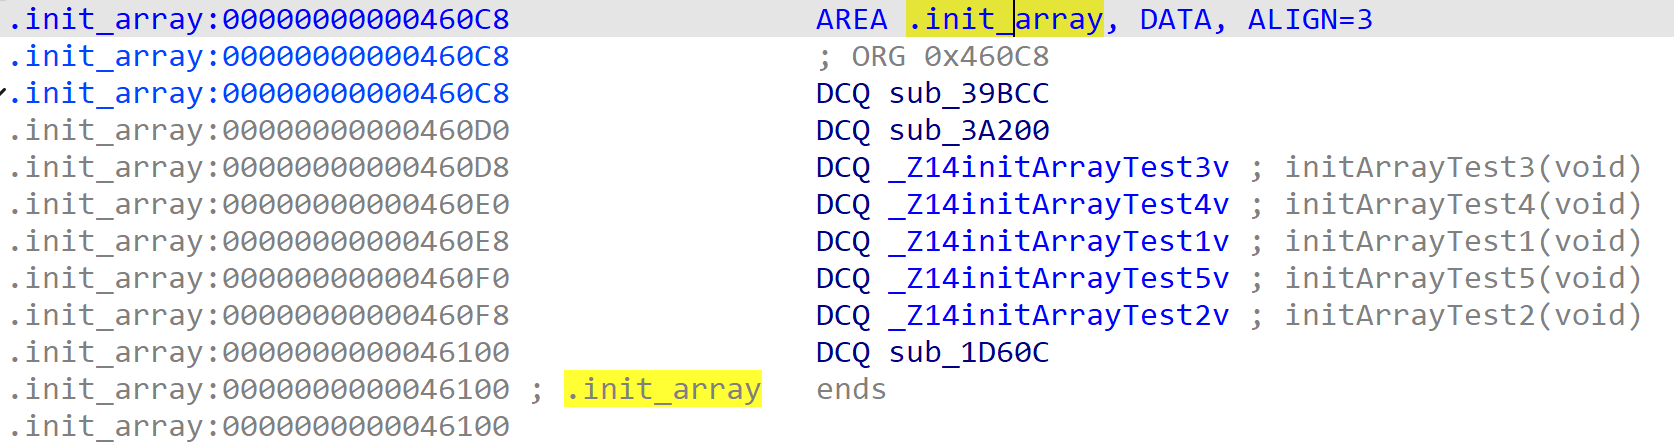
可以看到已经排好顺序了,即这里所看到的顺序和真实执行的排序是一样的。并且这里的 sub_1D60C 函数就是 initArrayTest6,符号确实被去掉了
二十一、尾声
通过这篇文章,较为系统的学习了解了 关于Android NDK 方面的开发知识,不仅仅在开发时有用,在基本的 Android 逆向分析中,我们也能有一个良好的思考线路。
转载请注明来源,欢迎对文章中的引用来源进行考证,欢迎指出任何有错误或不够清晰的表达。可以在下面评论区评论,也可以邮件至 1621925986@qq.com

